如何构建全栈人工智能代理🚀(CrewAI + CopilotKit)
太长不看
在本文中,您将学习如何使用 CrewAI、CopilotKit 和 Serper 构建一个结合了人机交互功能的全栈餐厅查找 AI 代理。
在正式开始之前,我们先来看看我们将要涵盖的内容:
-
CrewAI代理是什么?
-
构建、运行和部署 CrewAI 代理
-
使用 Copilot Cloud 和 CopilotKit 为 CrewAI 代理添加前端 UI
以下是我们将要开发的应用程序的预览。
CrewAI代理是什么?
想象一下,你正在参与一个大型团队项目,比如开发一款应用或游戏。你有一个团队,每个人都有特定的任务。
有人擅长编写后端代码,有人擅长设计用户界面,还有人负责测试,等等。
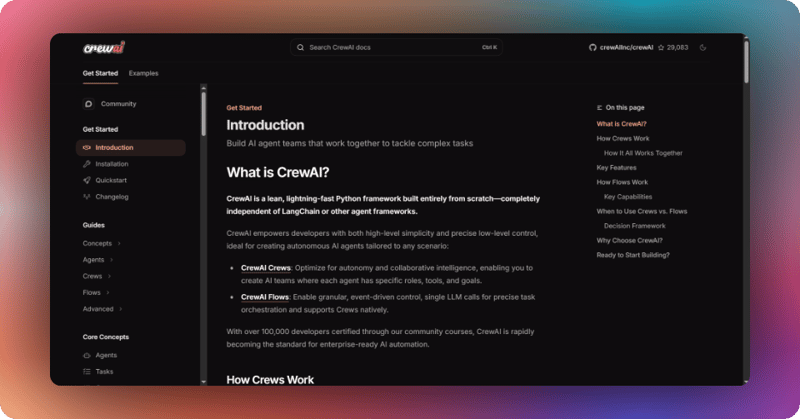
相反,人们将CrewAI 代理想象成一个由智能自动化助手组成的团队——每个助手都有自己的角色——共同协作解决问题或完成任务。
您可以在CrewAI文档中了解更多关于CrewAI代理的信息。
CopilotKit是什么?
CopilotKit 是一个开源的全栈框架,用于构建用户交互式代理和副驾驶。它使您的代理能够控制您的应用程序,传达其正在执行的操作,并生成完全自定义的用户界面。
先决条件
要完全理解本教程,您需要对 React 或 Next.js 有一定的了解。
我们还将利用以下资源:
-
Python是一种流行的编程语言,可用于使用 LangGraph 构建 AI 代理;请确保您的计算机上已安装 Python。
-
OpenAI API - 使我们能够使用 GPT 模型执行各种任务;对于本教程,请确保您有权访问 GPT-4 模型。
-
CopilotKit - 一个开源的辅助驾驶框架,用于构建自定义 AI 聊天机器人、应用内 AI 代理和文本区域。
-
CrewAI是一个Python框架,它使开发人员能够以高度的简洁性和精确的底层控制来创建自主 AI 代理。
-
SerperTool - 一款利用 serper.dev API 根据用户提供的查询来获取和显示最相关搜索结果的工具。
构建、运行和部署 CrewAI 代理
在本节中,您将学习如何使用 CrewAI 软件包构建和运行 CrewAI 代理。然后,您将学习如何使用 GitHub 将 AI 代理部署到 CrewAI 企业平台。
让我们开始吧。
步骤 1:构建 CrewAI 船员代理
首先,克隆餐厅查找器团队代码库,其中包含基于 Python 的 CrewAI Crew 代理的代码:
git clone https://github.com/TheGreatBonnie/restaurant-finder.git
该存储库包含一个 CrewAI Crew 代理,其结构如下:
restaurant-finder/
├── .gitignore
├── pyproject.toml
├── README.md
├── .env
└── src/
       └── restaurant_finder_agent/
              ├── init.py
              ├── main.py
              ├── crew.py
              ├── tools/
              │   ├── custom_tool.py
              │   └── init.py
              └── config/
                     ├── agents.yaml
                     └── tasks.yaml
以下是研究查找工具 CrewAI Crew 中的基本文件:
-
agents.yaml - 定义您的 AI 代理及其角色
-
tasks.yaml - 设置代理任务和工作流程
-
.env - 存储 API 密钥和环境变量
-
main.py - 项目入口点和执行流程
-
crew.py - 机组人员编排与协调
-
tools/ - 自定义代理工具目录
接下来, .env 在根目录下创建一个文件。然后将OpenAI和Serper API 密钥添加到环境变量中。
OPENAI_API_KEY=your-openai-api-key
SERPER_API_KEY=your-serper-api-key
然后使用 CrewAI 安装所有 CrewAI Crew 研究查找器的依赖项。如果您尚未安装 CrewAI 软件包,请按照CrewAI 文档中的安装指南进行操作。
crewai install
步骤 2:运行 CrewAI 船员代理
要运行餐厅 CrewAI 服务员代理,请在命令行中执行以下命令。
crewai run
程序启动后,会使用Serper网络搜索工具查找旧金山的餐厅。然后,它会整理一份餐厅列表,并征求您的反馈意见,如下所示。
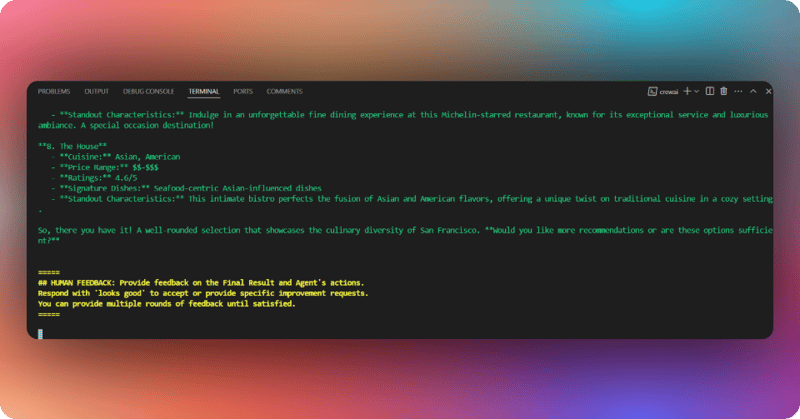
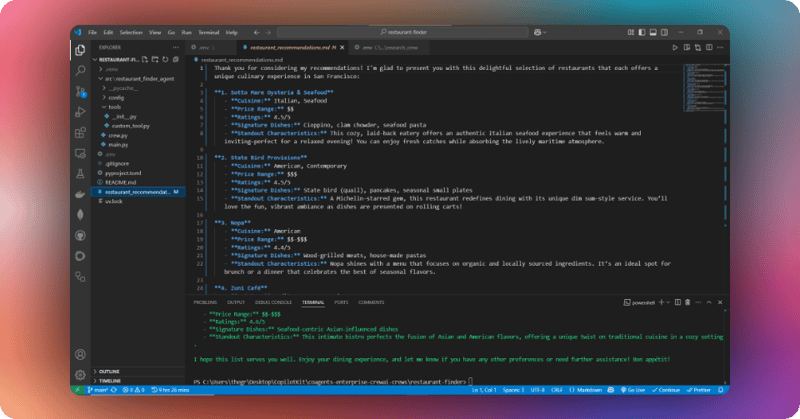
在终端回复“看起来不错”并按回车键。一个包含旧金山餐厅推荐的文件应该会保存在项目文件夹中,如下所示。
步骤 3:部署 CrewAI 机组代理
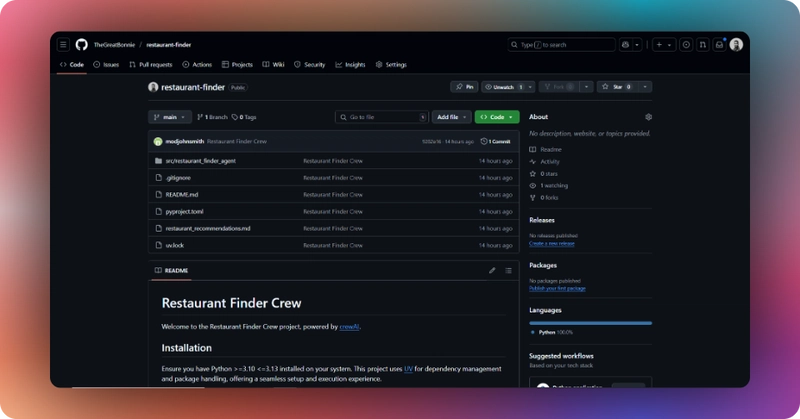
要部署餐厅查找器团队,请将餐厅查找器团队代码推送到 GitHub 存储库,如下所示。
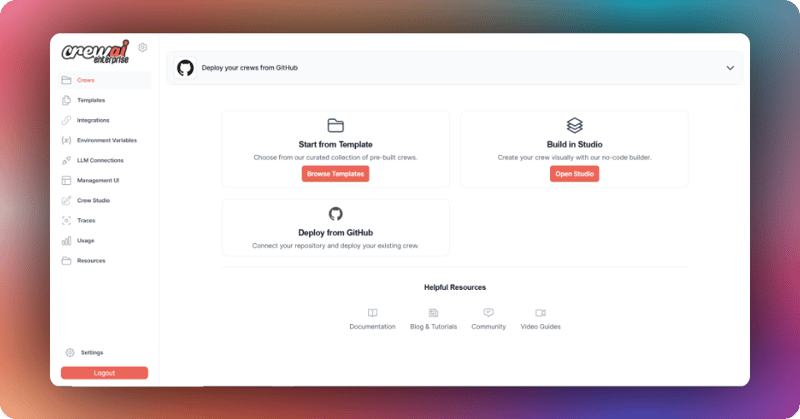
然后登录CrewAI。在您的控制面板上,将您的 GitHub 帐户与 CrewAI 关联,以访问餐厅查找器存储库。
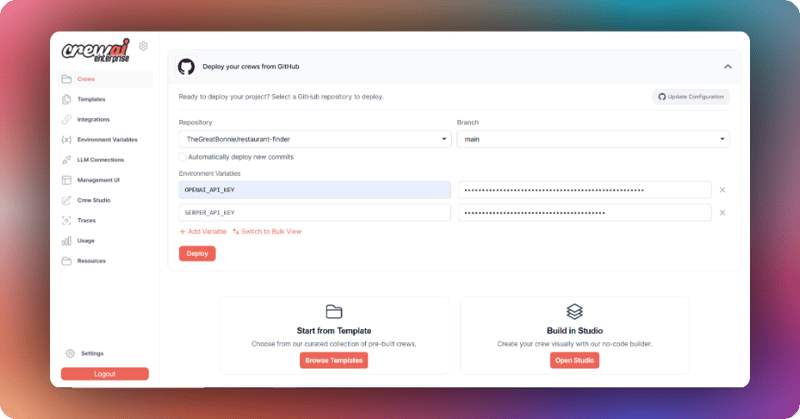
接下来,选择餐厅查找器存储库。然后,将 OpenAI 和 Serper API 密钥添加到环境变量中,如下所示,然后单击“部署”按钮。
餐厅搜寻小组应立即开始部署,如下图所示。请注意,第一批小组的部署可能需要长达 10 分钟。
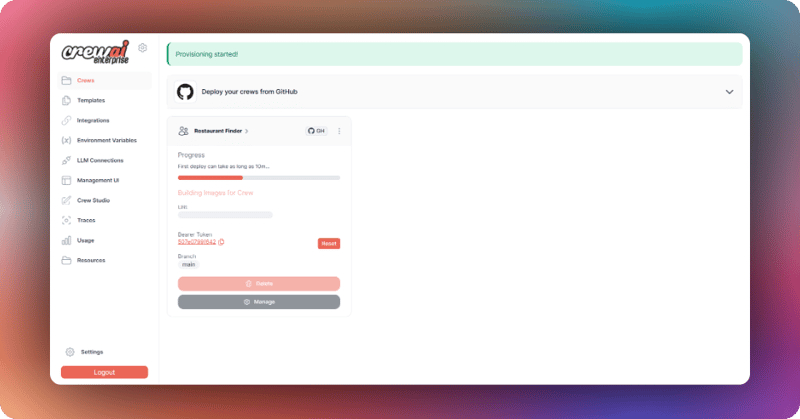
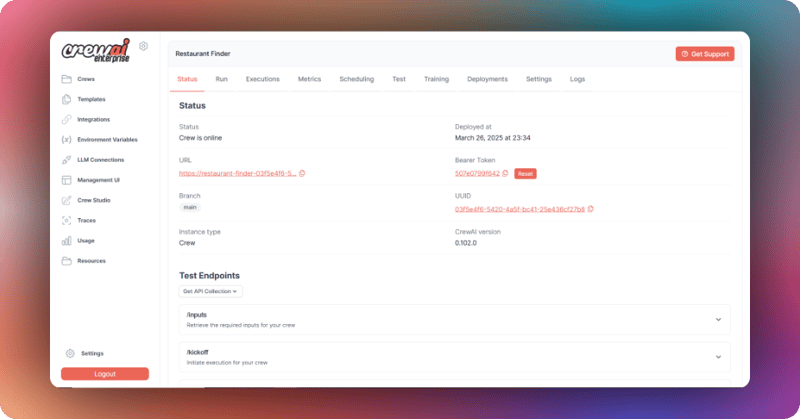
机组人员部署完成后,打开它,然后获取其 URL 和 bearer token。机组人员的 URL 和 bearer token 将用于在Copilot Cloud中注册该机组人员。
现在我们已经学会了如何构建、运行和部署 CrewAI 船员代理,接下来让我们看看如何添加一个前端 UI 来与它聊天。
使用 Copilot Cloud 和 CopilotKit 为 CrewAI 机组代理添加前端 UI
在本节中,您将学习如何使用 Copilot Cloud 和 CopilotKit 为 CrewAI 机组代理添加前端 UI。
我们开始吧。
步骤 1:在 Copilot Cloud 中注册 CrewAI 代理
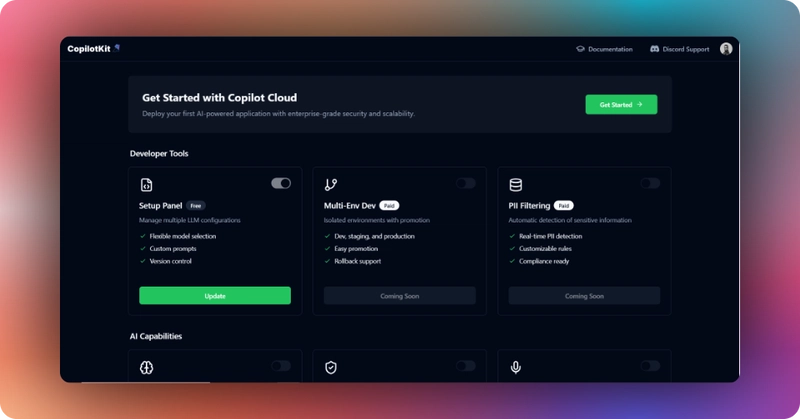
要注册 CrewAI 机组代理,请前往 Copilot Cloud,登录,然后点击“开始使用”按钮。
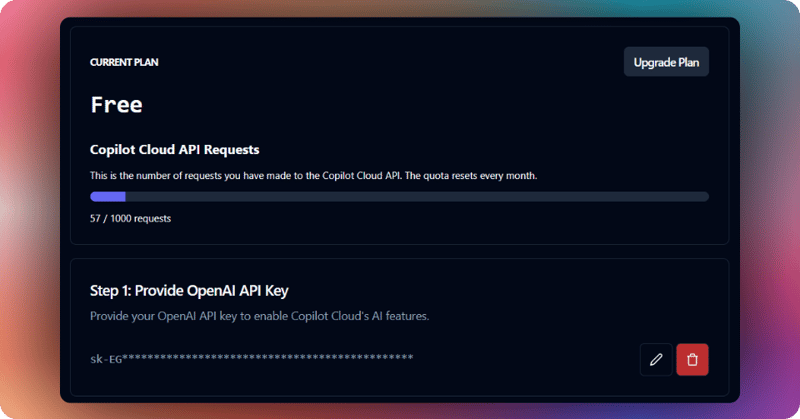
然后,将您的 OpenAI API 密钥添加到“提供 OpenAI API 密钥”部分,如下所示。
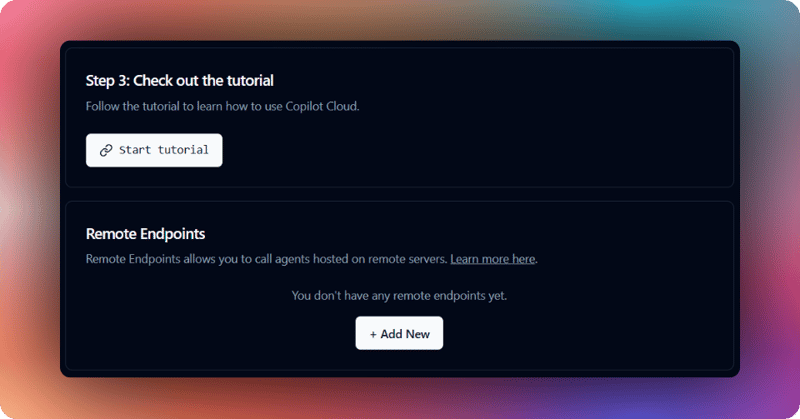
接下来,向下滚动到远程端点部分,然后单击“添加新端点”按钮。
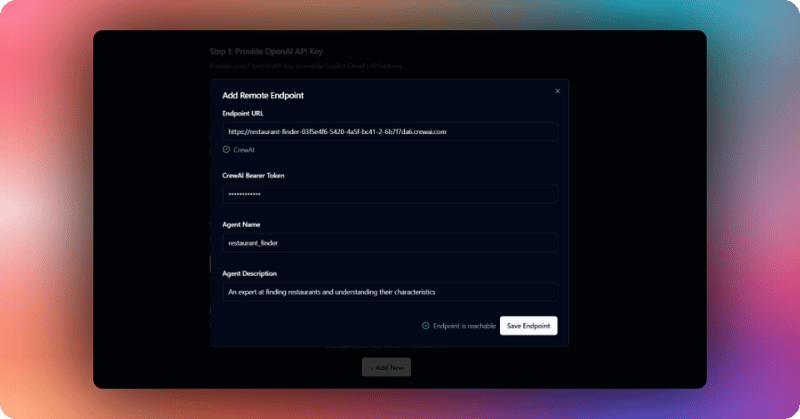
然后从弹出的对话框中选择远程端点。之后,添加您的 CrewAI 代理端点 URL、持有者令牌、名称和描述,如下所示。然后单击“保存端点”按钮。
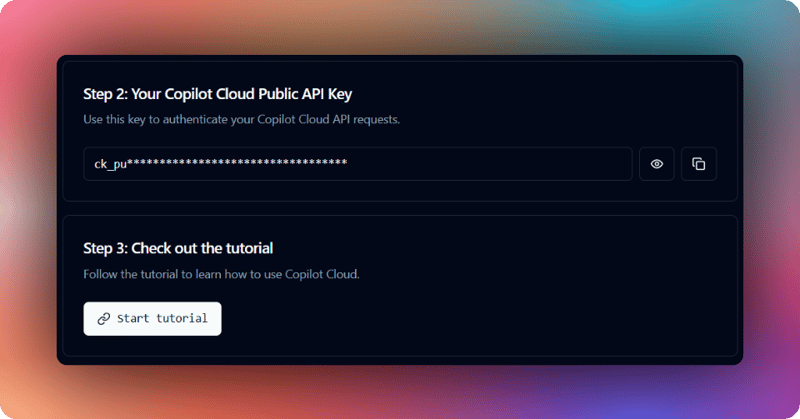
保存机组人员端点后,复制 Copilot Cloud 公共 API 密钥,如下所示。
步骤 2:构建 CrewAI 代理前端用户界面
要构建 CrewAI 代理前端 UI,首先克隆餐厅查找器 UI 存储库,其中包含 Next.js 项目的代码:
git clone https://github.com/TheGreatBonnie/restaurant-finder-ui.git
.env 接下来,在根目录下创建一个 文件。然后将您的 CrewAI 代理名称和 Copilot Cloud 公共 API 密钥添加到环境变量中。
NEXT_PUBLIC_AGENT_NAME=restaurant_finder
NEXT_PUBLIC_CPK_PUBLIC_API_KEY=your-copilot-cloud-api-key
之后,使用 pnpm 安装前端依赖项。
pnpm install
然后使用以下命令启动应用程序。
pnpm run dev
访问http://localhost:3000/,您应该可以看到 CrewAI 餐厅查找代理前端正在运行。
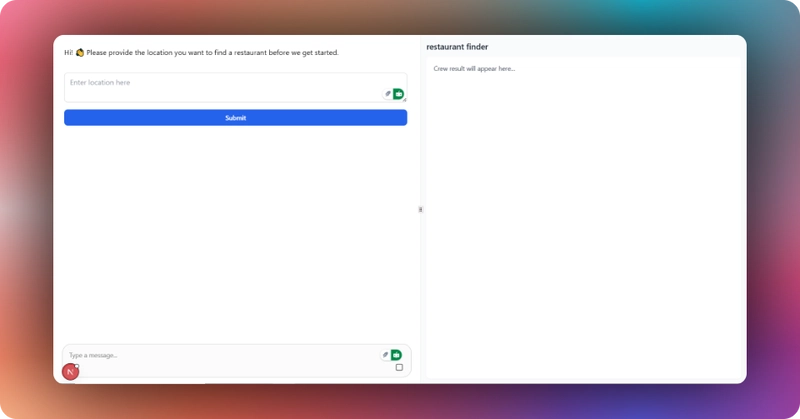
现在让我们看看如何使用 CopilotKit 为 CrewAI 代理构建前端 UI。
步骤 3:设置 CopilotKit 提供程序
要设置 CopilotKit 提供程序,组件 <CopilotKit> 必须封装应用程序中与 Copilot 相关的部分。对于大多数用例,最好将 CopilotKit 提供程序封装在整个应用程序中,例如,封装在 `<app-head>` 标签内layout.tsx,如下面的文件所示src/app/layout.tsx。
// Import CopilotKit React UI specific styles
import "@copilotkit/react-ui/styles.css";

// Import the CopilotKit component for AI integration
import { CopilotKit } from "@copilotkit/react-core";

// Define metadata for the application
export const metadata: Metadata = {
  // Set the page title
  title: "CopilotKit Crew Demo",
  // Set the page description for SEO and previews
  description: "Talk to your Crew",
};

export default function RootLayout({
  children,
}: Readonly<{
  children: React.ReactNode;
}>) {
  return (
    <html lang="en" className="h-full">
      <body className={` antialiased h-full`}>
        {/* CopilotKit wrapper for AI functionality */}
        <CopilotKit
          // Hide the development console in production
          showDevConsole={false}
          // Set the agent name from environment variables
          agent={process.env.NEXT_PUBLIC_AGENT_NAME}
          // Set the public API key from environment variables
          publicApiKey={process.env.NEXT_PUBLIC_CPK_PUBLIC_API_KEY}>
          {children}
        </CopilotKit>
      </body>
    </html>
  );
}
步骤 4:创建船员快速入门组件
要启动 CrewAI 代理,渲染船员状态和进度,处理人类反馈,并流式传输代理的响应,您需要创建一个 CrewQuickstart 组件,如文件中所示src/components/CrewQuickstart.tsx。
"use client";

// Import necessary hooks and types from CopilotKit for crew and chat functionality
import {
  CrewsAgentState,
  useCoAgent,
  useCopilotChat,
  useCopilotAdditionalInstructions,
} from "@copilotkit/react-core";
// Import React hooks for state and side effects
import { useEffect, useState } from "react";
// Import message types for chat functionality
import { MessageRole, TextMessage } from "@copilotkit/runtime-client-gql";
// Import UI components for resizable panels
import {
  ResizablePanelGroup,
  ResizablePanel,
  ResizableHandle,
} from "./ui/resizable";
// Import custom hook for window size detection
import { useWindowSize } from "@/hooks/useWindowSize";

// Define props interface for the component
interface CrewQuickstartProps {
  crewName: string; // Name of the crew/agent
  inputs: Array<string>; // Array of input field names to collect from user
}

// Export the main component with typed props
export const CrewQuickstart: React.FC<CrewQuickstartProps> = ({
  crewName,
  inputs,
}: {
  crewName: string;
  inputs: Array<string>;
}) => {
  // State to track if initial chat message has been sent
  const [initialMessageSent, setInitialMessageSent] = useState(false);
  // Get mobile detection from custom hook
  const { isMobile } = useWindowSize();
  // State for panel layout direction (horizontal for desktop, vertical for mobile)
  const [direction, setDirection] = useState<"horizontal" | "vertical">(
    "horizontal"
  );

  // Effect to update layout direction based on mobile status
  useEffect(() => {
    setDirection(isMobile ? "vertical" : "horizontal");
  }, [isMobile]);

  // Setup crew/agent with custom state using CopilotKit's useCoAgent hook
  const { state, setState, run } = useCoAgent<
    CrewsAgentState & {
      result: string; // Final result of crew execution
      inputs: Record<string, string>; // Object storing user inputs
    }
  >({
    name: crewName, // Name of the crew
    initialState: {
      inputs: {}, // Initial empty inputs object
      result: "Crew result will appear here...", // Default result message
    },
  });

  // Clean crewName for display by removing non-alphanumeric characters
  const agentName = crewName.replace(/[^a-zA-Z0-9]/g, " ");

  // Render the component UI
  return (
    // Container div taking full width and height
    <div className="w-full h-full relative">
      {/* Resizable panel group for layout */}
      <ResizablePanelGroup direction={direction} className="w-full h-full">
        {/* Left/main panel for chat (empty in this version) */}
        <ResizablePanel defaultSize={60} minSize={30}>
          {/* Placeholder for chat component */}
        </ResizablePanel>

        {/* Handle for resizing panels */}
        <ResizableHandle withHandle />

        {/* Right panel for crew state/results */}
        <ResizablePanel defaultSize={40} minSize={25}>
          {/* Scrollable container with styling */}
          <div className="h-full overflow-y-auto bg-gray-50 dark:bg-gray-900 p-3">
            <div className="flex flex-col h-full">
              {/* Header with crew name */}
              <div className="flex items-center justify-between mb-2">
                <h1 className="text-lg font-medium text-gray-800 dark:text-gray-200">
                  {agentName}
                </h1>
              </div>

              {/* Content area */}
              <div className="h-full">
                {/* Styled container for results */}
                <div className="text-sm text-gray-700 dark:text-gray-300 bg-white dark:bg-gray-800 rounded-md shadow-sm p-4 h-full overflow-y-auto prose dark:prose-invert max-w-none">
                  {/* Placeholder for result content */}
                </div>
              </div>
            </div>
          </div>
        </ResizablePanel>
      </ResizablePanelGroup>
    </div>
  );
};
创建 CrewQuickstart 组件后,您需要将其导入到您的主页面,如下面的文件所示src/app/page.tsx。
"use client";

import React from "react";

// Import the custom CrewQuickstart component from components directory
import { CrewQuickstart } from "@/components/CrewQuickstart";

export default function Home() {
  return (
    <div className="w-full h-full relative">
      {/* Render the CrewQuickstart component with specific props */}
      <CrewQuickstart
        crewName="Restaurant Finder" // Name of the crew/agent
        inputs={["location"]} // Array specifying required user input
      />
    </div>
  );
第五步:选择副驾驶用户界面
要设置您的 Copilot UI,首先在根组件中导入默认样式(通常为 layout.tsx)。
import "@copilotkit/react-ui/styles.css";
Copilot UI 内置了多种 UI 模式;您可以从CopilotPopup、CopilotSidebar、CopilotChat或Headless UI中选择您喜欢的模式。
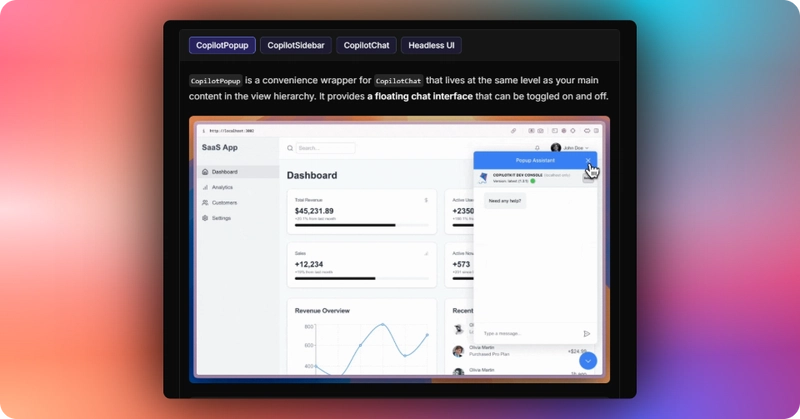
在这种情况下,我们将使用src/components/Chat.tsx文件中定义的 CopilotChat。
// Declare this component as a client-side component in Next.js
"use client";

import React from "react";

// Import specific types and components from CopilotKit's React UI package
import { CopilotKitCSSProperties, CopilotChat } from "@copilotkit/react-ui";

function Chat() {
  return (
    <div
      className="h-full relative overflow-y-auto"
      style={
        {
          // Define custom CSS variable for CopilotKit's primary color
          "--copilot-kit-primary-color": "#4F4F4F",
        } as CopilotKitCSSProperties // Type assertion for CopilotKit-specific CSS properties
      }>
      {/* CopilotChat component for the chat interface */}
      <CopilotChat
        // Instructions prop provides guidance to the AI assistant
        instructions={
          "You are assisting the user as best as you can. Answer in the best way possible given the data you have."
        }
        // Custom labels for the chat interface
        labels={{
          // Title displayed in the chat header
          title: "Your Assistant",
          // Initial message shown when chat starts
          initial:
            "Hi! 👋 Please provide the location you want to find a restaurant before we get started.",
        }}
        // Styling classes for the chat component using Tailwind CSS
        className="h-full flex flex-col"
        // Custom icons configuration
        icons={{
          // Custom spinner icon shown during loading states
          spinnerIcon: (
            // Span element with animated pulsing dots
            <span className="h-5 w-5 text-gray-500 animate-pulse">...</span>
          ),
        }}
      />
    </div>
  );
}

export default Chat;
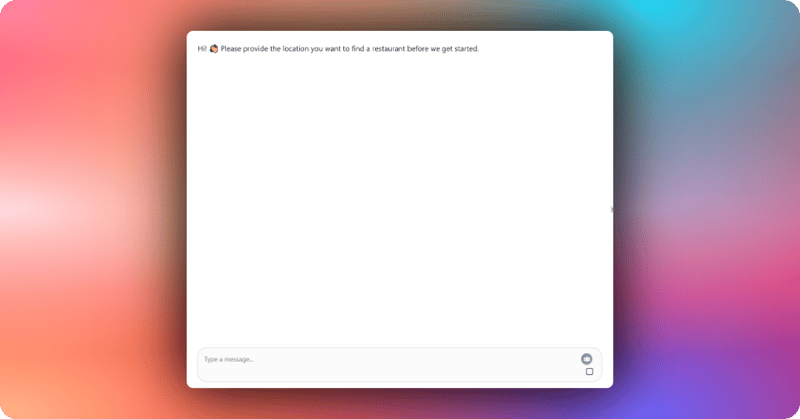
然后导入聊天组件并在src/components/CrewQuickstart.tsx文件中使用。聊天界面随后会在前端用户界面上渲染,如下所示。
步骤 6:启动 CrewAI 代理
要启动 CrewAI 代理,您需要发送初始欢迎消息,定义一个收集用户输入的操作,定义一个确认用户输入的效果,并定义一些指令,以确保在代理运行之前添加用户输入,如下面的文件中所示src/components/CrewQuickstart.tsx。
"use client";

// Import CopilotKit hooks and types for crew and chat functionality
import {
  CrewsAgentState,
  useCoAgent, // Hook for managing crew state and execution
  useCopilotChat, // Hook for chat functionality
  useCopilotAdditionalInstructions, // Hook for adding crew instructions
  useCopilotAction, // Hook for defining crew actions
} from "@copilotkit/react-core";
// Import React hooks for state and side effects
import { useEffect, useState } from "react";
// Import message types for chat
import { MessageRole, TextMessage } from "@copilotkit/runtime-client-gql";

// Define props interface for the component
interface CrewQuickstartProps {
  crewName: string; // Name of the crew/agent
  inputs: Array<string>; // Array of input field names required from user
}

// Export the CrewQuickstart component with typed props
export const CrewQuickstart: React.FC<CrewQuickstartProps> = ({
  crewName,
  inputs,
}: {
  crewName: string;
  inputs: Array<string>;
}) => {
  // State to track if initial welcome message has been sent
  const [initialMessageSent, setInitialMessageSent] = useState(false);

  // Setup crew with custom state using useCoAgent hook
  const { state, setState, run } = useCoAgent<
    CrewsAgentState & {
      result: string; // Stores the final crew execution result
      inputs: Record<string, string>; // Stores user-provided inputs as key-value pairs
    }
  >({
    name: crewName, // Set crew name from props
    initialState: {
      inputs: {}, // Initially empty inputs object
      result: "Crew result will appear here...", // Default result placeholder
    },
  });

  // Get chat functionality from useCopilotChat hook
  const { appendMessage, isLoading } = useCopilotChat();

  // Define instructions requiring inputs before crew execution
  const instructions =
    "INPUTS ARE ABSOLUTELY REQUIRED. Please call getInputs before proceeding with anything else.";

  // Effect to send initial welcome message when component mounts
  useEffect(() => {
    if (initialMessageSent || isLoading) return; // Skip if already sent or loading

    setTimeout(async () => {
      // Append welcome message to chat
      await appendMessage(
        new TextMessage({
          content: "Hi, Please provide your inputs before we get started.",
          role: MessageRole.Developer, // Attributed to developer role
        })
      );
      setInitialMessageSent(true); // Mark message as sent
    }, 0);
    // eslint-disable-next-line react-hooks/exhaustive-deps
  }, []); // Empty dependency array: runs once on mount

  // Effect to confirm inputs in chat once provided
  useEffect(() => {
    if (!initialMessageSent && Object.values(state?.inputs || {}).length > 0) {
      // If inputs exist and initial message not sent, show them in chat
      appendMessage(
        new TextMessage({
          role: MessageRole.Developer,
          content: "My inputs are: " + JSON.stringify(state?.inputs),
        })
      ).then(() => {
        setInitialMessageSent(true); // Mark as sent after appending
      });
    }
    // eslint-disable-next-line react-hooks/exhaustive-deps
  }, [initialMessageSent, state?.inputs]); // Depends on message state and inputs

  // Add instructions with conditional availability
  useCopilotAdditionalInstructions({
    instructions, // Instructions defined above
    available:
      Object.values(state?.inputs || {}).length > 0 ? "enabled" : "disabled", // Enable only when inputs are provided
  });

  // Define action to collect inputs from user
  useCopilotAction({
    name: "getInputs", // Action name
    followUp: false, // No follow-up action
    description:
      "This action allows Crew to get required inputs from the user before starting the Crew.",
    renderAndWaitForResponse({ status }) {
      // Render form and wait for submission
      if (status === "inProgress" || status === "executing") {
        return (
          // Form to collect inputs
          <form
            className="flex flex-col gap-4" // Styling for vertical layout with spacing
            onSubmit={async (e: React.FormEvent<HTMLFormElement>) => {
              e.preventDefault(); // Prevent default form submission
              const form = e.currentTarget; // Get form element
              const input = form.elements.namedItem(
                "input"
              ) as HTMLTextAreaElement; // Get input element
              const inputValue = input.value; // Get input value
              const inputKey = input.id; // Get input ID (matches input name from props)

              // Update crew state with new input
              setState({
                ...state,
                inputs: {
                  ...state.inputs,
                  [inputKey]: inputValue,
                },
              });
              // Run crew after state update
              setTimeout(async () => {
                console.log("running crew"); // Log start of crew execution
                await run(); // Execute the crew
                console.log("crew run complete"); // Log completion
              }, 0);
            }}>
            <div className="flex flex-col gap-4">
              {/* Map through required inputs to create textareas */}
              {inputs.map((input) => (
                <div key={input} className="flex flex-col gap-2">
                  <textarea
                    id={input} // Unique ID matching input name
                    autoFocus // Automatically focus first input
                    name="input" // Form element name
                    placeholder={`Enter ${input} here`} // Placeholder text
                    required // Input is mandatory
                    className="w-full px-3 py-2 border border-gray-300 rounded-md shadow-sm focus:outline-none focus:ring-2 focus:ring-blue-500 focus:border-blue-500" // Styling
                  />
                </div>
              ))}
              {/* Submit button */}
              <button
                type="submit"
                className="w-full px-4 py-2 text-sm font-medium text-white bg-blue-600 rounded-md hover:bg-blue-700 focus:outline-none focus:ring-2 focus:ring-offset-2 focus:ring-blue-500 transition-colors duration-200">
                Submit
              </button>
            </div>
          </form>
        );
      }
      return <>Inputs submitted</>; // Message shown after submission
    },
  });

  // Return basic container (UI incomplete in this snippet)
  return (
    <div className="w-full h-full relative">
      {/* Placeholder for additional UI */}
    </div>
  );
};
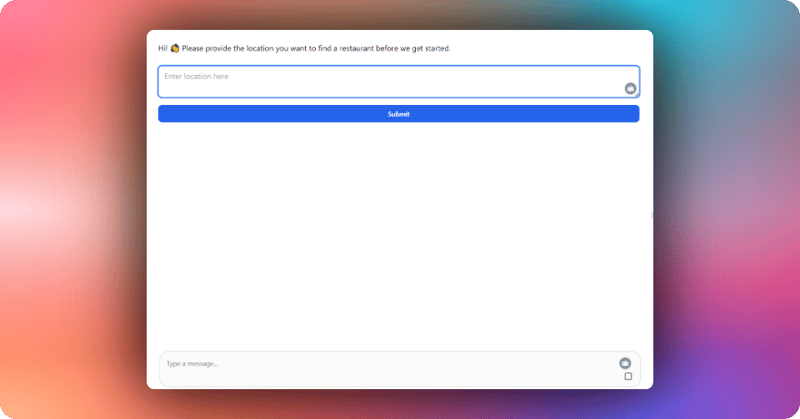
前端 UI 中会渲染初始消息和用于收集用户输入的表单组件,如下所示。
步骤 7:渲染 CrewAI 代理状态和进度
要渲染 CrewAI 代理的状态和进度,您需要定义一个 CrewStateRenderer 组件,该组件可以可视化代理步骤和任务的实时状态,如下面的src/components/CrewStateRenderer.tsx文件中所示。
"use client";

// Import CopilotKit types for crew state management
import {
  CrewsAgentState, // Type for overall crew state
  CrewsResponseStatus, // Type for crew execution status
  CrewsTaskStateItem, // Type for task items
  CrewsToolStateItem, // Type for tool items
} from "@copilotkit/react-core";
// Import React hooks and utilities
import { useEffect, useMemo, useRef, useState } from "react";
// Import ReactMarkdown for rendering markdown content
import ReactMarkdown from "react-markdown";

/**
 * Renders your Crew's steps & tasks in real-time.
 * @param state - The current state of the crew
 * @param status - The current execution status of the crew
 */
function CrewStateRenderer({
  state,
  status,
}: {
  state: CrewsAgentState; // Crew state containing steps and tasks
  status: CrewsResponseStatus; // Status like "inProgress" or "complete"
}) {
  // State to track if the renderer is collapsed or expanded
  const [isCollapsed, setIsCollapsed] = useState(true);
  // Ref to access the content div for scrolling
  const contentRef = useRef<HTMLDivElement>(null);
  // Ref to track previous item count for detecting new items
  const prevItemsLengthRef = useRef<number>(0);
  // State to track which item to highlight (newly added)
  const [highlightId, setHighlightId] = useState<string | null>(null);

  // Memoized computation to combine and sort steps and tasks
  const items = useMemo(() => {
    if (!state) return []; // Return empty array if no state
    // Combine steps and tasks, sort by timestamp
    return [...(state.steps || []), ...(state.tasks || [])].sort(
      (a, b) =>
        new Date(a.timestamp).getTime() - new Date(b.timestamp).getTime() // Sort ascending by timestamp
    );
  }, [state]); // Recompute when state changes

  // Effect to highlight new items and auto-scroll
  useEffect(() => {
    if (!state) return; // Skip if no state
    if (items.length > prevItemsLengthRef.current) {
      // Check if new item added
      const newestItem = items[items.length - 1]; // Get latest item
      setHighlightId(newestItem.id); // Highlight it
      setTimeout(() => setHighlightId(null), 1500); // Clear highlight after 1.5s

      // Auto-scroll to bottom if expanded
      if (contentRef.current && !isCollapsed) {
        contentRef.current.scrollTop = contentRef.current.scrollHeight;
      }
    }
    prevItemsLengthRef.current = items.length; // Update previous length
  }, [items, isCollapsed, state]); // Depends on items, collapse state, and crew state

  // Loading state if no state provided
  if (!state) {
    return <div>Loading crew state...</div>;
  }

  // Hide component if collapsed, empty, and not in progress
  if (isCollapsed && items.length === 0 && status !== "inProgress") return null;

  // Render the UI
  return (
    <div className="mt-2 text-sm">
      {/* Toggle header */}
      <div
        className="flex items-center cursor-pointer" // Flex layout with pointer cursor
        onClick={() => setIsCollapsed(!isCollapsed)} // Toggle collapse state
      >
        <span className="mr-1">{isCollapsed ? "▶" : "▼"}</span>{" "}
        {/* Arrow indicator */}
        <span className="text-gray-700">
          {status === "inProgress" ? "Crew is analyzing..." : "Crew analysis"}{" "}
          {/* Status text */}
        </span>
      </div>

      {/* Content area, shown only when expanded */}
      {!isCollapsed && (
        <div
          ref={contentRef} // Reference for scrolling
          className="max-h-[200px] overflow-auto border-l border-gray-200 pl-2 ml-1 mt-1">
          {items.length > 0 ? ( // Check if there are items to render
            items.map((item) => {
              // Map through sorted items
              const isTool = (item as CrewsToolStateItem).tool !== undefined; // Check if item is a tool
              const isHighlighted = item.id === highlightId; // Check if item should be highlighted
              return (
                <div
                  key={item.id} // Unique key for each item
                  className={`mb-2 ${isHighlighted ? "animate-fadeIn" : ""}`}>
                  {/* Item title (tool name or task name) */}
                  <div className="font-bold text-gray-800 dark:text-gray-200">
                    {isTool
                      ? (item as CrewsToolStateItem).tool // Display tool name
                      : (item as CrewsTaskStateItem).name}{" "}
                    {/*Display task name*/}
                  </div>
                  {/* Thought section, if present */}
                  {"thought" in item && item.thought && (
                    <div className="mt-1 opacity-80 text-gray-600 dark:text-gray-400 prose dark:prose-invert max-w-none">
                      <span className="font-medium">Thought:</span>{" "}
                      <ReactMarkdown>{item.thought}</ReactMarkdown>{" "}
                      {/* Render thought as markdown */}
                    </div>
                  )}
                  {/* Result section, if present */}
                  {"result" in item && item.result !== undefined && (
                    <pre className="mt-1 text-sm bg-gray-50 dark:bg-gray-800 p-2 rounded-md overflow-x-auto">
                      {JSON.stringify(item.result, null, 2)}{" "}
                      {/* Display result as formatted JSON */}
                    </pre>
                  )}
                  {/* Description section, if present */}
                  {"description" in item && item.description && (
                    <div className="mt-1 text-gray-700 dark:text-gray-300 prose dark:prose-invert max-w-none">
                      <ReactMarkdown>{item.description}</ReactMarkdown>{" "}
                      {/* Render description as markdown */}
                    </div>
                  )}
                </div>
              );
            })
          ) : (
            <div className="opacity-70 text-gray-500">No activity yet...</div> // Placeholder for empty state
          )}
        </div>
      )}

      {/* Inline styles for fade-in animation */}
      <style jsx>{`
        @keyframes fadeIn {
          0% {
            opacity: 0;
            transform: translateY(4px); // Start slightly below
          }
          100% {
            opacity: 1;
            transform: translateY(0); // End at normal position
          }
        }
        .animate-fadeIn {
          animation: fadeIn 0.5s; // Apply 0.5s fade-in animation
        }
      `}</style>
    </div>
  );
}

export default CrewStateRenderer;
然后,将 CrewStateRenderer 组件导入到 CrewQuickstart 组件中,CopilotKit 的钩子使用该组件useCoAgentStateRender动态渲染 CrewAI 代理状态,如下所示。
// Import the useCoAgentStateRender hook from CopilotKit for rendering crew state
import { useCoAgentStateRender } from "@copilotkit/react-core";

// Import the custom CrewStateRenderer component for visualizing crew state
import CrewStateRenderer from "./CrewStateRenderer";

export const CrewQuickstart: React.FC<CrewQuickstartProps> = ({
  crewName, // Name of the crew/agent
  inputs, // Array of input field names (unused in this version)
}: {
  crewName: string;
  inputs: Array<string>;
}) => {
  // Use CopilotKit's hook to render crew state dynamically
  useCoAgentStateRender({
    name: crewName, // Pass the crew name to identify which crew's state to render
    render: (
      { state, status } // Define how to render the state
    ) => (
      <CrewStateRenderer
        state={state} // Pass the crew's current state (steps, tasks, etc.)
        status={status} // Pass the crew's execution status (e.g., "inProgress")
      />
    ),
  });

  return (
    <div className="w-full h-full relative">
      {/* Placeholder for additional UI */}
    </div>
  );
};
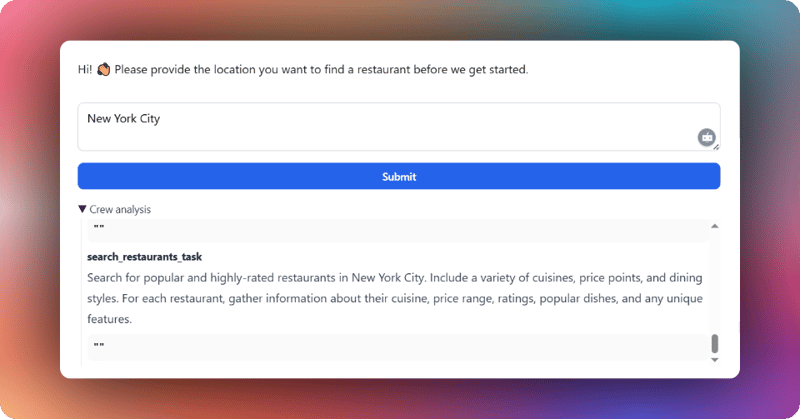
要实时查看 CrewAI 代理餐厅的状态,请在用户输入表单中添加“纽约市”作为输入项,然后单击提交按钮。打开代理的状态文本,您应该会看到代理的状态和进度,如下所示。
步骤 8:在 CrewAI 代理中处理人类反馈
要处理人类反馈,您需要定义一个 CrewHumanFeedbackRenderer 组件来处理 CrewAI 代理任务输出的用户反馈,如src/components/CrewHumanFeedbackRenderer.tsx文件中所示。
"use client";

// Import CopilotKit types for crew status and state items
import { CrewsResponseStatus, CrewsStateItem } from "@copilotkit/react-core";
// Import React hook for state management
import { useState } from "react";
// Import ReactMarkdown for rendering markdown content
import ReactMarkdown from "react-markdown";

// Define an interface extending CrewsStateItem for feedback-specific data
interface CrewsFeedback extends CrewsStateItem {
  /**
   * Output of the task execution
   */
  task_output?: string; // Optional field for the task's output
}

/**
 * Renders a simple UI for agent-requested user feedback (Approve / Reject).
 * @param feedback - The crew's feedback data including task output
 * @param respond - Optional callback to send user response back to the crew
 * @param status - Current status of the feedback process
 */
function CrewHumanFeedbackRenderer({
  feedback, // Feedback data from the crew
  respond, // Callback to send response (optional)
  status, // Status like "inProgress", "executing", or "complete"
}: {
  feedback: CrewsFeedback;
  respond?: (input: string) => void;
  status: CrewsResponseStatus;
}) {
  // State to toggle visibility of task output
  const [isExpanded, setIsExpanded] = useState(true);
  // State to track user's response (Approved/Rejected)
  const [userResponse, setUserResponse] = useState<string | null>(null);

  // Render feedback submission confirmation when complete
  if (status === "complete") {
    return (
      <div style={{ marginTop: 8, textAlign: "right" }}>
        {" "}
        {/* Right-aligned confirmation */}
        {userResponse || "Feedback submitted."}{" "}
        {/* Show user's response or default message */}
      </div>
    );
  }

  // Render feedback UI when in progress or executing
  if (status === "inProgress" || status === "executing") {
    return (
      <div style={{ marginTop: 8 }}>
        {isExpanded && ( // Show task output only when expanded
          <div
            className="border border-gray-200 rounded-lg p-4 mb-4 bg-white prose dark:prose-invert max-w-none dark:bg-gray-800 dark:border-gray-700 shadow-sm"
            // Styled container for task output with light/dark theme support
          >
            <ReactMarkdown>{feedback.task_output || ""}</ReactMarkdown>{" "}
            {/* Render task output as markdown */}
          </div>
        )}
        <div className="flex justify-end gap-2 mt-2">
          {/* Toggle button to show/hide task output */}
          <button
            className="px-3 py-2 text-sm font-medium text-gray-700 hover:text-gray-900 transition-colors duration-200"
            onClick={() => setIsExpanded(!isExpanded)} // Toggle expanded state
          >
            {isExpanded ? "Hide" : "Show"} Feedback {/* Dynamic button text */}
          </button>
          {/* Approve button */}
          <button
            className="px-4 py-2 text-sm font-medium text-white bg-gray-800 rounded-md hover:bg-gray-700 focus:outline-none focus:ring-2 focus:ring-offset-2 focus:ring-gray-500 transition-colors duration-200"
            onClick={() => {
              setUserResponse("Approved"); // Set local response state
              respond?.("Approve"); // Send "Approve" to crew if respond exists
            }}>
            Approve
          </button>
          {/* Reject button */}
          <button
            className="px-4 py-2 text-sm font-medium text-white bg-gray-800 rounded-md hover:bg-gray-700 focus:outline-none focus:ring-2 focus:ring-offset-2 focus:ring-gray-500 transition-colors duration-200"
            onClick={() => {
              setUserResponse("Rejected"); // Set local response state
              respond?.("Reject"); // Send "Reject" to crew if respond exists
            }}>
            Reject
          </button>
        </div>
      </div>
    );
  }

  // Return null for any other status (e.g., initial state before feedback request)
  return null;
}

export { CrewHumanFeedbackRenderer };
然后,将 CrewHumanFeedbackRenderer 组件导入到 CrewQuickstart 组件中,CopilotKit 的 useCopilotAction 使用该组件创建一个 crew_requesting_feedback 操作,该操作会渲染一个反馈 UI 并等待用户响应,如下所示。
// Import CopilotKit types and hook for crew actions
import {
  CrewsResponseStatus, // Type for crew execution status (e.g., "inProgress", "complete")
  CrewsStateItem, // Base type for crew state items
  useCopilotAction, // Hook to define custom crew actions
} from "@copilotkit/react-core";

// Import custom feedback renderer component
import { CrewHumanFeedbackRenderer } from "./CrewHumanFeedbackRenderer";

// Define interface for feedback, extending CrewsStateItem
interface CrewsFeedback extends CrewsStateItem {
  /**
   * Output of the task execution
   */
  task_output?: string; // Optional field for task output
}

// Define props interface for the CrewQuickstart component
interface CrewQuickstartProps {
  crewName: string; // Name of the crew/agent
  inputs: Array<string>; // Array of input field names (unused in this version)
}

// Export the CrewQuickstart component with typed props
export const CrewQuickstart: React.FC<CrewQuickstartProps> = ({
  crewName, // Crew identifier
  inputs, // Required inputs (not utilized here)
}: {
  crewName: string;
  inputs: Array<string>;
}) => {
  // Define a Copilot action for requesting user feedback
  useCopilotAction({
    name: "crew_requesting_feedback", // Action name
    description: "Request feedback from the user", // Action description
    renderAndWaitForResponse(props) {
      // Function to render UI and wait for response
      const { status, args, respond } = props; // Destructure props
      return (
        // Render the feedback UI using CrewHumanFeedbackRenderer
        <CrewHumanFeedbackRenderer
          feedback={args as unknown as CrewsFeedback} // Pass action arguments as feedback (type cast due to unknown args type)
          respond={respond} // Pass the respond callback to send user feedback back
          status={status as CrewsResponseStatus} // Pass the current status
        />
      );
    },
  });

  return (
    <div className="w-full h-full relative">
      {/* Placeholder for additional UI */}
    </div>
  );
};
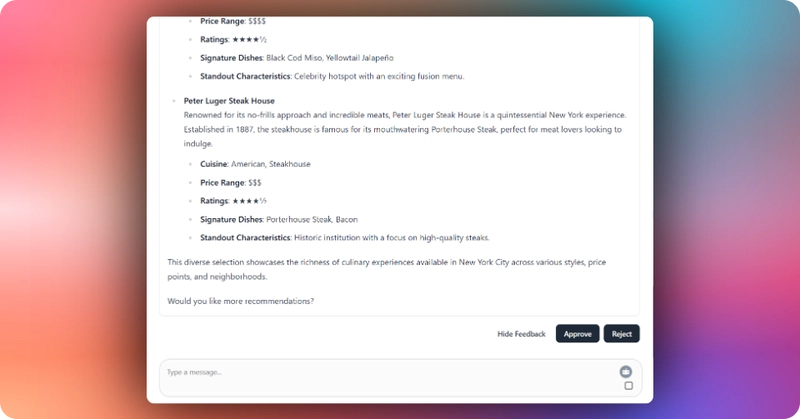
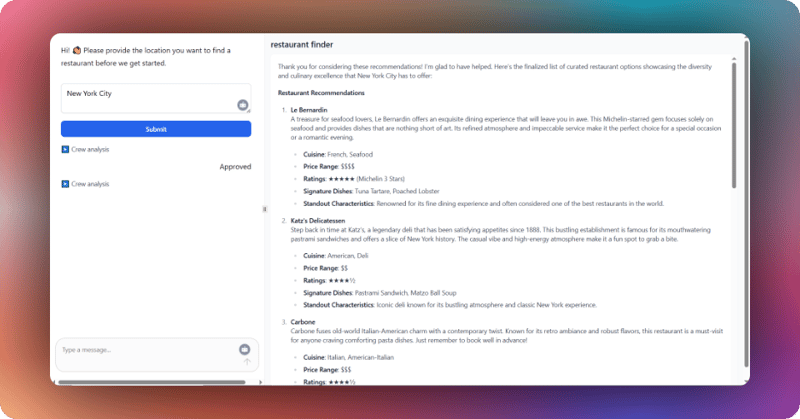
餐厅推荐助手 CrewAI 使用 CrewHumanFeedbackRenderer 组件,生成城市中精选的餐厅推荐列表。您可以点击“批准”或“拒绝”按钮向助手发送反馈,如下图所示。
步骤 9:流式传输 CrewAI 代理响应
要流式传输 CrewAI 代理的响应,您需要在 CrewQuickstart 组件中以 markdown 格式渲染船员的结果,如下所示。
"use client";

// Import CopilotKit types and hook for crew management
import { CrewsAgentState, useCoAgent } from "@copilotkit/react-core";

import { useEffect, useState } from "react";
// Import ReactMarkdown for rendering markdown content
import ReactMarkdown from "react-markdown";
// Import custom UI components for resizable panels
import {
  ResizablePanelGroup,
  ResizablePanel,
  ResizableHandle,
} from "./ui/resizable";
// Import custom hook for window size detection
import { useWindowSize } from "@/hooks/useWindowSize";

// Define props interface for the component
interface CrewQuickstartProps {
  crewName: string; // Name of the crew/agent
  inputs: Array<string>; // Array of input field names (unused in this version)
}

// Export the CrewQuickstart component with typed props
export const CrewQuickstart: React.FC<CrewQuickstartProps> = ({
  crewName, // Crew identifier
  inputs, // Required inputs (not utilized here)
}: {
  crewName: string;
  inputs: Array<string>;
}) => {
  // Get mobile detection from custom hook
  const { isMobile } = useWindowSize();
  // State for panel layout direction (horizontal for desktop, vertical for mobile)
  const [direction, setDirection] = useState<"horizontal" | "vertical">(
    "horizontal" // Default to horizontal
  );

  // Effect to update layout direction based on mobile status
  useEffect(() => {
    setDirection(isMobile ? "vertical" : "horizontal"); // Switch to vertical on mobile
  }, [isMobile]); // Re-run when isMobile changes

  // Setup crew with custom state using useCoAgent hook
  const { state, setState, run } = useCoAgent<
    CrewsAgentState & {
      result: string; // Crew execution result
      inputs: Record<string, string>; // User-provided inputs
    }
  >({
    name: crewName, // Set crew name from props
    initialState: {
      inputs: {}, // Initially empty inputs object
      result: "Crew result will appear here...", // Default result placeholder
    },
  });

  // Clean crewName for display by replacing non-alphanumeric chars with spaces
  const agentName = crewName.replace(/[^a-zA-Z0-9]/g, " ");

  // Render the UI
  return (
    <div className="w-full h-full relative">
      {" "}
      {/* Full-size container */}
      {/* Resizable panel group for responsive layout */}
      <ResizablePanelGroup direction={direction} className="w-full h-full">
        {/* Left/main panel (empty in this version) */}
        <ResizablePanel defaultSize={60} minSize={30}>
          {/* Placeholder for additional content (e.g., chat) */}
        </ResizablePanel>

        {/* Handle for resizing panels */}
        <ResizableHandle withHandle />

        {/* Right panel for crew results */}
        <ResizablePanel defaultSize={40} minSize={25}>
          <div className="h-full overflow-y-auto bg-gray-50 dark:bg-gray-900 p-3">
            {/* Scrollable container with light/dark theme */}
            <div className="flex flex-col h-full">
              {/* Header section */}
              <div className="flex items-center justify-between mb-2">
                <h1 className="text-lg font-medium text-gray-800 dark:text-gray-200">
                  {agentName} {/* Display cleaned crew name */}
                </h1>
              </div>

              {/* Content area */}
              <div className="h-full">
                <div className="text-sm text-gray-700 dark:text-gray-300 bg-white dark:bg-gray-800 rounded-md shadow-sm p-4 h-full overflow-y-auto prose dark:prose-invert max-w-none">
                  {/* Styled container for result */}
                  <ReactMarkdown>{state?.result || ""}</ReactMarkdown>{" "}
                  {/* Render result as markdown */}
                </div>
              </div>
            </div>
          </div>
        </ResizablePanel>
      </ResizablePanelGroup>
    </div>
  );
};
您可以通过点击人工反馈部分的“批准”按钮来查看 CrewAI 代理对餐厅的回复。之后,代理将生成一份最终的精选餐厅列表,如下所示。
结论
本教程涵盖了很多内容。希望您已经学会了如何使用 CrewAI 和 Copilotkit 构建、运行、部署全栈 AI 代理以及与它们进行交互。
点击此处查看GitHub上的完整源代码。
在Twitter上关注 CopilotKit并打个招呼,如果你想开发一些很酷的东西,请加入Discord社区。
文章来源:https://dev.to/copilotkit/how-to-build-full-stack-ai-agents-crewai-copilotkit-1fn6