

AutoView - 将您的蓝图转换为 UI 组件(AI 代码生成器)
1. 前言
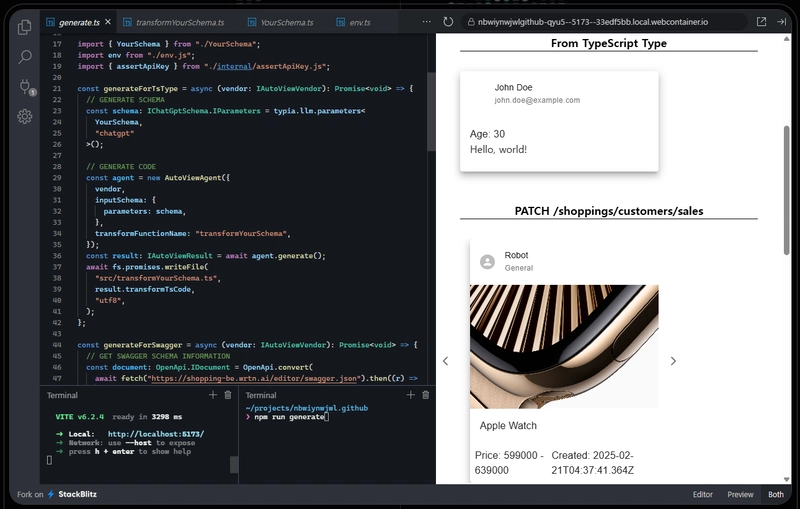
@autoview是一个自动化前端构建器,它使用类型信息生成代码。
@autoview是一个代码生成器,它根据模式信息生成 TypeScript 前端组件。这些模式信息可以来源于 TypeScript 类型或 Swagger/OpenAPI 文档。
前端开发人员可以利用@autoviewTypeScript 显著提高工作效率。只需定义 TypeScript 类型,前端代码就会立即生成。然后,您可以完善和增强这段代码,最终完成您的应用程序。
对于后端开发人员,只需将您的swagger.json文件上传到指定位置即可@autoview。如果您的 API 包含 200 个函数,它将自动生成 200 个前端组件。如果有 300 个 API 函数,则会自动生成 300 个前端组件。
- GitHub 仓库:https://github.com/wrtnlabs/autoview
- Playground 主页:https://wrtnlabs.io/autoview
2. 如何使用
2.1 游乐场
访问我们的主页即可直接体验@autoview。
在代码编辑器标签页(由StackBlitz提供支持)中,导航到该env.ts文件并输入您的 OpenAI 密钥。npm run generate在终端中运行命令,即可查看它如何@autoview根据从 TypeScript 类型和 OpenAPI 文档派生的示例模式生成 TypeScript 前端代码。
您可以将提供的 schema 替换为您自己的 schema,从而生成自定义的 TypeScript 前端代码,而无需@autoview在本地安装。这种示例方法因其便捷性而备受推荐。
2.2. TypeScript 类型
import { AutoViewAgent } from "@autoview/agent";
import fs from "fs";
import OpenAI from "openai";
import typia, { tags } from "typia";

interface IMember {
  id: string & tags.Format<"uuid">;
  name: string;
  age: number & tags.Minimum<0> & tags.Maximum<100>;
  thumbnail: string & tags.Format<"uri"> & tags.ContentMediaType;
}

const agent: AutoViewAgent = new AutoViewAgent({
  vendor: {
    api: new OpenAI({ apiKey: "********" }),
    model: "o3-mini",
  },
  inputSchema: {
    parameters: typia.llm.parameters<
      IMember,
      "chatgpt",
      { reference: true }
    >(),
  },
});
const result: IAutoViewResult = await agent.generate();

await fs.promises.writeFile(
  "./src/transformers/transformMember.ts",
  result.transformTsCode,
  "utf8",
);
要从 TypeScript 类型生成前端代码,请使用该typia.llm.parameters<Schema, Model, Config>()函数。
创建AutoViewAgent实例并typia.llm.parameters<Schema, Model>()指定IMember类型,然后调用该AutoViewAgent.generate()函数。生成的 TypeScript 代码将位于该IAutoViewResult.transformTsCode属性中。
代码生成后,将其保存到您想要的位置以备将来使用。这就是@autoviewAI 如何根据 TypeScript 类型生成 TypeScript 前端代码的方法。
import { AutoViewAgent } from "@autoview/agent";
import fs from "fs";
import OpenAI from "openai";
import typia, { tags } from "typia";

interface IMember {
  id: string & tags.Format<"uuid">;
  name: string;
  age: number & tags.Minimum<0> & tags.Maximum<100>;
  thumbnail: string & tags.Format<"uri"> & tags.ContentMediaType;
}

// LLM SCHEMA GENERATION
const $defs: Record<string, IChatGptSchema> = {};
const schema: IChatGptSchema = typia.llm.schema<
  Array<IMember>,
  "chatgpt",
  { reference: true }
>({ $defs });

// CODE GENERATION
const agent: AutoViewAgent = new AutoViewAgent({
  vendor: {
    api: new OpenAI({ apiKey: "********" }),
    model: "o3-mini",
  },
  inputSchema: {
    $defs,
    schema,
  },
  transformFunctionName: "transformMember",
});
const result: IAutoViewResult = await agent.execute();

await fs.promises.writeFile(
  "./src/transformers/transformMember.ts",
  result.transformTsCode,
  "utf8",
);
请注意,该typia.llm.parameters<Schema, Model, Config>()函数仅支持不带动态键的静态对象类型。如果您需要为非对象类型(例如 `<object>`)生成前端代码Array<IMember>,则必须使用 ` typia.llm.schema<Schema, Model, Config>()<object>` 函数。
使用该函数生成模式时,预先定义并分配一个类型为的变量typia.llm.schema<Schema, Model, Config>()至关重要。$defsRecord<string, IChatGptSchema>
2.3. Swagger/OpenAPI 文档
import { AutoViewAgent } from "@autoview/agent";
import { OpenApi } from "@samchon/openapi";
import fs from "fs";
import OpenAI from "openai";
import typia, { tags } from "typia";

const app: IHttpLlmApplication<"chatgpt"> = HttpLlm.application({
  model: "chatgpt",
  document,
  options: {
    reference: true,
  },
});
const func: IHttpLlmFunction<"chatgpt"> | undefined = app.functions.find(
  (func) =>
    func.path === "/shoppings/customers/sales/{id}" &&
    func.method === "get",
);
if (func === undefined) throw new Error("Function not found");
else if (func.output === undefined) throw new Error("No return type");

const agent: AutoViewAgent = new AutoViewAgent({
  vendor: {
    api: new OpenAI({ apiKey: "********" }),
    model: "o3-mini",
  },
  inputSchema: {
    $defs: func.parameters.$defs,
    schema: func.output!,
  },
  transformFunctionName: "transformSale",
});
const result: IAutoViewResult = await agent.generate();

await fs.promises.writeFile(
  "./src/transformers/transformSale.ts",
  result.typescript,
  "utf8",
);
只要有swagger.json文件,就可以批量生成前端代码组件。
使用该函数将 Swagger/OpenAPI 文档转换为 LLM 函数调用模式HttpLlm.application(),并将其中一个模式提供给AutoViewAgent类。这样,您就可以为每个 API 函数自动创建前端组件。
此外,您还可以将后端服务器与 集成@agentica,这是一个专门用于 LLM 函数调用的 Agentic AI 框架。通过从 获取参数值@agentica并使用 自动查看返回值@autoview,您可以完全自动化前端应用程序开发:
2.4 前端渲染
//----
// GENERATED CODE
//----
// src/transformSale.ts
import { IAutoViewComponentProps } from "@autoview/interface";

export function transformSale(sale: IShoppingSale): IAutoViewComponentProps;

//----
// RENDERING CODE
//----
// src/SaleView.tsx
import { IAutoViewComponentProps } from "@autoview/interface";
import { renderComponent } from "@autoview/ui";

import { transformSale } from "./transformSale";

export const SaleView = (props: {
  sale: IShoppingSale
}) => {
  const comp: IAutoViewComponentProps = transformSale(sale);
  return <div>
    {renderComponent(comp)}
  </div>;
};
export default SaleView;

//----
// MAIN APPLICATION
//----
// src/main.tsx
import ReactDOM from "react-dom";

import SaleView from "./SaleView";

const sale: IShoppingSale = { ... };
ReactDOM.render(<SaleView sale={sale} />, document.body);
你可以使用该软件包渲染自动生成的代码@autoview/ui。
renderComponent()从代码中导入该函数@autoview/ui,并将其渲染为如上所示的 React 组件。
3. 原则
import { FunctionCall } from "pseudo";
import { IValidation } from "typia";

export const correctCompile = <T>(ctx: {
  call: FunctionCall;
  compile: (src: string) => Promise<IValidation<(v: T) => IAutoViewComponentProps>>;
  random: () => T;
  repeat: number;
  retry: (reason: string, errors?: IValidation.IError[]) => Promise<unknown>;
}): Promise<(v: T) => IAutoViewComponentProps>> => {
  // FIND FUNCTION
  if (ctx.call.name !== "render")
    return ctx.retry("Unable to find function. Try it again");

  //----
  // COMPILER FEEDBACK
  //----
  const result: IValidation<(v: T) => IAutoViewComponentProps>> =
    await ctx.compile(call.arguments.source);
  if (result.success === false)
    return ctx.retry("Correct compilation errors", result.errors);

  //----
  // VALIDATION FEEDBACK
  //----
  for (let i: number = 0; i < ctx.repeat; ++i) {
    const value: T = ctx.random(); // random value generation
    try {
      const props: IAutoViewComponentProps = result.data(value);
      const validation: IValidation<IAutoViewComponentProps> =
        func.validate(props); //validate AI generated function
      if (validation.success === false)
        return ctx.retry(
          "Type errors are detected. Correct it through validation errors",
          {
            errors: validation.errors,
          },
        );
    } catch (error) {
      //----
      // EXCEPTION FEEDBACK
      //----
      return ctx.retry(
        "Runtime error occurred. Correct by the error message",
        {
          errors: [
            {
              path: "$input",
              name: error.name,
              reason: error.message,
              stack: error.stack,
            }
          ]
        }
      )
    }
  }
  return result.data;
}
@autoview读取用户定义的模式(TypeScript 类型或 Swagger/OpenAPI 模式),并指导 AI 根据这些模式编写 TypeScript 前端代码。
然而,AI生成的前端代码并不完美。为了引导AI编写正确的前端代码,@autoview我们采用了多种验证反馈策略:
第一种策略是将编译错误反馈给人工智能体。人工智能体从编译器反馈中学习,并在后续尝试中生成正确的 TypeScript 代码。
第二种策略是验证反馈。@autoview它使用函数为给定的模式类型生成随机值typia.random<T>(),并测试 AI 生成的 TypeScript 渲染函数是否产生有效输出。如果验证失败,@autoview则使用详细的跟踪信息引导 AI 代理修正该函数。
最后一种策略是异常反馈。即使 AI 生成的 TypeScript 代码编译没有错误,运行时仍然可能出现异常。在这种情况下,@autoview它会引导 AI 代理利用异常信息来修正函数。
4. 路线图
4.1. 屏幕截图反馈
从渲染结果中学习。
当前版本@autoview实现了三种反馈策略:“编译器”、“验证”和“异常”。在下次更新中,@autoview将添加“屏幕截图反馈”。
当 AI 为用户定义的类型创建一个新的 TypeScript 转换器函数时,@autoview它会请求该类型的示例值,捕获结果的屏幕截图,并允许 AI 代理查看屏幕截图。
由于人工智能代理擅长分析和解释图像,因此下一代产品@autoview将提供更加激动人心的体验。
4.2 人类反馈
与用户讨论渲染结果。
当前版本@autoview并非聊天机器人,而是一个仅使用用户自定义类型模式的前端代码生成器。
在下次更新中,它将支持AutoViewAgent.conversate()聊天机器人开发功能。在这个聊天机器人中,用户可以通过对话引导AI生成前端代码。在查看渲染结果时,用户可以发出如下指令,请求AI修改前端代码:
- 太窄了,加宽点。
- 我想增强标题效果,把它放大。
- 细节太多了,请精简一些。
4.3 主题系统
@autoview支持主题系统,允许您使用@autoview/ui自定义选项替换默认渲染器。
然而,这项自定义主题功能尚未有文档说明。
下次更新中,我们将提供自定义主题的完整文档。
5. Agentica
@agentica是一个专门用于 LLM 函数调用的智能体 AI 框架。
当您提供 TypeScript 类时@agentica,AI 聊天机器人会正确调用该类的函数。如果您提供 Swagger/OpenAPI 文档,它将成为一个可以与后端 API 函数交互的聊天机器人。
通过@agentica与结合使用@autoview,您可以体验到全新的开发工作流程。使用@agentica驱动的 AI 聊天机器人替换参数输入组件,并使用 实现返回值查看器的自动化@autoview。这代表了基于 AI 的前端自动化最有前景的方法之一:
以下是一段示例代码片段以及一段演示该代码运行的视频。这些示例展示了智能体人工智能在未来的巨大潜力。
import { Agentica } from "@agentica/agent";
import { HttpLlm, OpenApi } from "@samchon/openapi";
import typia from "typia";

const agent = new Agentica({
  model: "chatgpt",
  vendor: {
    api: new OpenAI({ apiKey: "*****" }),
    model: "gpt-4o-mini",
  },
  controllers: [
    {
      protocol: "http",
      name: "shopping",
      application: HttpLlm.application({
        model: "chatgpt",
        document: await fetch(
          "https://shopping-be.wrtn.ai/editor/swagger.json",
        ).then((r) => r.json()),
      }),
      connection: {
        host: "https://shopping-be.wrtn.ai",
        headers: {
          Authorization: "Bearer *****",
        },
      },
    },
    {
      protocol: "class",
      name: "counselor",
      application: typia.llm.application<ShoppingCounselor, "chatgpt">(),
      execute: new ShoppingCounselor(),
    },
    {
      protocol: "class",
      name: "policy",
      application: typia.llm.application<ShoppingPolicy, "chatgpt">(),
      execute: new ShoppingPolicy(),
    },
    {
      protocol: "class",
      name: "rag",
      application: typia.llm.application<ShoppingSearchRag, "chatgpt">(),
      execute: new ShoppingSearchRag(),
    },
  ],
});
await agent.conversate("I want to buy a MacBook Pro");