

React Router v6 的新特性
React Router v6 目前仍处于 alpha 测试阶段,但 React Router 即将推出许多新功能。正如您所知,React 中最常用的路由包有两个:Reach Router 和 React Router。
React Router 和 Reach Router 将会合并,React Router 将成为新的单一数据源。
React Router v6 将向我们展示一些最受期待的功能,例如嵌套路由、相对链接、相对路由、自动路由排名等等。
安装 React Router v6
运行以下命令,在您的项目中安装 React Router v6。
npm install react-router@6 react-router-dom@6
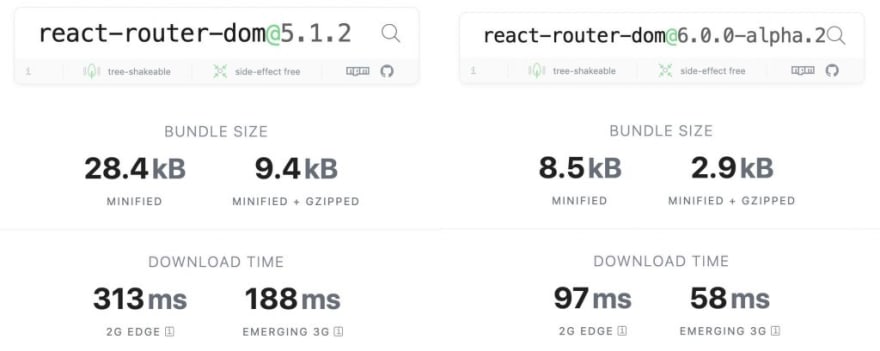
尺寸减少了70%。
我们能注意到的最大变化是,与之前的版本(即 5.1 版本)相比,新版本的软件包大小要小。
5.1 版本的大小为9.4kb,但新的 React Route v6 的大小仅为2.9kb。
嵌套路由
得益于 React Router v6,我们现在可以轻松使用嵌套路由。以前,创建嵌套路由非常混乱,管理起来也很复杂。我们通常需要在组件中添加手动代码来处理不同的嵌套路由。
由于嵌套关系,现在情况变得相对了。
现在,我们可以在路由组件中使用元素属性(element prop)来代替组件属性(component prop )。
function App() {
  return (
    <Routes>
      <Route path="invoices" element={<Invoices />}>
        <Route path=":invoiceId" element={<IndividualInvoice />} />
        <Route path="sent" element={<SentInvoices />} />
      </Route>
    </Routes>
  );
}
相对链接
与此类似<Route path>,<Link to>它也相对于路由的层级结构。如果省略开头的/,它将相对于它所在的路由路径。
import { Routes, Route, Link, Outlet } from 'react-router-dom';

function Home() {
  return <h1>Home</h1>;
}

function Dashboard() {
  return (
    <div>
      <h1>Dashboard</h1>
      <nav>
        <Link to="invoices">Invoices</Link>{" "}
        <Link to="team">Team</Link>
      </nav>
      <hr />
      <Outlet />
    </div>
  );
}

function Invoices() {
  return <h1>Invoices</h1>;
}

function Team() {
  return <h1>Team</h1>;
}

function App() {
  return (
    <Routes>
      <Route path="/" element={<Home />} />
      <Route path="dashboard" element={<Dashboard />}>
        <Route path="invoices" element={<Invoices />} />
        <Route path="team" element={<Team />} />
      </Route>
    </Routes>
  );
}
多条路线
以前,我们的 React 应用只能使用一次路由。但现在,我们可以在 React 应用中使用多个路由,这将帮助我们基于不同的路由管理多个应用逻辑。
import React from 'react';
import { Routes, Route } from 'react-router-dom';

function Dashboard() {
  return (
    <div>
      <p>Look, more routes!</p>
      <Routes>
        <Route path="/" element={<DashboardGraphs />} />
        <Route path="invoices" element={<InvoiceList />} />
      </Routes>
    </div>
  );
}

function App() {
  return (
    <Routes>
      <Route path="/" element={<Home />} />
      <Route path="dashboard/*" element={<Dashboard />} />
    </Routes>
  );
}
交换机已替换为路由
<Switch>被替换为<Routes>。借助这个新的 API,我们可以在一个地方定义所有路由,并实现自动路由排名以及相对路由和链接。
import React from 'react';
import ReactDOM from 'react-dom';
import {
  BrowserRouter as Router,
  Routes,
  Route
} from 'react-router-dom';

function App() {
  return (
    <div>
      <h1>Welcome</h1>
      <Routes>
        <Route path="/" element={<Home />} />
        <Route path="about" element={<About />} />
      </Routes>
    </div>
  );
}

ReactDOM.render((
  <Router>
    <App />
  </Router>
), document.getElementById('app'));
使用 useRoutes 而不是 react-router-config
不再需要 react-router-config 包了。之前我们用这个包把所有路由都写成一个对象,但现在我们可以使用 useRoutes hook 来实现同样的功能,而且还有一些改进。
例子
function App() {
  let element = useRoutes([
    // These are the same as the props you provide to <Route>
    { path: '/', element: <Home /> },
    { path: 'dashboard', element: <Dashboard /> },
    { path: 'invoices',
      element: <Invoices />,
      // Nested routes use a children property, which is also
      // the same as <Route>
      children: [
        { path: ':id', element: <Invoice /> },
        { path: 'sent', element: <SentInvoices /> }
      ]
    },
    // Redirects use a redirectTo property to
    { path: 'home', redirectTo: '/' },
    // Not found routes work as you'd expect
    { path: '*', element: <NotFound /> }
  ]);

  // The returned element will render the entire element
  // hierarchy with all the appropriate context it needs
  return element;
}
使用 useNavigate 而不是 useHistory
得益于 React Router v6,我们可以使用 useNavigate hook 轻松处理重定向逻辑。
useHistory 已成为历史。它已被 React 的、支持 Suspense 的 navigate API 所取代。从现在开始,您可以使用 useNavigate 进行导航。它同时提供了命令式和声明式两种方式。
例子
import { Navigate, useNavigate } from 'react-router-dom';

function Declarative() {
  return <Navigate to="/home" replace state={state} />;
}

function Imperative() {
  let navigate = useNavigate();
  function handleClick() {
    navigate('/home')
  }
  return (
    <div>
      <button onClick={handleClick}>go home</button>
    </div>
  );
}
希望你现在已经了解了 React Router。
注:撰写本文时使用的是 React Router v6.0.0-alpha.2。
请点击这里查看 React Router 的完整指南。
欢迎访问我的个人博客:https://blogreact.com/
文章来源:https://dev.to/narendersaini32/what-s-new-in-react-router-v6-2g8g