Android Vitals - 深入探索冷启动🥶
Activity.startActivity()
盯着起跑窗口👀
分叉的受精卵🍴
一款应用诞生了✨
应用程序操控
早期初始化
结论
题图:罗曼·盖伊的《冰与火之歌》 。
本系列博客专注于生产环境中 Android 应用的稳定性和性能监控。上周,我写了一篇关于在Android Vitals 中测量时间的文章——现在几点了?
在接下来的几篇博文中,我将探讨如何监控冷启动。根据应用程序启动时间文档:
冷启动是指应用程序从头开始运行:在此之前,系统进程尚未创建该应用程序的进程。冷启动通常发生在以下情况下:应用程序自设备启动以来首次启动,或自系统终止该应用程序以来首次启动。
冷启动时,系统有 3 个任务:
- 正在加载并启动应用程序。
- 显示启动窗口。
- 创建应用程序流程。
本文将深入探讨冷启动的开始过程,从点击启动器图标到创建应用程序进程。

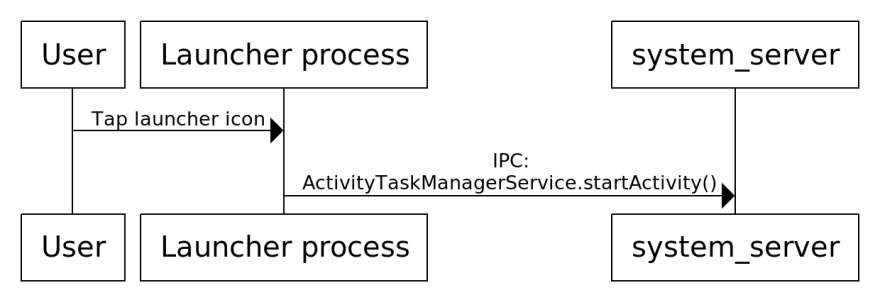
使用WebSequenceDiagram创建的图表。
Activity.startActivity()
当用户点击启动器图标时,启动器应用程序进程会调用Activity.startActivity(),该函数会委托给Instrumentation.execStartActivity():
public class Instrumentation {

  public ActivityResult execStartActivity(...) {
    ...
    ActivityTaskManager.getService()
        .startActivity(...);
  }
}
启动器应用程序进程随后会向进程内的 ActivityTaskManagerService.startActivity() 发起进程间通信(IPC)调用。该进程承载着大部分系统服务。system_serversystem_server
盯着起跑窗口👀
在创建新的应用程序进程之前,该进程会通过PhoneWindowManager.addSplashScreen()system_server创建一个启动窗口:
public class PhoneWindowManager implements WindowManagerPolicy {

  public StartingSurface addSplashScreen(...) {
    ...
    PhoneWindow win = new PhoneWindow(context);
    win.setIsStartingWindow(true);
    win.setType(TYPE_APPLICATION_STARTING);
    win.setTitle(label);
    win.setDefaultIcon(icon);
    win.setDefaultLogo(logo);
    win.setLayout(MATCH_PARENT, MATCH_PARENT);

    addSplashscreenContent(win, context);

    WindowManager wm = (WindowManager) context.getSystemService(
      WINDOW_SERVICE
    );
    View view = win.getDecorView();
    wm.addView(view, params);
    ...
  }

  private void addSplashscreenContent(PhoneWindow win,
      Context ctx) {
    TypedArray a = ctx.obtainStyledAttributes(R.styleable.Window);
    int resId = a.getResourceId(
      R.styleable.Window_windowSplashscreenContent,
      0
    );
    a.recycle();
    Drawable drawable = ctx.getDrawable(resId);
    View v = new View(ctx);
    v.setBackground(drawable);
    win.setContentView(v);
  }
}
启动窗口是指用户在应用进程启动期间(即冷启动完成之前)看到的内容。用户可能会长时间盯着启动窗口,所以务必确保它看起来美观大方😎。

启动窗口的内容是从已启动活动的windowSplashscreenContent和windowBackground可绘制对象加载的。要了解更多信息,请查看“Android 应用启动美化指南”。

如果用户从“最近使用”屏幕而不是点击启动器图标来恢复活动,则该system_server进程会调用TaskSnapshotSurface.create()来创建一个起始窗口,该窗口会绘制活动的已保存快照。
启动窗口显示后,system_server进程即可启动应用程序进程,并调用ZygoteProcess.startViaZygote():
public class ZygoteProcess {
  private Process.ProcessStartResult startViaZygote(...) {
    ArrayList<String> argsForZygote = new ArrayList<>();
    argsForZygote.add("--runtime-args");
    argsForZygote.add("--setuid=" + uid);
    argsForZygote.add("--setgid=" + gid);
    argsForZygote.add("--runtime-flags=" + runtimeFlags);
    ...
    return zygoteSendArgsAndGetResult(openZygoteSocketIfNeeded(abi),
                                          zygotePolicyFlags,
                                          argsForZygote);
  }
}
ZygoteProcess.zygoteSendArgsAndGetResult()通过套接字将起始参数发送到Zygote 进程。
分叉的受精卵🍴
根据 Android内存管理文档:
每个应用程序进程都是从一个名为 Zygote 的现有进程派生而来的。Zygote 进程在系统启动时启动,并加载通用框架代码和资源(例如活动主题)。要启动一个新的应用程序进程,系统会派生 Zygote 进程,然后在新的进程中加载并运行应用程序的代码。这种方法使得分配给框架代码和资源的大部分 RAM 页面可以在所有应用程序进程之间共享。
系统启动时,Zygote 进程启动并调用ZygoteInit.main():
public class ZygoteInit {

  public static void main(String argv[]) {
    ...
    if (!enableLazyPreload) {
        preload(bootTimingsTraceLog);
    }
    // The select loop returns early in the child process after
    // a fork and loops forever in the zygote.
    caller = zygoteServer.runSelectLoop(abiList);
    // We're in the child process and have exited the
    // select loop. Proceed to execute the command.
    if (caller != null) {
      caller.run();
    }
  }

  static void preload(TimingsTraceLog bootTimingsTraceLog) {
    preloadClasses();
    cacheNonBootClasspathClassLoaders();
    preloadResources();
    nativePreloadAppProcessHALs();
    maybePreloadGraphicsDriver();
    preloadSharedLibraries();
    preloadTextResources();
    WebViewFactory.prepareWebViewInZygote();
    warmUpJcaProviders();
  }
}
如您所见,ZygoteInit.main()执行了 2 项重要操作:
- 它会预加载 Android 框架类和资源、共享库、图形驱动程序等。这种预加载不仅可以节省内存,还可以缩短启动时间。
- 然后它调用ZygoteServer.runSelectLoop(),该函数打开一个套接字并等待。
当在该套接字上收到 fork 命令时,ZygoteConnection.processOneCommand()通过ZygoteArguments.parseArgs()解析参数,并调用Zygote.forkAndSpecialize():
public final class Zygote {

  public static int forkAndSpecialize(...) {
    ZygoteHooks.preFork();

    int pid = nativeForkAndSpecialize(...);

    // Set the Java Language thread priority to the default value.
    Thread.currentThread().setPriority(Thread.NORM_PRIORITY);

    ZygoteHooks.postForkCommon();
    return pid;
  }
}

注意:Android 10 新增了对一种名为“未专用应用进程 ( USAP )”的优化的支持,它包含一个等待专用化的分支 Zygote 池。这种优化可以略微加快启动速度,但会占用更多内存(默认情况下已关闭)。Android 11 搭载了IORap,性能更佳。
一款应用诞生了✨
子进程 fork 后,会运行RuntimeInit.commonInit()
,该函数会安装默认的 UncaughtExceptionHandler。然后,子进程会运行ActivityThread.main():
public final class ActivityThread {

  public static void main(String[] args) {
    Looper.prepareMainLooper();

    ActivityThread thread = new ActivityThread();
    thread.attach(false, startSeq);

    Looper.loop();
  }

  final ApplicationThread mAppThread = new ApplicationThread();

  private void attach(boolean system, long startSeq) {
    if (!system) {
      IActivityManager mgr = ActivityManager.getService();
      mgr.attachApplication(mAppThread, startSeq);
    }
  }
}
这里有两个有趣的部分:
- ActivityThread.main()调用Looper.loop(),该循环会永远进行下去,等待新消息发布到其MessageQueue中。
- ActivityThread.attach()会向ActivityManagerService.attachApplication()发起 IPC 调用,
system_server以告知其应用程序的主线程已准备就绪🚀。

应用程序操控
在此system_server过程中,ActivityManagerService.attachApplication()会调用ActivityManagerService.attachApplicationLocked(),从而完成应用程序的设置:
public class ActivityManagerService extends IActivityManager.Stub {

  private boolean attachApplicationLocked(
      IApplicationThread thread, int pid, int callingUid,
      long startSeq) {
    thread.bindApplication(...);

    // See if the top visible activity is waiting to run
    //  in this process...
    mAtmInternal.attachApplication(...);

    // Find any services that should be running in this process...
    mServices.attachApplicationLocked(app, processName);

    // Check if a next-broadcast receiver is in this process...
    if (isPendingBroadcastProcessLocked(pid)) {
        sendPendingBroadcastsLocked(app);
    }
    return true;
  }
}
几个关键要点:
- 该进程向应用程序进程中的ActivityThread.bindApplication()
system_server发出 IPC 调用,该调用会安排在应用程序主线程上调用ActivityThread.handleBindApplication() 。 - 随后,该
system_server流程会立即安排启动任何待处理的活动、服务和广播接收器。 - ActivityThread.handleBindApplication()会加载 APK 并按以下顺序加载应用程序组件:
- 加载应用程序的AppComponentFactory子类并创建一个实例。
- 调用AppComponentFactory.instantiateClassLoader()。
- 调用AppComponentFactory.instantiateApplication()加载应用程序子类 Application 并创建一个实例。
- 对于每个已声明的ContentProvider,按优先级顺序调用AppComponentFactory.instantiateProvider()来加载其类并创建实例,然后调用ContentProvider.onCreate()。
- 调用Application.onCreate()。
- 应用程序开发者对ActivityThread.handleBindApplication()之前所花费的时间几乎没有影响,因此应用程序冷启动监控应该从这里开始。

早期初始化
如果您需要尽早运行代码,您有以下几种选择:
- 最早的钩子是在AppComponentFactory类加载时触发的。
- 在 application 标签中添加appComponentFactory 属性
AndroidManifest.xml。 - 如果您使用 AndroidX,则需要添加
tools:replace="android:appComponentFactory"并委托对AndroidX AppComponentFactory 的调用。 - 你可以在那里添加一个静态初始化器,并执行诸如存储时间戳之类的操作。
- 缺点:此功能仅适用于 Android P 及更高版本,并且您将无法访问上下文。
- 在 application 标签中添加appComponentFactory 属性
- 对于应用程序开发者来说,一个安全的早期钩子是Application.onCreate()。
- 对于库开发者来说,一个安全的早期钩子是`ContentProvider.onCreate()`。这个技巧由Doug Stevenson在《Firebase 如何在 Android 上初始化?》一文中推广开来。
- 一个新的 AndroidX应用启动库也采用了相同的提供程序技巧。其目标是只声明一个提供程序,而不是多个,因为每个声明的提供程序都会使应用启动速度降低几毫秒,并增加包管理器中 ApplicationInfo 对象的大小。
结论
我们首先对冷启动过程有了较为深入的了解:
现在我们确切地知道会发生什么了:
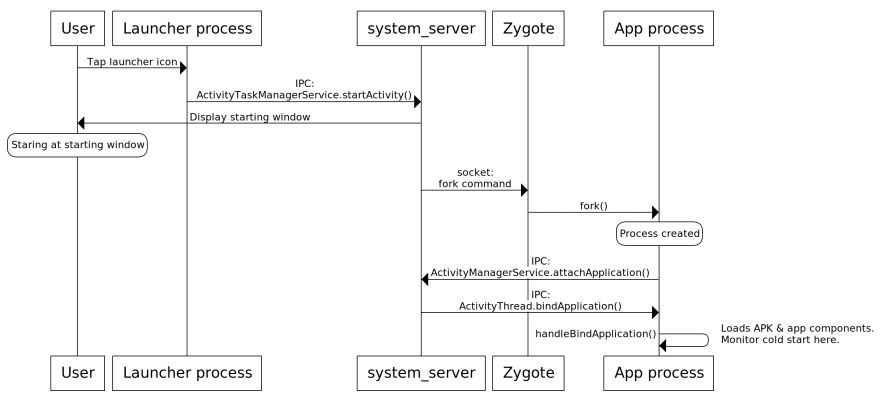
启动活动的用户体验始于用户触摸屏幕的那一刻,然而应用程序开发者对触摸屏幕之前所花费的时间几乎没有影响ActivityThread.handleBindApplication(),因此应用程序冷启动监控应该从这里开始。
这篇文章很长,而关于冷启动的内容还远未结束。敬请期待更多内容!
文章来源:https://dev.to/pyricau/android-vitals-diving-into-cold-start-waters-5hi6