React身份验证 - 保护和访问路由/端点
在之前的教程中,我们成功登录了用户账号。太棒了!
跳转至
我们知道,用户登录或身份验证的主要目的是为了授予其访问应用程序某些受限功能的权限。鉴于此,本文将重点介绍如何保护路由以及如何访问这些路由。让我们从创建两个路由开始。请跟随我的步骤……

创建路由
跳转至
创建两个(2)组件
- 在目录中创建一个新文件
src并将其命名为FreeComponent.js - 文件应包含以下内容:
import React from "react";

export default function FreeComponent() {
  return (
    <div>
      <h1 className="text-center">Free Component</h1>
    </div>
  );
}
-
接下来,创建另一个文件并将其命名为
AuthComponent.js -
文件应包含以下内容:
import React from "react";

export default function AuthComponent() {
  return (
    <div>
      <h1 className="text-center">Auth Component</h1>
    </div>
  );
}
设置路线
- 安装
react-router-dom
npm install --save react-router-dom
-
导航至
index.js文件 -
导入
BrowserRouter
import { BrowserRouter } from "react-router-dom";
<App>用另一个组件包裹该</BrowserRouter>组件。因此,index.js文件现在看起来像这样:
import React from "react";
import ReactDOM from "react-dom";
import "./index.css";
import App from "./App";
import reportWebVitals from "./reportWebVitals";
import "bootstrap/dist/css/bootstrap.min.css";
import { BrowserRouter } from "react-router-dom";

ReactDOM.render(
  <React.StrictMode>
    <BrowserRouter>
      <App />
    </BrowserRouter>
  </React.StrictMode>,
  document.getElementById("root")
);

// If you want to start measuring performance in your app, pass a function
// to log results (for example: reportWebVitals(console.log))
// or send to an analytics endpoint. Learn more: https://bit.ly/CRA-vitals
reportWebVitals();
- 现在导航到该
App.js文件 - 导入导入
Switch,并Route在文件顶部
import { Switch, Route } from "react-router-dom";
Account用以下代码替换组件
     <Switch>
        <Route exact path="/" component={Account} />
        <Route exact path="/free" component={FreeComponent} />
        <Route exact path="/auth" component={AuthComponent} />
      </Switch>
你会注意到没有任何变化。这是因为在路由时,Account 组件仍然是我们的默认组件。但是,我们现在可以访问多个路由。
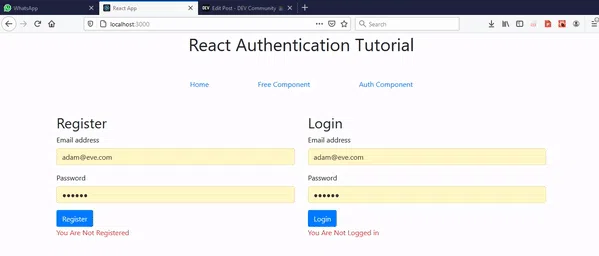
- 在标题下方添加用于导航的链接,
React Authentication Tutorial如下所示:
     <Row>
        <Col className="text-center">
          <h1>React Authentication Tutorial</h1>

          <section id="navigation">
            <a href="/">Home</a>
            <a href="/free">Free Component</a>
            <a href="/auth">Auth Component</a>
          </section>
        </Col>
      </Row>
- 导航至此
index.css处以添加以下样式,以达到美观目的
#navigation{
  margin-top: 5%;
  margin-bottom: 5%;
}

#navigation a{
  margin-right: 10%;
}

#navigation a:last-child{
  margin-right: 0;
}
保护路线
跳转至:
路由设置完成后,我们现在需要保护其中一条路由(即主路由AuthComponent)。为此,我们需要创建一个新组件,该组件将帮助我们检查是否满足特定条件,然后再允许用户访问该路由。
我们将在自身案例中使用的条件是我们在开发过程中生成的令牌login。因此,在创建此ProtectedRoute组件之前,让我们先从组件中获取令牌Login,并使其在我们的整个应用程序中可用。
获取令牌
- 安装
universal-cookie。这是一个 cookie 包,可帮助我们在应用程序之间共享值或变量。
npm i universal-cookie -s
-
导航至
Login.js文件 -
universal-cookie在顶部导入并按如下方式初始化:
import Cookies from "universal-cookie";
const cookies = new Cookies();
then接下来,在axios 调用代码块中添加以下代码
       // set the cookie
        cookies.set("TOKEN", result.data.token, {
          path: "/",
        });
上面的代码中,我们使用 `setCookie` 方法设置 cookie cookie.set()。它接受三个参数:Namecookie 的名称("TOKEN"可以是任何名称,只需记住即可)、Valuecookie 的路径(result.data.token)以及我们希望 cookie 生效的页面或路由(将路径设置为 `true`path会使"/"cookie 在所有页面中都可用)。希望这能解释清楚。
- 在 cookie.set() 下方,添加以下代码行,以便在登录成功后将用户重定向到 authComponent。
        // redirect user to the auth page
        window.location.href = "/auth";
如果您勾选“登录”选项,它应该会将您重定向到身份验证页面。
创建用于保护路由的组件
由于我们已将令牌在整个应用程序中共享,因此现在我们可以在所有已创建或待创建的组件或页面上访问它。让我们继续……
-
创建一个名为“
ProtectedRoutes.js -
将以下代码输入到文件中
import React from "react";
import { Route, Redirect } from "react-router-dom";
import Cookies from "universal-cookie";
const cookies = new Cookies();

// receives component and any other props represented by ...rest
export default function ProtectedRoutes({ component: Component, ...rest }) {
  return (

    // this route takes other route assigned to it from the App.js and return the same route if condition is met
    <Route
      {...rest}
      render={(props) => {
        // get cookie from browser if logged in
        const token = cookies.get("TOKEN");

        // return route if there is a valid token set in the cookie
        if (token) {
          return <Component {...props} />;
        } else {
          // return the user to the landing page if there is no valid token set
          return (
            <Redirect
              to={{
                pathname: "/",
                state: {
                  // sets the location a user was about to assess before being redirected to login
                  from: props.location,
                },
              }}
            />
          );
        }
      }}
    />
  );
}
等等!等等!!这个
ProtectedRoutes组件到底发生了什么?
首先,这更像是一个模板。真正改变的是ProtectedRoutes组件所基于的条件。在我们的例子中,它基于token登录时从 cookie 中接收到的信息。因此,在其他应用程序中,条件可能有所不同。
现在,这里的情况是这样的:ProtectedRoutes组件接收到一个请求component后,会决定是否将组件返回给用户。为了做出这个决定,它会检查tokencookie 中是否存在有效的令牌(登录成功后会设置令牌)。如果令牌有效undefined,则会重定向到默认页面path(在本例中是登录页面)。
代码中的注释也会帮助你理解组件的运行机制。请耐心阅读……
使用该ProtectedRoutes组件
现在让我们使用该ProtectedRoutes组件来保护我们的身份验证组件,因为我们希望它只能被已认证的用户访问。
-
导航至
App.js文件 -
导入
ProtectedRoutes组件
import ProtectedRoutes from "./ProtectedRoutes";
- 替换
<Route exact path="/auth" component={AuthComponent} />为<ProtectedRoutes path="/auth" component={AuthComponent} />
我
App.js目前的状况是这样的:
import { Switch, Route } from "react-router-dom";
import { Container, Col, Row } from "react-bootstrap";
import Account from "./Account";
import FreeComponent from "./FreeComponent";
import AuthComponent from "./AuthComponent";
import ProtectedRoutes from "./ProtectedRoutes";

function App() {
  return (
    <Container>
      <Row>
        <Col className="text-center">
          <h1>React Authentication Tutorial</h1>

          <section id="navigation">
            <a href="/">Home</a>
            <a href="/free">Free Component</a>
            <a href="/auth">Auth Component</a>
          </section>
        </Col>
      </Row>

      {/* create routes here */}
      <Switch>
        <Route exact path="/" component={Account} />
        <Route exact path="/free" component={FreeComponent} />
        <ProtectedRoutes path="/auth" component={AuthComponent} />
      </Switch>
    </Container>
  );
}

export default App;
现在尝试在
http://localhost:3000/auth不登录的情况下访问,你会发现它会将你重定向到首页。这很神奇,对吧?
请看我下面的照片
使用useEffectHook进行 API 调用
跳转至:
我们在创建注册和登录页面时已经了解了如何使用 Axios 进行 API 调用。我想利用本节清楚地说明如何向不同类型的端点进行 API 调用。
我们将使用hook 调用本教程中创建的两个 API 端点useEffect。该useEffecthook 对 React 的作用functional component与componentDidMount()对 React 的作用相同class component。
-
免费端点:
https://nodejs-mongodb-auth-app.herokuapp.com/free-endpoint -
受保护的端点:
https://nodejs-mongodb-auth-app.herokuapp.com/auth-endpoint
调用免费端点的 API
- 导航至
FreeComponent.js文件 - 导入
useEffect并useState调整您的react导入行,如下所示
import React, { useEffect, useState, } from "react";
- 接下来,导入 axios
import axios from "axios";
- 设置初始状态
message如下:
const [message, setMessage] = useState("");
- 在该语句上方,像这样
return声明函数useEffect
  useEffect(() => {

  }, [])
空数组(即空数组[])对于避免 API 调用完成后继续执行非常重要。
- 在该函数中,设置以下配置
  useEffect(() => {
    // set configurations for the API call here
    const configuration = {
      method: "get",
      url: "https://nodejs-mongodb-auth-app.herokuapp.com/free-endpoint",
    };
  }, [])
- 接下来,使用 axios 发起 API 调用,如下所示:
  // useEffect automatically executes once the page is fully loaded
  useEffect(() => {
    // set configurations for the API call here
    const configuration = {
      method: "get",
      url: "https://nodejs-mongodb-auth-app.herokuapp.com/free-endpoint",
    };

    // make the API call
    axios(configuration)
      .then((result) => {
        // assign the message in our result to the message we initialized above
        setMessage(result.data.message);
      })
      .catch((error) => {
        error = new Error();
      });
  }, [])
setMessage(result.data.message);将结果(即 result.data.message)中的消息赋值给我们上面初始化的消息。现在我们可以message在组件中显示它了。
我在上一篇文章中已经展示了如何在控制台中检查 API 调用的结果。你可以用这种方法来追踪我们是如何走到这一步的result.data.message。
message要将我们得到的结果显示在FreeComponent页面上,请在下方输入以下代码<h1 className="text-center">Free Component</h1>行。
<h3 className="text-center text-danger">{message}</h3>
message由于存在花括号,React 会将 `<value>` 读取为变量。如果message`<value>` 没有花括号,React 则会将其读取为普通文本。
这是我
FreeComponent.js目前的文件:
import React, { useEffect, useState } from "react";
import axios from "axios";

export default function FreeComponent() {
  // set an initial state for the message we will receive after the API call
  const [message, setMessage] = useState("");

  // useEffect automatically executes once the page is fully loaded
  useEffect(() => {
    // set configurations for the API call here
    const configuration = {
      method: "get",
      url: "https://nodejs-mongodb-auth-app.herokuapp.com/free-endpoint",
    };

    // make the API call
    axios(configuration)
      .then((result) => {
        // assign the message in our result to the message we initialized above
        setMessage(result.data.message);
      })
      .catch((error) => {
        error = new Error();
      });
  }, []);

  return (
    <div>
      <h1 className="text-center">Free Component</h1>

      {/* displaying our message from our API call */}
      <h3 className="text-center text-danger">{message}</h3>
    </div>
  );
}
- 我
FreeComponent当前的页面:

调用受保护端点的 API
- 导航至
AuthComponent.js文件 - 导入
useEffect并useState调整您的react导入行,如下所示
import React, { useEffect, useState, } from "react";
- 接下来,导入 axios
import axios from "axios";
- 按如下方式导入并初始化 universal-cookie:
import Cookies from "universal-cookie";
const cookies = new Cookies();
- 获取登录时生成的令牌,方法如下:
const token = cookies.get("TOKEN");
- 设置初始状态
message如下:
const [message, setMessage] = useState("");
- 在该语句上方,像这样
return声明函数useEffect
  useEffect(() => {

  }, [])
空数组(即空数组[])对于避免 API 调用完成后继续执行非常重要。
- 在该函数中,设置以下配置
  useEffect(() => {
    // set configurations for the API call here
    const configuration = {
      method: "get",
      url: "https://nodejs-mongodb-auth-app.herokuapp.com/auth-endpoint",
      headers: {
        Authorization: `Bearer ${token}`,
      },
    };
  }, [])
请注意,此配置包含一个 `<protected>` 标签header。这是与 `<protected>` 配置的主要区别free-endpoint。这是因为 ` auth-enpoint<protected>` 是一个受保护的端点,只能通过本文Authorization token中指定的`<protected>` 标签访问。因此,我们需要在 `<protected>` 标头中指定 `<protected>`标签。如果没有此标头,API 调用将返回错误。Authorization token403:Forbidden
- 接下来,我们像这样进行 API 调用。
// useEffect automatically executes once the page is fully loaded
  useEffect(() => {
    // set configurations for the API call here
    const configuration = {
      method: "get",
      url: "https://nodejs-mongodb-auth-app.herokuapp.com/auth-endpoint",
      headers: {
        Authorization: `Bearer ${token}`,
      },
    };

    // make the API call
    axios(configuration)
      .then((result) => {
        // assign the message in our result to the message we initialized above
        setMessage(result.data.message);
      })
      .catch((error) => {
        error = new Error();
      });
  }, []);
message要将我们得到的结果显示在AuthComponent页面上,请在下方输入以下代码<h1 className="text-center">Auth Component</h1>行。
<h3 className="text-center text-danger">{message}</h3>
- 我
AuthComponent当前的页面:

注销功能
最后,浏览完authComponent页面后我们需要注销账号。这是为了安全起见。为此,请在authComponent页面中添加一个注销按钮。
- 按如下方式导入 Button 组件:
import { Button } from "react-bootstrap";
- 请在文本下方添加以下代码。
<Button type="submit" variant="danger">Logout</Button>
- 我们希望在点击按钮时触发注销功能,因此请将其添加
onClick={() => logout()}到按钮选项中。这样,我们的按钮看起来会像这样:
{/* logout */}
<Button type="submit" variant="danger" onClick={() => logout()}>
   Logout
</Button>
- 现在我们来创建这个函数。在 return 语句上方输入以下代码。
  // logout
  const logout = () => {

  }
- 在注销函数中添加以下代码,以移除或销毁登录期间生成的令牌。
// logout
  const logout = () => {
    // destroy the cookie
    cookies.remove("TOKEN", { path: "/" });
  }
- 使用以下代码将用户重定向到目标页面。
// logout
  const logout = () => {
    // destroy the cookie
    cookies.remove("TOKEN", { path: "/" });
    // redirect user to the landing page
    window.location.href = "/";
  }
- 将其添加
className="text-center"到父元素div中AuthComponent。这样可以使整个页面居中显示。现在您可以从其他地方移除它。我的AuthComponent.js文件现在包含以下内容:
import React, { useEffect, useState } from "react";
import { Button } from "react-bootstrap";
import axios from "axios";
import Cookies from "universal-cookie";
const cookies = new Cookies();

// get token generated on login
const token = cookies.get("TOKEN");

export default function AuthComponent() {
  // set an initial state for the message we will receive after the API call
  const [message, setMessage] = useState("");

  // useEffect automatically executes once the page is fully loaded
  useEffect(() => {
    // set configurations for the API call here
    const configuration = {
      method: "get",
      url: "https://nodejs-mongodb-auth-app.herokuapp.com/auth-endpoint",
      headers: {
        Authorization: `Bearer ${token}`,
      },
    };

    // make the API call
    axios(configuration)
      .then((result) => {
        // assign the message in our result to the message we initialized above
        setMessage(result.data.message);
      })
      .catch((error) => {
        error = new Error();
      });
  }, []);

  // logout
  const logout = () => {
    // destroy the cookie
    cookies.remove("TOKEN", { path: "/" });
    // redirect user to the landing page
    window.location.href = "/";
  }

  return (
    <div className="text-center">
      <h1>Auth Component</h1>

      {/* displaying our message from our API call */}
      <h3 className="text-danger">{message}</h3>

      {/* logout */}
      <Button type="submit" variant="danger" onClick={() => logout()}>
        Logout
      </Button>
    </div>
  );
}
我的应用程序运行情况如下所示。

React 身份验证就介绍到这里啦!!!
恭喜!您现在是 React 身份验证专家了!!!

结论
本系列文章从如何注册用户开始。上一篇文章我们讨论了如何登录用户。在本文中,我们了解了如何保护路由以及如何访问它们。我们还了解了如何根据端点类型(免费或受保护)进行 API 调用。最后,我们学习了如何在登录后注销。
那确实很多。毫无疑问。但是,它帮助我们涵盖了很多主题,例如 hooks、cookie、axios 等等。所以,是的!这很值得。
所有代码都在这里
请分享,帮助他人。感谢阅读。
我保证很快就会有更多内容与大家见面。
文章来源:https://dev.to/ebereplenty/react-authentication-protecting-and-accessing-routes-endpoints-96h