Kubernetes:它复活了!
对于那些没有耐心的人来说
负载均衡
我最近对Kubernetes产生了兴趣,白天从事与 Web 无关的工作,晚上则利用业余时间学习相关知识。为了快速了解和体验 Kubernetes 的实际运行情况,我决定编写一些服务来触发和观察 Kubernetes 的特定行为。我首先实现了负载均衡、服务自愈以及基于 CPU 利用率的自动扩展。
在这篇博文中,我将解释每个服务的工作原理以及 Kubernetes 在实际应用中的行为。请注意,这是我第一次使用 Go 语言编写代码,因此我无法保证代码质量良好,或者没有违反我尚未了解的 Go 语言规范和最佳实践。:-)
本文面向已经搭建并运行 Kubernetes 集群的用户。您应该了解 Pod、副本集和 Deployment 的概念,并且能够构建 Docker 容器和使用 Docker Registry。
如果您还没有运行 Kubernetes 集群,我推荐您阅读 Scott Hanselman 的著作《Kubernetes: Up & Running》和/或博文《如何使用 ARM Raspberry Pi 构建 Kubernetes 集群》。如果您不了解 Kubernetes 是什么或它是如何工作的,您可以阅读giantswarm.io网站的 Puja Abbassi 撰写的优秀博文系列《理解 Kubernetes 基本概念》。
对于那些没有耐心的人来说
在集群上运行 kube-alive 之前,请确保您已具备以下条件:
- kubectl 已安装并配置到正在运行的集群(检查“kubectl get nodes”是否至少列出一个处于“Ready”状态的节点)。
- 狂欢
- 您的集群运行在基于 amd64 或 ARM CPU 的 Linux 系统上。
如果您还没有启动并运行集群,我推荐您阅读 Scott Hanselman 前面提到的文章,了解如何在 Raspberry Pi 上启动集群,或者您可以使用Minikube在您的 PC 或 Mac 上运行本地集群。
如果您只想将 kube-alive 部署到集群并查看其运行情况,可以使用以下单个命令:
curl -sSL https://raw.githubusercontent.com/daniel-kun/kube-alive/master/deploy.sh | bash

Using 192.168.178.79 as the exposed IP to access kube-alive.
deployment "getip-deployment" created
service "getip" created
deployment "healthcheck-deployment" created
service "healthcheck" created
deployment "cpuhog-deployment" created
service "cpuhog" created
horizontalpodautoscaler "cpuhog-hpa" created
deployment "frontend-deployment" created
service "frontend" created

FINISHED!
You should now be able to access kube-alive at http://192.168.178.79/.
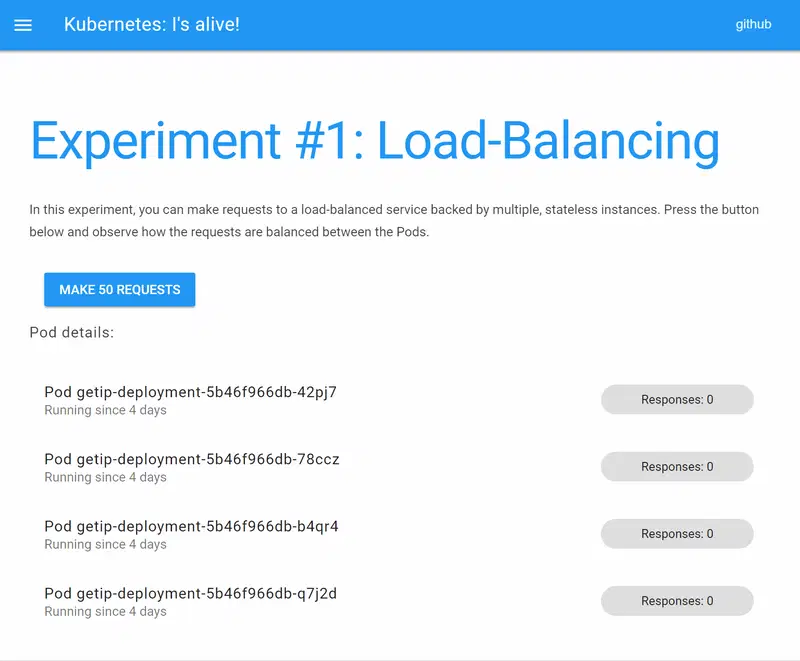
负载均衡
Kubernetes 最基本的功能是在多个同类型服务之间进行负载均衡。为了观察请求是由同一实例还是不同实例提供的,我决定让服务返回其宿主机的 IP 地址。要在 Kubernetes 中运行服务,你需要:a) 编写服务代码;b) 构建一个托管该服务的容器;c) 将容器推送到镜像仓库;d) 在 Kubernetes 中创建一个运行该容器的对象;最后 e) 使该服务可以从集群外部访问。
阶段 A:编写服务
那么让我们深入研究代码。我用 Go 编写了一个服务器,它在 8080 端口上运行,解析命令“ip a”的输出并返回容器的 IP 地址。
package main
import "fmt"
import "bufio"
import "os/exec"
import "log"
import "strings"
import "net/http"

/**
getip starts an HTTP server on 8080 that returns nothing but this container's IP address (the last one outputted by "ip a").
**/
func getIP() string {
    // Left out for brevity, see
https://raw.githubusercontent.com/daniel-kun/kube-alive/master/src/getip/main.go
}

func main() {
    http.HandleFunc("/", func(w http.ResponseWriter, r *http.Request) {
        fmt.Fprintf(w, getIP())
    })
    fmt.Printf("'getip' server starting, listening to 8080 on all interfaces.\n")
    http.ListenAndServe(":8080", nil)
}
第二阶段:建造集装箱
由于 Kubernetes 中运行的所有内容都必须是容器,所以我编写了一个 Dockerfile 来运行此服务:
FROM golang
COPY main.go /go/src/getip/main.go
RUN go install getip
ENTRYPOINT /go/bin/getip
这个 Dockerfile 很简单:它使用一个基于 golang 的容器,该容器已准备好编译和运行 Go 代码。然后,它将唯一的源代码文件 main.go 复制到容器中,并使用“go install”命令将其编译并安装到 /go/bin/ 目录下。
已安装的二进制文件 /go/bin/getip 被设置为入口点,因此当没有给 docker run 提供参数时,它会执行我们的服务。
您可以使用以下命令构建容器:
docker build .
请注意,命令末尾有一个“.”,这意味着在执行 docker build 之前,您必须先切换到 getip 源目录。
Docker 构建完成后,您将能够通过以下方式看到具有新生成的随机镜像 ID 的新容器:
docker images
容器只能在构建它的本地机器上运行。由于 Kubernetes 会在任何它认为合适的节点上运行此容器,因此必须确保容器在所有节点上都可用。这时,Docker Registry 就派上了用场,它本质上是一个远程 Docker 容器仓库,可以从所有节点访问。
阶段 C:将容器推送到注册表
我最初尝试搭建本地镜像仓库,虽然可行,但这种配置无法
跨集群移植。因此,我决定直接使用 Docker 自带的镜像仓库:https://hub.docker.com。要推送新构建的容器,首先需要在 Docker Hub 上注册,然后为容器添加仓库地址、所需的容器名称以及一个可选的标签。如果没有指定标签,则默认使用“latest”。
docker tag <your-repository>/getip <image id> # tag the docker image with your repository name and the service name, such as "getip"
docker login # enter your username and password of http://hub.docker.com now.
docker push <your-repository>/getip # and then push your container
现在任何人都可以(无需授权)拉取它,包括您的 Kubernetes 节点。
阶段 D:定义副本集
为了让 Kubernetes 知道应该将此容器作为服务运行,并运行此服务的多个实例,您应该使用副本集 (Replica Set)。我已将副本集封装到 Deployment 中,以便日后轻松升级服务:
apiVersion: apps/v1beta2
kind: Deployment
metadata:
  name: getip-deployment
  labels:
    app: getip
spec:
  replicas: 4
  selector:
    matchLabels:
      app: getip
  template:
    metadata:
      labels:
        app: getip
    spec:
      containers:
      - name: getip
        image: <your-repository>/getip
        ports:
        - containerPort: 8080
我将副本数设置为 4,这意味着 Kubernetes 会尽一切努力确保任何时候都只有 4 个实例在运行。但是,这并没有给我们提供一个连接到这些实例的统一 URL。我们将使用 Service 在这些实例之间进行负载均衡:
kind: Service
apiVersion: v1
metadata:
  name: getip
spec:
  selector:
    app: getip
  ports:
  - protocol: TCP
    port: 80
    targetPort: 8080
此服务提供一个负载均衡的单一 URL 来访问各个服务实例。在此过程中,它会将默认的 HTTP 端口 80 重映射到服务自身的端口 8080。该服务将可通过http://getip.svc.default.cluster访问,或者更简洁地,在任何运行的 Kubernetes Pod 上,都可通过http://getip 访问。
但是,此服务只能从 Kubernetes 内部使用,而不能从集群“外部”使用。
阶段 E:发布服务
我决定构建自己的 nginx 容器来提供构成前端的静态 HTML 和 JavaScript 文件,并从特定的 IP 地址发布服务。
events {
    # empty
}
http {
    server {
        root /www/data;
        location / {
            # for the frontend SPA
        }
        # Forward traffic to <yourip>/getip to the getip service.
        location /getip {
              proxy_pass http://getip/;
        }
        # I have left out the other services like "cpuhog" and "healthcheck" here for brevity.
        # See their code on https://github.com/daniel-kun/kube-alive/

        # Allow WebSocket connections to the Kubernetes API:
        location /api {
              proxy_pass https://kubernetes.default/api;
              proxy_http_version 1.1;
              proxy_set_header Upgrade $http_upgrade;
              proxy_set_header Connection "Upgrade";
              proxy_set_header Authorization "Bearer %%SERVICE_ACCOUNT_TOKEN%%";
        }
    }
}
由此可见,nginx 期望 SPA 位于 /www/data/ 目录下,而该目录正是 Dockerfile 中 COPY 命令的目标位置。服务 getip 通过 Kubernetes DNS 访问,Kubernetes DNS 会自动将服务名称解析为其集群 IP 地址,进而对请求进行负载均衡,最终将请求分发到各个服务实例。第三个位置 /api 供前端用于接收正在运行的 Pod 信息。(目前,完整的 API 以完全管理员权限暴露,因此安全性极低——请仅在隔离环境中使用!我会在近期修复此问题。)
以下是前端服务的 Dockerfile:
FROM nginx
COPY nginx.conf /etc/nginx/
COPY index.html /www/data/
COPY output/main.js /www/data/output/main.js
COPY run_nginx_with_service_account.sh /kube-alive/
CMD /kube-alive/run_nginx_with_service_account.sh
shell 脚本run_nginx_with_service_account.sh将替换nginx.conf授权标头中的变量,以便使用 Kubernetes 服务帐户令牌,让 nginx 处理授权,这样前端就不必进行授权操作。
现在,我们准备将最后一块拼图拼上去:一个用于运行前端的副本集和一个用于向外部发布前端的服务。请注意,我再次将副本集封装到了一个部署中:
apiVersion: apps/v1beta2
kind: Deployment
metadata:
  name: frontend-deployment
  labels:
    app: frontend
spec:
  replicas: 1
  selector:
    matchLabels:
      app: frontend
  template:
    metadata:
      labels:
        app: frontend
    spec:
      containers:
      - name: frontend
        imagePullPolicy: Always
        image: <your-repository>/frontend_amd64
        ports:
        - containerPort: 80
---
kind: Service
apiVersion: v1
metadata:
  name: frontend
spec:
  selector:
    app: frontend
  externalIPs:
  - <put your external IP, e.g. of your cluster's master, here>
  ports:
  - protocol: TCP
    port: 80
    targetPort: 80
搞定!kubectl apply插入有效参数后externalIP,一切应该就能正常运行,可以开始使用 Kubernetes 负载均衡进行首次实验了。
连接到“kubectl”配置所针对的IP地址,应该会看到如下界面:
随后进行了更多实验。这些实验都遵循与 getip 相同的概念,您可以在这里查看它们的源代码和部署 YAML 文件:
自我疗愈
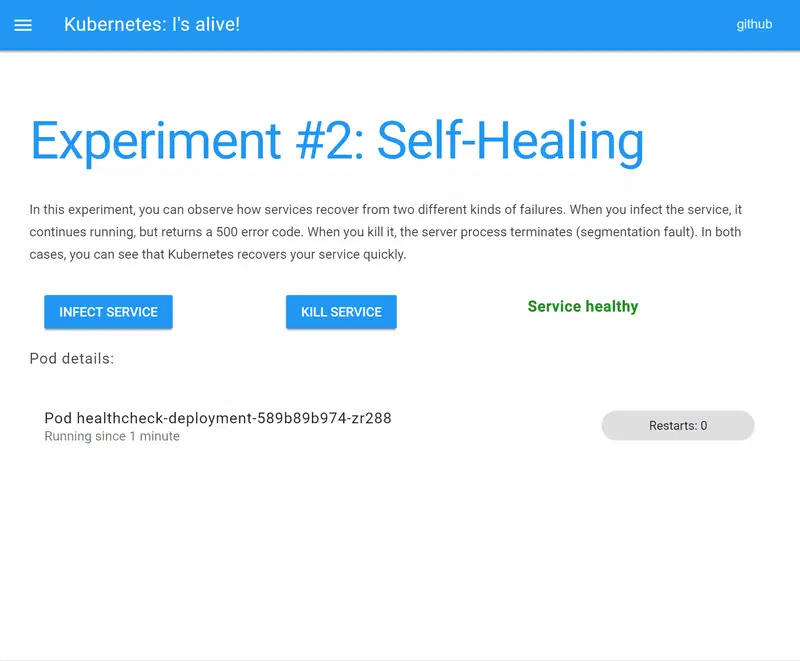
自愈实验的代码如下:
https://github.com/daniel-kun/kube-alive/tree/master/src/healthcheck
https://github.com/daniel-kun/kube-alive/blob/master/deploy/healthcheck.yml
滚动更新
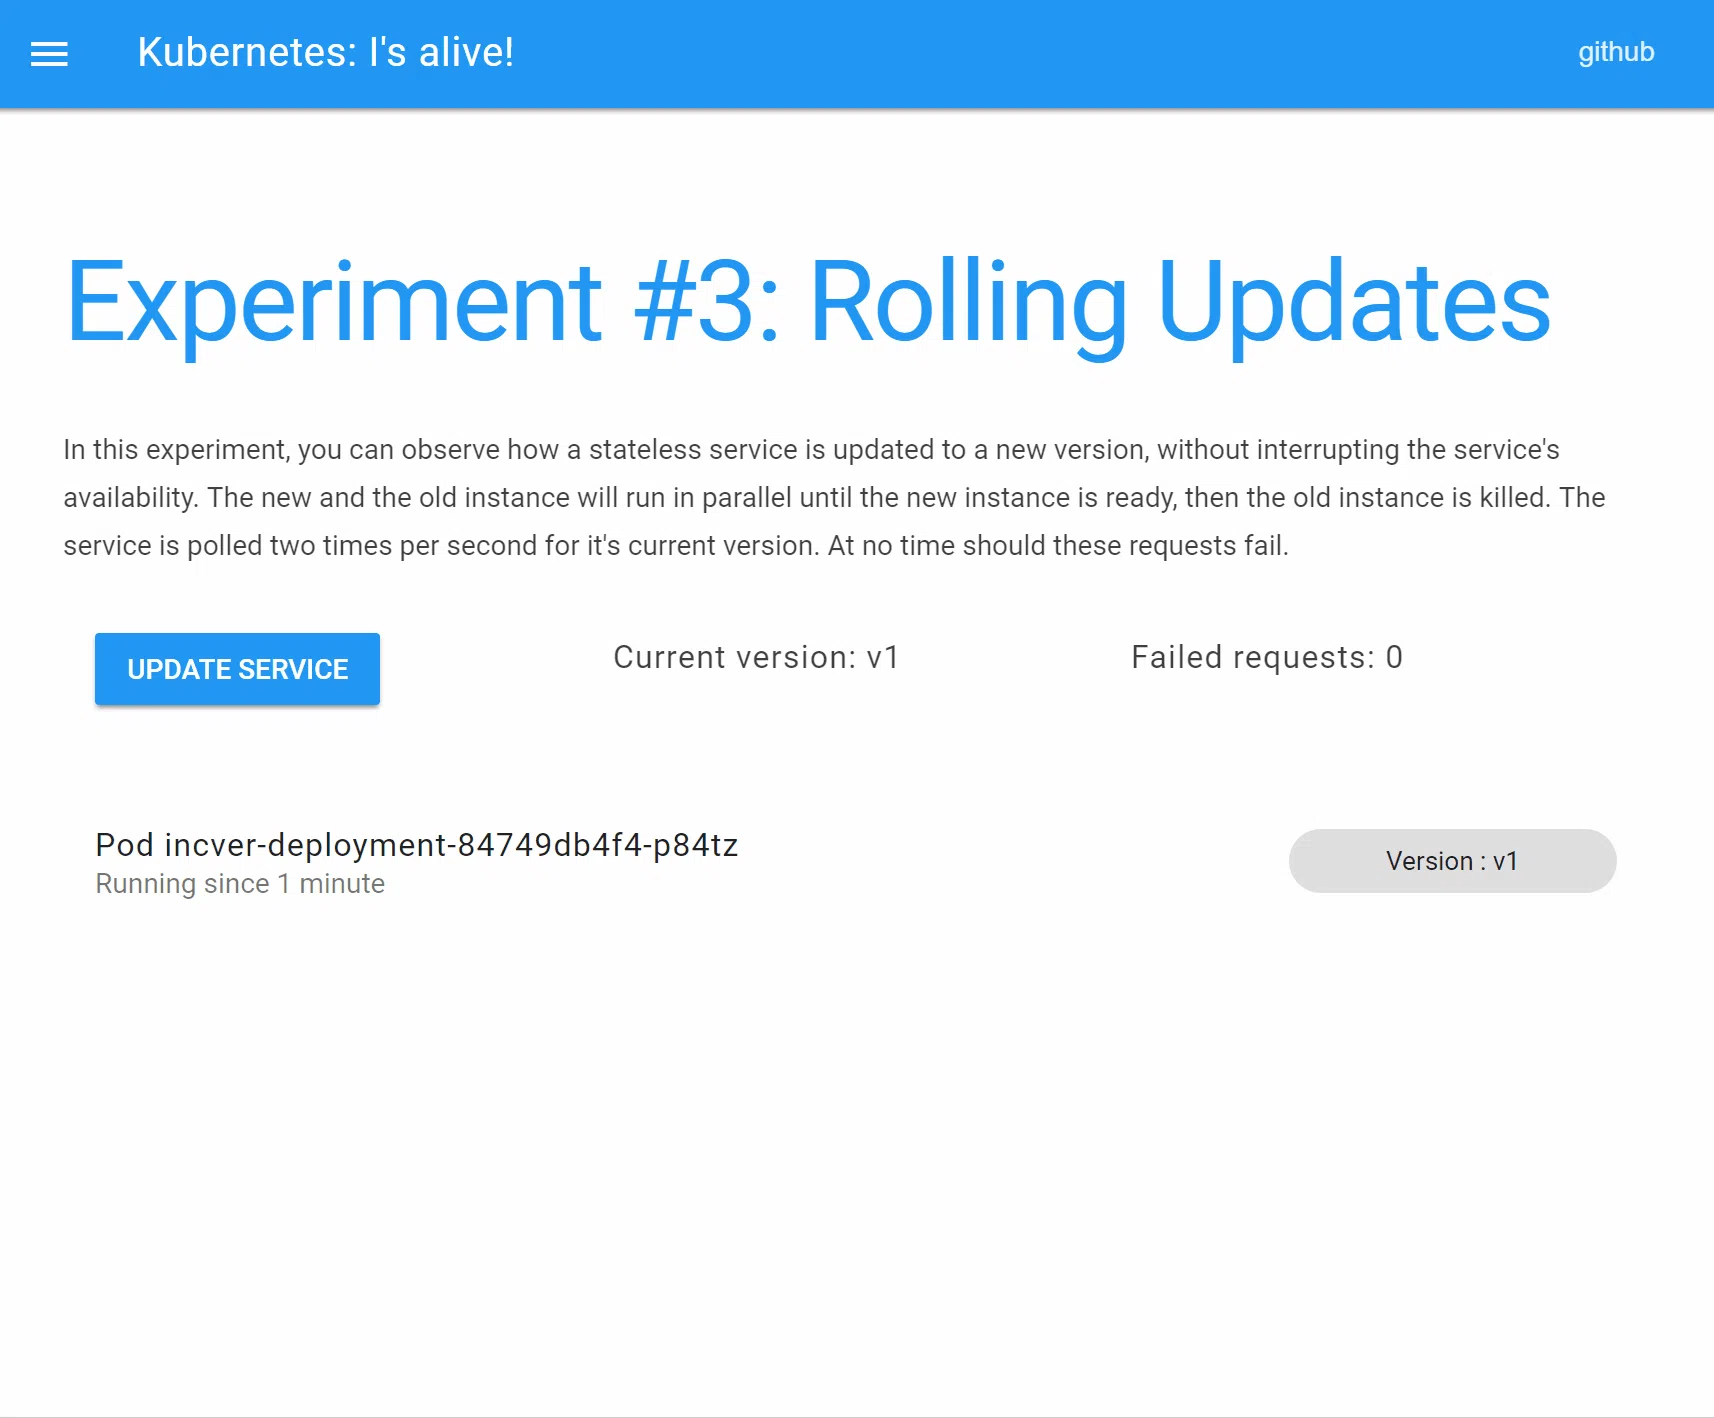
滚动更新实验的代码如下:
https://github.com/daniel-kun/kube-alive/tree/master/src/incver
https://github.com/daniel-kun/kube-alive/blob/master/deploy/incver.yml
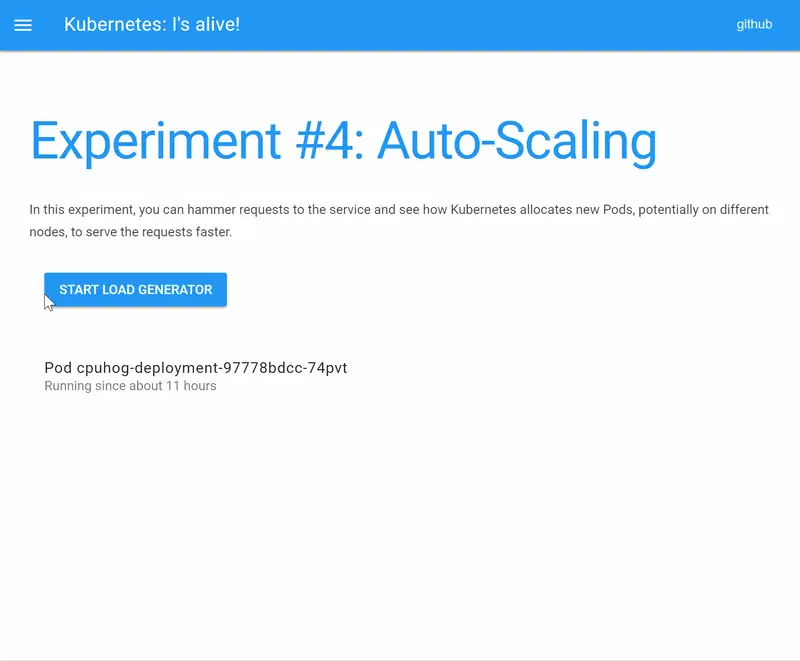
自动缩放(基于 CPU)
自动扩缩容实验的代码如下:
https://github.com/daniel-kun/kube-alive/tree/master/src/cpuhog
https://github.com/daniel-kun/kube-alive/blob/master/deploy/cpuhog.yml
我将该服务命名为“cpuhog”,因为它对每个请求都会在 2 秒内尽可能多地占用 CPU 资源。
我计划未来添加更多实验,例如使用 Deployment 进行滚动更新的实验。
希望您觉得这篇博文和 kube-alive 服务对您有所帮助,如果您能在评论区留下反馈,我将不胜感激。或许有一天,kube-alive 能成为许多初学者和工程师了解 Kubernetes 实际运行情况的起点,帮助他们评估 Kubernetes 是否适合自己的应用。
2018年1月25日更新:我已移除安全警告,因为最新版本的kube-alive安全性已得到加强。API仅公开了一部分(kube-alive命名空间中的Pod),前端使用一个仅有权访问专用kube-alive命名空间且仅能读取和列出Pod的服务帐户运行。因此,通过API获取的信息与前端显示的信息并无太大差异。
2018年3月8日更新:将gif图更新为新的、改进的视觉效果,并添加了滚动更新实验。
文章来源:https://dev.to/danielkun/kubernetes-its-alive-2ndc