使用 Spring Boot 创建支持 JWT 授权的 API
AWS AI 直播!
各位朋友,
今天我将介绍如何使用 Spring Boot 创建带有 JWT 授权的简单 REST API。
您不妨看看我之前关于如何使用 Spring 和 Tomcat 创建 API 的博客文章。
我在上面的博客文章中已经介绍了如何设置 MySQL 以及如何在 IntelliJ 中创建新项目,因此在这篇博客中我将跳过这部分内容。
0.使用SQL查询创建MySQL数据库和表:
- 创建新数据库
CREATE DATABASE restapi;
USE restapi;
- 为博客创建新表
CREATE TABLE blog (
  id INT(6) UNSIGNED AUTO_INCREMENT PRIMARY KEY,
  title VARCHAR(500) NOT NULL,
  content VARCHAR(5000) NOT NULL
);
- 创建新的用户信息表:
CREATE TABLE user_info(
  id INT(6) UNSIGNED AUTO_INCREMENT PRIMARY KEY,
  username VARCHAR(50) NOT NULL,
  password VARCHAR(500) NOT NULL,
  fullname VARCHAR(50) NOT NULL
);
1. 本教程所需的依赖项:
<parent>
        <groupId>org.springframework.boot</groupId>
        <artifactId>spring-boot-starter-parent</artifactId>
        <version>2.1.8.RELEASE</version>
    </parent>


    <dependencies>
        <dependency>
            <groupId>org.springframework.boot</groupId>
            <artifactId>spring-boot-starter-web</artifactId>
        </dependency>
        <dependency>
            <groupId>org.springframework.boot</groupId>
            <artifactId>spring-boot-starter-data-jpa</artifactId>
        </dependency>
        <dependency>
            <groupId>mysql</groupId>
            <artifactId>mysql-connector-java</artifactId>
        </dependency>
        <!-- https://mvnrepository.com/artifact/org.springframework.security/spring-security-core -->
        <dependency>
            <groupId>org.springframework.security</groupId>
            <artifactId>spring-security-core</artifactId>
            <version>5.1.6.RELEASE</version>
        </dependency>
        <!-- https://mvnrepository.com/artifact/org.springframework.security/spring-security-web -->
        <dependency>
            <groupId>org.springframework.security</groupId>
            <artifactId>spring-security-web</artifactId>
            <version>5.1.6.RELEASE</version>
        </dependency>
        <!-- https://mvnrepository.com/artifact/org.springframework.security/spring-security-config -->
        <dependency>
            <groupId>org.springframework.security</groupId>
            <artifactId>spring-security-config</artifactId>
            <version>5.1.6.RELEASE</version>
        </dependency>
        <!-- https://mvnrepository.com/artifact/org.projectlombok/lombok -->
        <dependency>
            <groupId>org.projectlombok</groupId>
            <artifactId>lombok</artifactId>
            <version>1.18.10</version>
            <scope>provided</scope>
        </dependency>
        <!-- https://mvnrepository.com/artifact/io.jsonwebtoken/jjwt -->
        <dependency>
            <groupId>io.jsonwebtoken</groupId>
            <artifactId>jjwt</artifactId>
            <version>0.9.1</version>
        </dependency>
    </dependencies>
我们需要 spring-boot-starter 来创建 REST API。
Mysql-connector-java 用于连接到 MySQL 数据库。
Spring Security 用于设置授权
用于将 JWT 与授权一起使用的 jsonwebtoken
2.项目结构
- 资源:我们将在 application.properties 文件中定义项目的属性。
spring.datasource.url=jdbc:mysql://localhost:3306/restapi
spring.datasource.username=xxxx
spring.datasource.password=xxxx
spring.datasource.platform=mysql
jwt.secret={bcrypt}$donald
spring.datasource 用于提供有关数据库的信息。您需要提供用户名和密码才能使其正常工作。
jwt.secret 是 JWT 的密钥。(稍后我会详细讲解)
- 项目包:
+) 配置:
用于存储项目的配置文件。
+) 控制器:
用于定义身份验证、博客内容的 CRUD 操作以及创建新用户的控制器类。
+) 异常:
定义用于验证数据的基本错误处理程序和异常处理程序
。+) 模型:
创建博客实体、用户信息实体、JwtRequest 和 JwtResponse 的模型。
+) 存储库:
创建博客和用户信息存储库,以便使用 JPA 与 MySQL 数据库交互。
+) 服务:
创建 JwtUserDetailsService,用于检查用户名是否存在于数据库中。
- 运行 SpringBootApplication 的主应用程序类:
@SpringBootApplication
public class MainApplicationClass {


    public static void main(String[] args) {
        SpringApplication.run(MainApplicationClass.class, args);
    }

}
3.我们将创造什么:
- 用于在应用程序中创建新用户的 API
- 用于验证用户凭据是否有效的 API,如果有效,则返回令牌,以便用户能够执行其他操作。
- 用于创建新博客文章、查看博客文章或更新博客文章的 API。
因此,用于创建和验证凭据的 API 将不包含授权部分 --> 以确保任何人都可以访问和执行这些 API。
与博客交互的 API 需要使用 jwt 令牌进行身份验证。
为此,我们需要在 config 包中的 WebSecurityConfig 类中创建 configure 方法:
httpSecurity.csrf().disable()

                .authorizeRequests().antMatchers("/authenticate","/user").permitAll().

        anyRequest().authenticated().and().

        exceptionHandling().authenticationEntryPoint(jwtAuthenticationEntryPoint).and().sessionManagement()

                .sessionCreationPolicy(SessionCreationPolicy.STATELESS);

        httpSecurity.addFilterBefore(jwtRequestFilter, UsernamePasswordAuthenticationFilter.class);
4. 配置 JWT 令牌
JwtAuthenticationEntryPoint,以便在用户凭据不正确时抛出未授权消息。
import org.springframework.security.core.AuthenticationException;
import org.springframework.security.web.AuthenticationEntryPoint;

import javax.servlet.http.HttpServletRequest;
import javax.servlet.http.HttpServletResponse;
import java.io.IOException;
import java.io.Serializable;

public class JwtAuthenticationEntryPoint implements AuthenticationEntryPoint, Serializable {

    private static final long serialVersionUID = -7858869558953243875L;

    @Override
    public void commence(HttpServletRequest request, HttpServletResponse response,

                         AuthenticationException authException) throws IOException {

        response.sendError(HttpServletResponse.SC_UNAUTHORIZED, "Unauthorized");

    }

}
使用 JwtRequestFilter 过滤 Authorization 标头的值:
import donald.apiwithspringboot.service.JwtUserDetailsService;
import io.jsonwebtoken.ExpiredJwtException;
import org.springframework.beans.factory.annotation.Autowired;
import org.springframework.security.authentication.UsernamePasswordAuthenticationToken;
import org.springframework.security.core.context.SecurityContextHolder;
import org.springframework.security.core.userdetails.UserDetails;
import org.springframework.security.web.authentication.WebAuthenticationDetailsSource;
import org.springframework.stereotype.Component;
import org.springframework.web.filter.OncePerRequestFilter;
import javax.servlet.FilterChain;
import javax.servlet.ServletException;
import javax.servlet.http.HttpServletRequest;
import javax.servlet.http.HttpServletResponse;
import java.io.IOException;


@Component
public class JwtRequestFilter extends OncePerRequestFilter {


    @Autowired
    private JwtUserDetailsService jwtUserDetailsService;

    private final JwtToken jwtTokenUtil;

    public JwtRequestFilter(JwtToken jwtTokenUtil) {
        this.jwtTokenUtil = jwtTokenUtil;
    }

    @Override
    protected void doFilterInternal(HttpServletRequest request, HttpServletResponse response, FilterChain chain)

            throws ServletException, IOException {

        final String requestTokenHeader = request.getHeader("Authorization");

        String username = null;

        String jwtToken = null;


        if (requestTokenHeader != null && requestTokenHeader.startsWith("Bearer ")) {

            jwtToken = requestTokenHeader.substring(7);

            try {

                username = jwtTokenUtil.getUsernameFromToken(jwtToken);

            } catch (IllegalArgumentException e) {

                System.out.println("Unable to get JWT Token");

            } catch (ExpiredJwtException e) {

                System.out.println("JWT Token has expired");

            }

        } else {

            logger.warn("JWT Token does not begin with Bearer String");

        }


        if (username != null && SecurityContextHolder.getContext().getAuthentication() == null) {

            UserDetails userDetails = this.jwtUserDetailsService.loadUserByUsername(username);


            if (jwtTokenUtil.validateToken(jwtToken, userDetails)) {

                UsernamePasswordAuthenticationToken usernamePasswordAuthenticationToken = new UsernamePasswordAuthenticationToken(

                        userDetails, null, userDetails.getAuthorities());

                usernamePasswordAuthenticationToken

                        .setDetails(new WebAuthenticationDetailsSource().buildDetails(request));


                SecurityContextHolder.getContext().setAuthentication(usernamePasswordAuthenticationToken);
            }
        }
        chain.doFilter(request, response);
    }
}
用于生成 JWT 令牌的 JwtToken 类:
@Component
public class JwtToken implements Serializable {

    private static final long serialVersionUID = -2550185165626007488L;

    public static final long JWT_TOKEN_VALIDITY = 5 * 60 * 60;

    @Value("${jwt.secret}")
    private String secret;


    public String getUsernameFromToken(String token) {

        return getClaimFromToken(token, Claims::getSubject);

    }


    public Date getExpirationDateFromToken(String token) {

        return getClaimFromToken(token, Claims::getExpiration);

    }

    public <T> T getClaimFromToken(String token, Function<Claims, T> claimsResolver) {

        final Claims claims = getAllClaimsFromToken(token);

        return claimsResolver.apply(claims);

    }


    private Claims getAllClaimsFromToken(String token) {

        return Jwts.parser().setSigningKey(secret).parseClaimsJws(token).getBody();

    }


    private Boolean isTokenExpired(String token) {

        final Date expiration = getExpirationDateFromToken(token);

        return expiration.before(new Date());

    }


    public String generateToken(UserDetails userDetails) {

        Map<String, Object> claims = new HashMap<>();

        return doGenerateToken(claims, userDetails.getUsername());

    }


    private String doGenerateToken(Map<String, Object> claims, String subject) {

        return Jwts.builder().setClaims(claims).setSubject(subject).setIssuedAt(new Date(System.currentTimeMillis()))

                .setExpiration(new Date(System.currentTimeMillis() + JWT_TOKEN_VALIDITY * 1000))

                .signWith(SignatureAlgorithm.HS512, secret).compact();

    }


    public Boolean validateToken(String token, UserDetails userDetails) {

        final String username = getUsernameFromToken(token);

        return (username.equals(userDetails.getUsername()) && !isTokenExpired(token));

    }

}
使用 WebSecurityConfig 定义我们需要的 bean 和身份验证配置路径:
import donald.apiwithspringboot.service.JwtUserDetailsService;
import org.springframework.beans.factory.annotation.Autowired;
import org.springframework.context.annotation.Bean;
import org.springframework.context.annotation.Configuration;
import org.springframework.security.authentication.AuthenticationManager;
import org.springframework.security.config.annotation.authentication.builders.AuthenticationManagerBuilder;
import org.springframework.security.config.annotation.method.configuration.EnableGlobalMethodSecurity;
import org.springframework.security.config.annotation.web.builders.HttpSecurity;
import org.springframework.security.config.annotation.web.configuration.EnableWebSecurity;
import org.springframework.security.config.annotation.web.configuration.WebSecurityConfigurerAdapter;
import org.springframework.security.config.http.SessionCreationPolicy;
import org.springframework.security.core.userdetails.UserDetailsService;
import org.springframework.security.crypto.bcrypt.BCryptPasswordEncoder;
import org.springframework.security.crypto.password.PasswordEncoder;
import org.springframework.security.web.authentication.UsernamePasswordAuthenticationFilter;


@Configuration
@EnableWebSecurity
@EnableGlobalMethodSecurity(prePostEnabled = true)
public class WebSecurityConfig extends WebSecurityConfigurerAdapter {

    @Autowired
    private JwtAuthenticationEntryPoint jwtAuthenticationEntryPoint;

    @Autowired
    private JwtUserDetailsService jwtUserDetailsService;

    @Autowired
    private JwtRequestFilter jwtRequestFilter;

    @Autowired
    public void configureGlobal(AuthenticationManagerBuilder auth) throws Exception {

        auth.userDetailsService(jwtUserDetailsService).passwordEncoder(passwordEncoder());

    }

    @Bean
    public JwtAuthenticationEntryPoint jwtAuthenticationEntryPointBean() throws Exception{
        return new JwtAuthenticationEntryPoint();
    }


    @Bean
    public PasswordEncoder passwordEncoder() {
        return new BCryptPasswordEncoder();
    }

    @Bean
    @Override
    public AuthenticationManager authenticationManagerBean() throws Exception {
        return super.authenticationManagerBean();

    }

    @Override
    protected void configure(HttpSecurity httpSecurity) throws Exception {

        httpSecurity.csrf().disable()

                .authorizeRequests().antMatchers("/authenticate","/user").permitAll().

        anyRequest().authenticated().and().

        exceptionHandling().authenticationEntryPoint(jwtAuthenticationEntryPoint).and().sessionManagement()

                .sessionCreationPolicy(SessionCreationPolicy.STATELESS);

        httpSecurity.addFilterBefore(jwtRequestFilter, UsernamePasswordAuthenticationFilter.class);

    }

}
5.控制器:
AuthController 用于定义 API,以验证用户凭据并返回正确的 JWT 令牌:
import donald.apiwithspringboot.model.JwtRequest;
import donald.apiwithspringboot.model.JwtResponse;
import donald.apiwithspringboot.service.JwtUserDetailsService;
import org.springframework.beans.factory.annotation.Autowired;
import org.springframework.http.ResponseEntity;
import org.springframework.security.authentication.BadCredentialsException;
import org.springframework.security.authentication.DisabledException;
import org.springframework.security.authentication.UsernamePasswordAuthenticationToken;
import org.springframework.security.core.userdetails.UserDetails;
import org.springframework.web.bind.annotation.*;
import donald.apiwithspringboot.config.JwtToken;
import org.springframework.security.authentication.AuthenticationManager;

@RestController
@CrossOrigin
public class AuthController {

    @Autowired
    private AuthenticationManager authenticationManager;

    @Autowired
    private JwtToken jwtToken;

    @Autowired
    private JwtUserDetailsService jwtUserDetailsService;


    @RequestMapping(value = "/authenticate", method = RequestMethod.POST)
    public ResponseEntity<?> createAuthenticationToken(@RequestBody JwtRequest authenticationRequest) throws Exception {


        authenticate(authenticationRequest.getUsername(), authenticationRequest.getPassword());

        final UserDetails userDetails = jwtUserDetailsService

                .loadUserByUsername(authenticationRequest.getUsername());

        final String token = jwtToken.generateToken(userDetails);

        return ResponseEntity.ok(new JwtResponse(token));

    }

    private void authenticate(String username, String password) throws Exception {

        try {

            authenticationManager.authenticate(new UsernamePasswordAuthenticationToken(username, password));

        } catch (DisabledException e) {

            throw new Exception("USER_DISABLED", e);

        } catch (BadCredentialsException e) {

            throw new Exception("INVALID_CREDENTIALS", e);

        }

    }

}
BlogController 类用于创建 API,以便创建新博客、修改博客内容、查看博客或更新博客。
import donald.apiwithspringboot.model.Blog;
import donald.apiwithspringboot.repository.BlogRepository;
import org.springframework.web.bind.annotation.*;
import java.util.List;
import java.util.Map;

@RestController
public class BlogController {

    final
    private BlogRepository blogRepository;

    public BlogController(BlogRepository blogRepository) {
        this.blogRepository = blogRepository;
    }

    @GetMapping("/blog")
    public List<Blog> index(){
        return blogRepository.findAll();
    }

    @GetMapping("/blog/{id}")
    public Blog show(@PathVariable String id){
        int blogId = Integer.parseInt(id);
        return blogRepository.findById(blogId).orElse(new Blog());
    }

    @PostMapping("/blog/search")
    public List<Blog> search(@RequestBody Map<String, String> body){
        String searchTerm = body.get("text");
        return blogRepository.findByTitleContainingOrContentContaining(searchTerm, searchTerm);
    }

    @PostMapping("/blog")
    public Blog create(@RequestBody Map<String, String> body){
        String title = body.get("title");
        String content = body.get("content");
        return blogRepository.save(new Blog(title, content));
    }

    @PutMapping("/blog/{id}")
    public Blog update(@PathVariable String id, @RequestBody Map<String, String> body){
        int blogId = Integer.parseInt(id);
        // getting blog
        Blog blog = blogRepository.findById(blogId).orElse(new Blog());
        blog.setTitle(body.get("title"));
        blog.setContent(body.get("content"));
        return blogRepository.save(blog);
    }

    @DeleteMapping("blog/{id}")
    public boolean delete(@PathVariable String id){
        int blogId = Integer.parseInt(id);
        blogRepository.deleteById(blogId);
        return true;
    }

}
UserInfoController 用于创建 API,创建新用户并将其插入数据库,密码使用 BCryptPasswordEncoder 进行编码:
import donald.apiwithspringboot.exceptions.ValidationException;
import donald.apiwithspringboot.model.UserInfo;
import donald.apiwithspringboot.repository.UserInfoRepository;
import org.springframework.security.crypto.bcrypt.BCryptPasswordEncoder;
import org.springframework.web.bind.annotation.PostMapping;
import org.springframework.web.bind.annotation.RequestBody;
import org.springframework.web.bind.annotation.RestController;
import java.security.NoSuchAlgorithmException;
import java.util.Map;

@RestController
public class UserInfoController {


    final
    private UserInfoRepository userInfoRepository;

//    private HashData hashData = new HashData();

    public UserInfoController(UserInfoRepository userInfoRepository) {
        this.userInfoRepository = userInfoRepository;
    }


    @PostMapping("/user")
    public Boolean create(@RequestBody Map<String, String> body) throws NoSuchAlgorithmException {
        String username = body.get("username");
        if (userInfoRepository.existsByUsername(username)){

            throw new ValidationException("Username already existed");

        }

        String password = body.get("password");
        String encodedPassword = new BCryptPasswordEncoder().encode(password);
//        String hashedPassword = hashData.get_SHA_512_SecurePassword(password);
        String fullname = body.get("fullname");
        userInfoRepository.save(new UserInfo(username, encodedPassword, fullname));
        return true;
    }

}
6.例外情况:
BaseErrorHandles 类用于处理 BAD_REQUEST 异常:
import lombok.extern.slf4j.Slf4j;
import org.springframework.http.HttpStatus;
import org.springframework.http.ResponseEntity;
import org.springframework.web.bind.annotation.ControllerAdvice;
import org.springframework.web.bind.annotation.ExceptionHandler;
import org.springframework.web.bind.annotation.ResponseBody;

@ControllerAdvice
@Slf4j
public class BaseErrorHandles {

    @ResponseBody
    @ExceptionHandler(value = ValidationException.class)
    public ResponseEntity<?> handleException(ValidationException exception) {
        return ResponseEntity.status(HttpStatus.BAD_REQUEST).body(exception.getMsg());
    }
}
验证异常
public class ValidationException extends RuntimeException {

    private static final long serialVersionUID = 1L;
    private String msg;

    public ValidationException(String msg) {
        this.msg = msg;
    }

    public String getMsg() {
        return msg;
    }

}
7.模型:
博客模型:定义博客实体
@Entity
public class Blog {

    @Id
    @GeneratedValue(strategy = GenerationType.IDENTITY)
    private int id;

    private String title;
    private String content;

    public Blog() {  }

    public Blog(String title, String content) {
        this.setTitle(title);
        this.setContent(content);
    }

    public Blog(int id, String title, String content) {
        this.setId(id);
        this.setTitle(title);
        this.setContent(content);
    }

    public int getId() {
        return id;
    }

    public void setId(int id) {
        this.id = id;
    }

    public String getTitle() {
        return title;
    }

    public void setTitle(String title) {
        this.title = title;
    }

    public String getContent() {
        return content;
    }

    public void setContent(String content) {
        this.content = content;
    }

    @Override
    public String toString() {
        return "Blog{" +
                "id=" + id +
                ", title='" + title + '\'' +
                ", content='" + content + '\'' +
                '}';
    }

}
用于定义 UserInfo 实体的 UserInfo 类:
import javax.persistence.Entity;
import javax.persistence.GeneratedValue;
import javax.persistence.GenerationType;
import javax.persistence.Id;

@Entity
public class UserInfo {

    @Id
    @GeneratedValue(strategy = GenerationType.IDENTITY)
    private int id;

    private String username;
    private String password;
    private String fullname;

    public UserInfo() {
    }

    public int getId() {
        return id;
    }

    public void setId(int id) {
        this.id = id;
    }

    public String getUsername() {
        return username;
    }

    public void setUsername(String username) {
        this.username = username;
    }

    public String getPassword() {
        return password;
    }

    public void setPassword(String password) {
        this.password = password;
    }

    public UserInfo(String username, String password, String fullname) {
        this.username = username;
        this.password = password;
        this.fullname = fullname;
    }

    public String getFullname() {
        return fullname;
    }

    public void setFullname(String fullname) {
        this.fullname = fullname;
    }
}
AuthController 中的 JwtRequest 模型用于验证请求中的用户名和密码。
public class JwtRequest implements Serializable {

    private static final long serialVersionUID = 5926468583005150707L;

    private String username;

    private String password;

    public JwtRequest()

    {

    }

    public JwtRequest(String username, String password) {

        this.setUsername(username);

        this.setPassword(password);

    }

    public String getUsername() {

        return this.username;

    }

    public void setUsername(String username) {

        this.username = username;

    }

    public String getPassword() {

        return this.password;

    }

    public void setPassword(String password) {

        this.password = password;

    }

}
JwtResponse 创建令牌响应模型
import java.io.Serializable;

public class JwtResponse implements Serializable {

    private static final long serialVersionUID = -8091879091924046844L;

    private final String jwttoken;

    public JwtResponse(String jwttoken) {

        this.jwttoken = jwttoken;

    }

    public String getToken() {

        return this.jwttoken;

    }

}
8.存储库:
BlogRepository 通过 JPA 操作 MySQL 数据库,用于管理博客表:
@Repository
public interface BlogRepository extends JpaRepository<Blog,Integer> {

    // custom query to search to blog post by title or content
    List<Blog> findByTitleContainingOrContentContaining(String text, String textAgain);

}
UserInfoRepository 通过 JPA 操作 MySQL 数据库中的 user_info 表
@Repository
public interface UserInfoRepository extends JpaRepository<UserInfo,Integer> {

    Boolean existsByUsername(String username);
    UserInfo findByUsername(String username);


}
9.服务:
为 loadUserByUsername 方法定义 JwtUserDetailsService:
@Component
public class JwtUserDetailsService implements UserDetailsService {

    @Autowired
    private UserInfoRepository userInfoRepository;


    @Override
    public UserDetails loadUserByUsername(String username) throws UsernameNotFoundException {

        UserInfo user = userInfoRepository.findByUsername(username);
        if (user == null) {
            throw new UsernameNotFoundException("User not found with username: " + username);
        }
        return new org.springframework.security.core.userdetails.User(user.getUsername(), user.getPassword(),
                new ArrayList<>());
    }

}
10.运行 Spring Boot 应用:
只需运行:mvn spring-boot:run
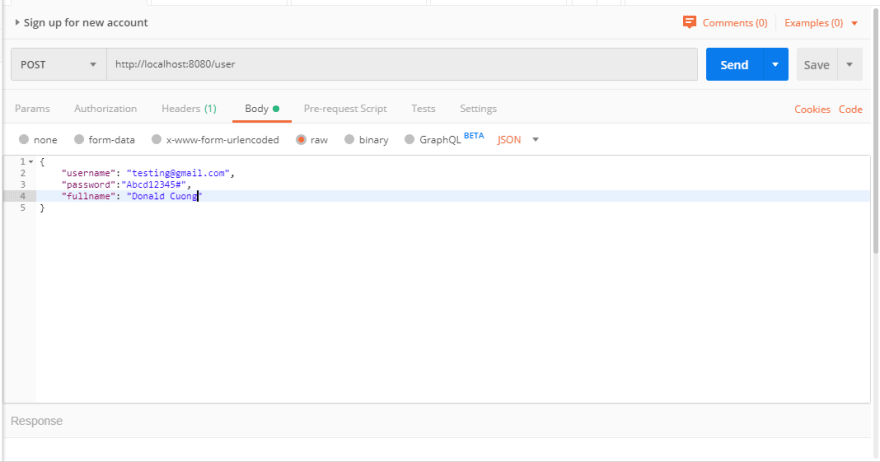
11.使用Postman与API交互:
创建新用户
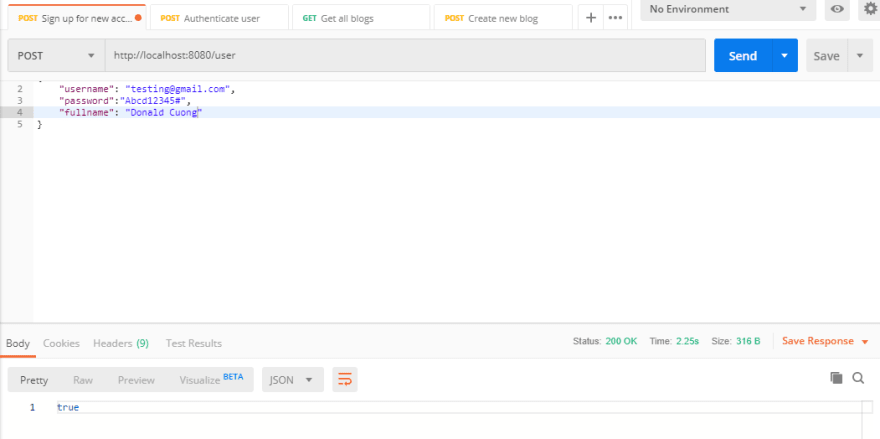
创造新的用户成功:
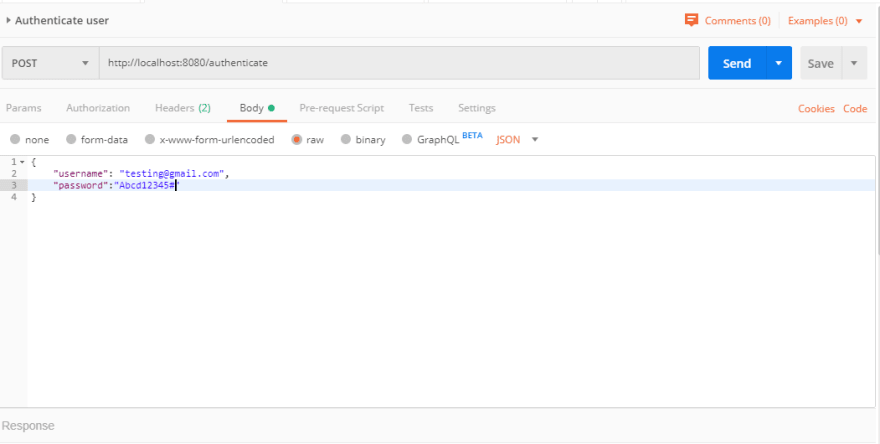
验证用户凭据:
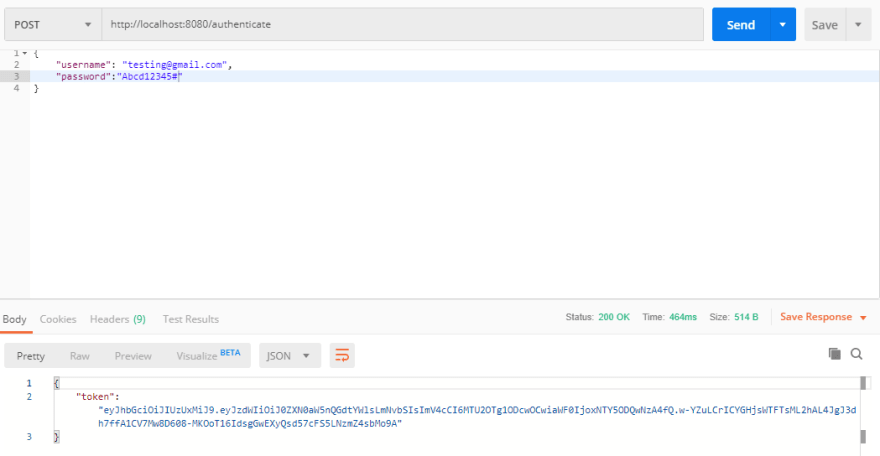
用户凭据验证成功:
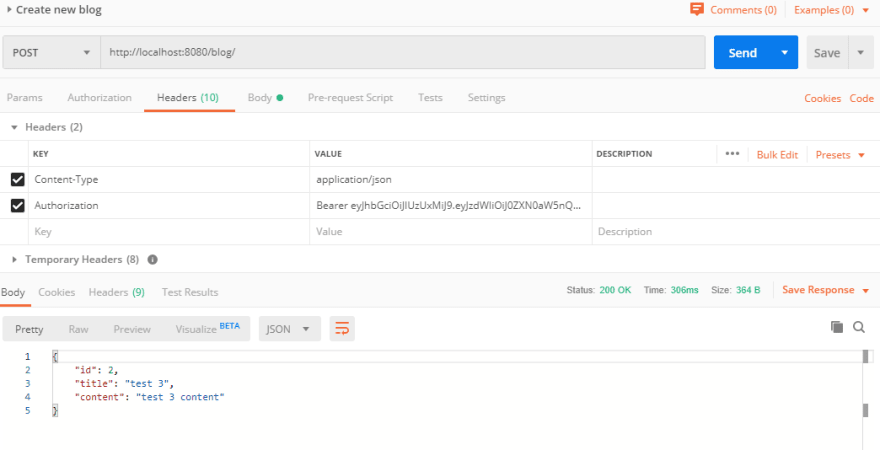
创建新的博客请求正文:
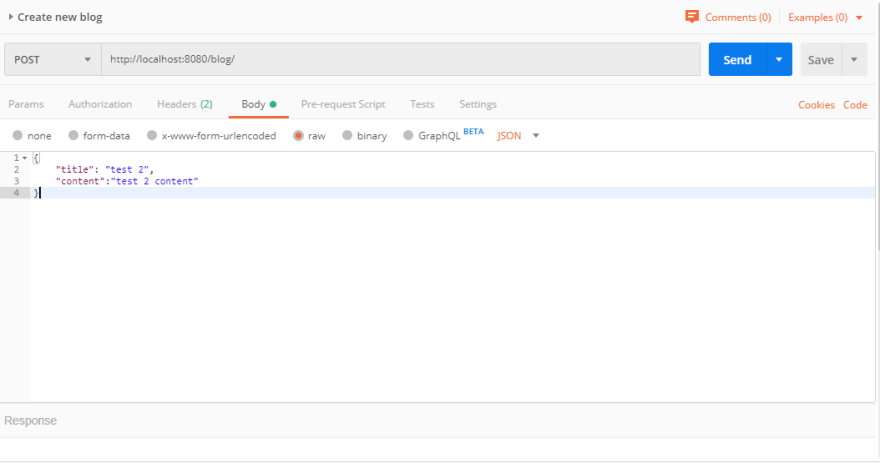
创建新的博客标题:

创建新的博客回复:
就这样。
在以后的教程中,我将讲解如何编写单元测试和契约测试。
你可以像往常一样在 GitHub 上找到源代码,链接在这里。
谢谢大家!
和平!!!
注:如果您觉得这篇博客对您有帮助,并想表达感谢,欢迎随时访问:

这将有助于我创作更多有价值的内容。
文章来源:https://dev.to/cuongld2/create-apis-with-jwt-authorization-using-spring-boot-24f9