使用 Laravel 和 VueJS 构建您自己的看板
第一部分 - 设置项目并构建看板
入门
创建我们的任务和状态
搭建看板
总结
第一部分 - 设置项目并构建看板
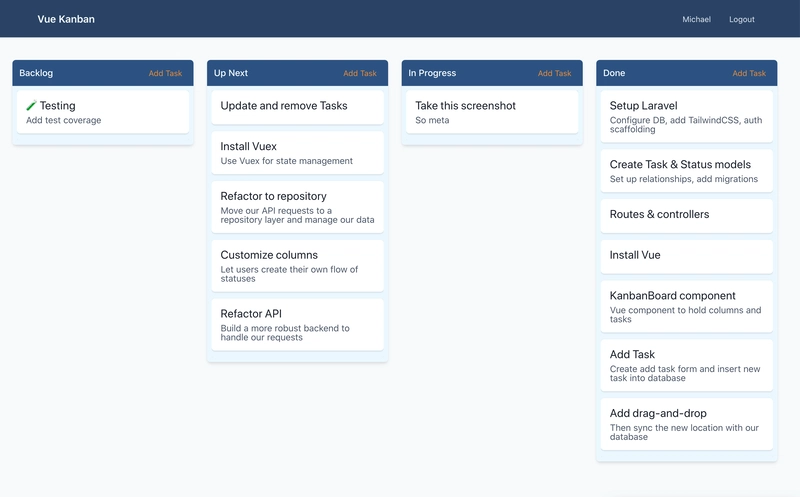
看板是管理任务、项目或生活的绝佳方式。它使用列来表示任务流程,也是一种流行的敏捷项目管理工具。如果你用过 Trello,就会明白我的意思。
那么,让我们来构建我们自己的 Trello 式看板吧!

入门
让我们开始为新项目设置所有样板代码。
Laravel 安装和设置
首先创建一个新的 Laravel 项目。在终端中导航到你想创建项目的目录,然后运行以下命令之一。
# with the laravel installer
laravel new kanban-board

# or using composer
composer create-project --prefer-dist laravel/laravel kanban-board
现在创建一个新的数据库并配置连接.env。对我来说,配置如下所示:
DB_CONNECTION=mysql
DB_HOST=127.0.0.1
DB_PORT=3306
DB_DATABASE=kanban
DB_USERNAME=root
DB_PASSWORD=
使用 TailwindCSS 构建 UI 和身份验证框架
本指南中我们不会过多关注身份验证,Laravel 会自动处理框架搭建。此外,我们将使用Tailwind CSS作为 CSS 框架。
幸运的是,@michaeldyrynda制作了一个非常棒的 laravel/ui 预设,用于初始化所有框架。您可以在这里查看:laravel-frontend-presets/tailwindcss。
安装依赖项并运行迁移:
# install laravel/ui from composer
composer require laravel-frontend-presets/tailwindcss --dev

# then generate the scaffolding including authentication
php artisan ui tailwindcss --auth

# install npm dependencies
npm install && npm run dev

# ready to migrate
php artisan migrate
太棒了!我们已经完成了身份验证框架的搭建,数据库也已设置完毕,使用 Tailwind 一切看起来都很完美。请在浏览器中访问您的本地站点并创建您的用户帐户 👉 http://kanban-board.test

创建我们的任务和状态
我们知道需要创建任务并通过不同的列(我们称之为状态)来跟踪它们,那么让我们开始在 Laravel 中创建模型吧。
一项任务应包含以下内容:
- 标题 — 必须有标题
- 描述——可添加的额外详细信息(可选)
- 顺序——应该知道它在列中的位置。
- 状态 ID — 我们需要跟踪任务当前所处的状态。
- 用户 ID — 一项任务应该只属于一个用户
状态应包含以下内容:
- 标题——状态应具有描述性标题
- Slug — 标题的 Slug 化版本,可用作键值对和更美观的 URL
- 顺序——对于列来说尤其如此,状态应该有明确的顺序。
- 用户 ID — 允许用户创建自己的状态和工作流程
创建任务和状态模型、迁移和控制器:
php artisan make:model -mc Task
php artisan make:model -mc Status
注意这些-mc标志;这将为我们的模型创建一个迁移和控制器。
迁徙
一些
// database/migrations/XXXX_create_tasks_table.php
class CreateTasksTable extends Migration
{
    public function up()
    {
        Schema::create('tasks', function (Blueprint $table) {
            $table->id();
            $table->string('title');
            $table->text('description')->nullable();
            $table->smallInteger('order')->default(0);
            $table->unsignedInteger('user_id');
            $table->unsignedInteger('status_id');
            $table->timestamps();
        });
    }
}

// database/migrations/XXXX_create_statuses_table.php
class CreateStatusesTable extends Migration
{
    public function up()
    {
        Schema::create('statuses', function (Blueprint $table) {
            $table->id();
            $table->string('title');
            $table->string('slug');
            $table->smallInteger('order')->default(0);
            $table->unsignedInteger('user_id');
        });
    }
}
根据我们上面的简要说明,我们已经创建了所有需要的列。现在运行迁移:
php artisan migrate
模型
我们需要定义每个模型之间的关系,并告诉 Laravel 哪些属性可以批量赋值。以后需要的时候我们会再补充,但这已经足够我们入门了。
用户
将关系添加到任务和状态中。请注意,我们可以设置关系始终按照 order 属性指定的顺序返回记录。
// app/User.php

// ...
class User extends Authenticatable
{
    protected $fillable = [
        'name', 'email', 'password',
    ];

    protected $hidden = [
        'password', 'remember_token',
    ];

    public function tasks()
    {
        return $this->hasMany(Task::class);
    }

    public function statuses()
    {
        return $this->hasMany(Status::class)->orderBy('order');
    }
}
任务
// app/Task.php

// ...
class Task extends Model
{
    protected $fillable = [‘title’, ‘description’, ‘order’, ‘status_id’];

    public function user()
    {
        return $this->belongsTo(User::class);
    }

    public function status()
    {
        return $this->belongsTo(Status::class);
    }
}
地位
由于我们在迁移文件中移除了时间戳,我们需要告诉 Laravel 在创建/更新记录时不要尝试修改它们。此外,我们还需要orderBy为任务关联添加一个默认值。
// app/Status.php

// ...
class Status extends Model
{
    protected $fillable = [‘title’, ‘slug’, ‘order’];

    public $timestamps = false;

    public function tasks()
    {
        return $this->hasMany(Task::class)->orderBy('order');
    }

    public function user()
    {
        return $this->belongsTo(User::class);
    }
}
路由和控制器
让我们思考一下我们需要采取哪些行动,以及我们需要哪些路由和控制器方法。
任务
- 获取所有任务
GET tasks——TaskController@index - 添加新任务
POST tasks——TaskController@store - 更新任务
PUT tasks/{task}——TaskController@update
状态
- 添加新状态 —
POST statuses—StatusController@store - 更新状态
PUT statuses——StatusController@update
为了简单起见,我们现在先将/home路由重定向到/tasks。
请将文件更新/routes/web.php为以下内容:
// routes/web.php

// Update our 'home' route to redirect to /tasks
Route::get('/home', function () {
    return redirect()->route('tasks.index');
})->name('home');

Route::group(['middleware' => 'auth'], function () {
    Route::get('tasks', 'TaskController@index')->name('tasks.index');
    Route::post('tasks', 'TaskController@store')->name('tasks.store');
    Route::put('tasks/sync', 'TaskController@sync')->name('tasks.sync');
    Route::put('tasks/{task}', 'TaskController@update')->name('tasks.update');
});

Route::group(['middleware' => 'auth'], function () {
    Route::post('statuses', 'StatusController@store')->name('statuses.store');
    Route::put('statuses', 'StatusController@update')->name('statuses.update');
});
您可以运行程序php artisan route:list查看所有可用的路线。

更新任务控制器
让我们思考一下看板上预期呈现的数据:一个用户有很多任务,这些任务也属于同一个状态。如果我们按这种结构返回数据会怎样呢?
我们不会只返回用户的任务数组,而是返回用户的状态数组,该状态数组又包含该状态下的任务数组。
更新index()TaskController 中的方法:
// app/Http/Controllers/TaskController.php

// ...
class TaskController extends Controller
{
    public function index()
    {
        $tasks = auth()->user()->statuses()->with('tasks')->get();

        return view('tasks.index', compact('tasks'));
    }

    // ...
}
创建看板将要放置的视图
/resources/views/tasks在名为 `named` 的文件夹中创建一个新的 Blade 模板index.blade.php,并添加以下样板代码:
<!-- resources/views/tasks/index.blade.php -->

@extends('layouts.app')

@section('content')
<div class="md:mx-4 relative overflow-hidden">
    <main class="h-full flex flex-col overflow-auto">
        <!-- Our Kanban Vue component will go here -->
    </main>
</div>
@endsection
默认列
为了更快地入门,请创建一些默认状态,每个新用户都将拥有这些状态。使用 User 类的booted方法,我们可以在创建新用户时创建和添加状态。
将以下内容添加到您的User.php模型中:
// app/User.php

protected static function booted()
    {
        static::created(function ($user) {
            // Create default statuses
            $user->statuses()->createMany([
                [
                    'title' => 'Backlog',
                    'slug' => 'backlog',
                    'order' => 1
                ],
                [
                    'title' => 'Up Next',
                    'slug' => 'up-next',
                    'order' => 2
                ],
                [
                    'title' => 'In Progress',
                    'slug' => 'in-progress',
                    'order' => 3
                ],
                [
                    'title' => 'Done',
                    'slug' => 'done',
                    'order' => 4
                ]
            ]);
        });
    }
完成初始后端
我们目前为止做了哪些工作?
- 已安装 Laravel 和所需的 Composer 依赖项。
- 身份验证框架
- 创建了状态和任务的资源
- 将用户任务返回到视图
- 创建用户时创建一些默认状态
后端初始样板代码和脚手架都已完成,接下来我们来编写一些前端代码。
搭建看板
让我们来详细分析一下如何才能让我们的第一个组件正常运行:
- 设置 Vue
- 创建我们的看板组件
- 添加新任务
- 实现拖放功能
- 任务移动后,更新其顺序和状态。
安装 Vue
由于我们没有使用 Laravel 的 Vue 脚手架,所以需要自己进行配置。请从 npm 获取:
npm install vue
Vue安装完成后,我们可以在resources/js/app.js文件中对其进行初始化:
require("./bootstrap");

window.Vue = require("vue");

// Register our components (in the next step)

const app = new Vue({
    el: "#app"
});
搞定!我们的 Laravel 应用现在已经集成了 Vue,可以开始利用它提供的所有功能了。npm run dev在浏览器中运行并检查网站,控制台现在应该会提示你正在以开发模式运行 Vue,这很好。
提示:
在继续之前,我建议你安装适用于你当前浏览器的Vue 开发者工具。这样可以方便你调试并深入了解 Vue 组件的状态。
注册看板组件
KanbanBoard.vue在组件文件夹中创建一个名为 `<components_name>` 的新文件resources/js/components/,并将其注册到您的app.js文件中:
// resources/js/app.js

// Register our components
Vue.component("kanban-board", require("./components/KanbanBoard.vue").default);
将该组件添加到 Blade 视图中:
// resources/views/tasks/index.blade.php

<main class="h-full flex flex-col overflow-auto">
    <kanban-board :initial-data="{{ $tasks }}"></kanban-board>
</main>
为了避免npm run dev每次更改组件时都必须这样做:
npm run watch
让我们一起建造它
我知道了……终于!
接下来内容很多,但大部分只是 HTML 脚手架搭建和应用 TailwindCSS 类。我们会把重点部分拆解开来。
<template>
  <div class="relative p-2 flex overflow-x-auto h-full">

    <!-- Columns (Statuses) -->
    <div
      v-for="status in statuses"
      :key="status.slug"
      class="mr-6 w-4/5 max-w-xs flex-1 flex-shrink-0"
    >
      <div class="rounded-md shadow-md overflow-hidden">
        <div class="p-3 flex justify-between items-baseline bg-blue-800 ">
          <h4 class="font-medium text-white">
            {{ status.title }}
          </h4>
          <button class="py-1 px-2 text-sm text-orange-500 hover:underline">
            Add Task
          </button>
        </div>
        <div class="p-2 flex-1 flex flex-col h-full overflow-x-hidden overflow-y-auto bg-blue-100">

          <!-- Tasks -->
          <div
            v-for="task in status.tasks"
            :key="task.id"
            class="mb-3 p-3 h-24 flex flex-col bg-white rounded-md shadow transform hover:shadow-md cursor-pointer"
          >
            <span class="block mb-2 text-xl text-gray-900">
              {{ task.title }}
            </span>
            <p class="text-gray-700 truncate">
              {{ task.description }}
            </p>
          </div>
          <!-- ./Tasks -->

          <!-- No Tasks -->
          <div
            v-show="!status.tasks.length"
            class="flex-1 p-4 flex flex-col items-center justify-center"
          >
            <span class="text-gray-600">No tasks yet</span>
            <button
              class="mt-1 text-sm text-orange-600 hover:underline"
            >
              Add one
            </button>
          </div>
          <!-- ./No Tasks -->
        </div>
      </div>
    </div>
    <!-- ./Columns -->

  </div>
</template>

<script>
export default {
  props: {
    initialData: Array
  },
  data() {
    return {
      statuses: []
    };
  },
  mounted() {
    // 'clone' the statuses so we don't alter the prop when making changes
    this.statuses = JSON.parse(JSON.stringify(this.initialData));
  }
};
</script>
请记住,在命名 props 时,HTML 中应使用 kebab-cased 命名法(initial-data),组件中应使用 camelCase 命名法(initialData)。
您可能已经注意到,我们对 prop 数据进行了一些奇怪的 JSON 解析,这会创建一个数组的“克隆”,因此我们实际上不会更改 prop 传递的数据,而只会更改我们的副本。
我们使用替代方案JSON.parse(JSON.stringify(this.initialData));而不是类似方案[…this.initialData],因为它在处理嵌套数据(例如每个状态对象中的任务数组)时更安全。
在模板中,我们用来v-for="status in statuses"遍历状态数组以显示列。别忘了添加一个 `<div>` 标签key,这对于本项目尤为重要,因为我们希望 Vue 能够跟踪元素的顺序。
同样地,在每一列中,我们v-for使用当前状态下的任务列表来显示我们的任务卡片。

添加新任务

创建 AddTaskForm 组件
我们将AddTaskForm.vue在/resources/js/components目录中创建一个名为“Vue”的新组件。
该组件将包含一个表单,其中包含标题和描述字段。它会将表单数据发送到我们的服务器,服务器将在我们的数据库中创建新任务,并在没有验证错误的情况下返回该任务。
我们将把这个新任务传递给看板组件,并将其添加到正确的列中。
// resources/js/components/AddTaskForm.vue

<template>
  <form
    class="relative mb-3 flex flex-col justify-between bg-white rounded-md shadow overflow-hidden"
    @submit.prevent="handleAddNewTask"
  >
    <div class="p-3 flex-1">
      <input
        class="block w-full px-2 py-1 text-lg border-b border-blue-800 rounded"
        type="text"
        placeholder="Enter a title"
        v-model.trim="newTask.title"
      />
      <textarea
        class="mt-3 p-2 block w-full p-1 border text-sm rounded"
        rows="2"
        placeholder="Add a description (optional)"
        v-model.trim="newTask.description"
      ></textarea>
      <div v-show="errorMessage">
        <span class="text-xs text-red-500">
          {{ errorMessage }}
        </span>
      </div>
    </div>
    <div class="p-3 flex justify-between items-end text-sm bg-gray-100">
      <button
        @click="$emit('task-canceled')"
        type="reset"
        class="py-1 leading-5 text-gray-600 hover:text-gray-700"
      >
        cancel
      </button>
      <button
        type="submit"
        class="px-3 py-1 leading-5 text-white bg-orange-600 hover:bg-orange-500 rounded"
      >
        Add
      </button>
    </div>
  </form>
</template>

<script>
export default {
  props: {
    statusId: Number
  },
  data() {
    return {
      newTask: {
        title: "",
        description: "",
        status_id: null
      },
      errorMessage: ""
    };
  },
  mounted() {
    this.newTask.status_id = this.statusId;
  },
  methods: {
    handleAddNewTask() {
      // Basic validation so we don't send an empty task to the server
      if (!this.newTask.title) {
        this.errorMessage = "The title field is required";
        return;
      }

      // Send new task to server
      axios
        .post("/tasks", this.newTask)
        .then(res => {
          // Tell the parent component we've added a new task and include it
          this.$emit("task-added", res.data);
        })
        .catch(err => {
          // Handle the error returned from our request
          this.handleErrors(err);
        });
    },
    handleErrors(err) {
      if (err.response && err.response.status === 422) {
        // We have a validation error
        const errorBag = err.response.data.errors;
        if (errorBag.title) {
          this.errorMessage = errorBag.title[0];
        } else if (errorBag.description) {
          this.errorMessage = errorBag.description[0];
        } else {
          this.errorMessage = err.response.message;
        }
      } else {
        // We have bigger problems
        console.log(err.response);
      }
    }
  }
};
</script>
在这个组件中,data我们持续跟踪一个newTask对象,该对象status_id从 props 获取其属性。
通过使用,v-model.trim=“newTask.title”我们可以在输入和状态之间建立双向绑定,并告诉 Vue 删除任何空白字符。
提交表单后,我们需要将发生的情况告知父组件并返回新任务。如果响应中存在错误,我们会显示一条消息,告知用户哪里出了问题。
将新组件添加到看板
// resources/js/components/KanbanBoard.vue

<template>
  // ...
  <AddTaskForm
    v-if="newTaskForStatus === status.id"
    :status-id="status.id"
    v-on:task-added="handleTaskAdded"
    v-on:task-canceled="closeAddTaskForm"
  />
  // Add this just above our list of tasks
  <!-- Tasks -->
  //...
  <!-- No Tasks -->
  // Update the placeholder to include a click handler to create a new task
  // and hide it when the form is open
  <div
    v-show="!status.tasks.length && newTaskForStatus !== status.id"
    class="flex-1 p-4 flex flex-col items-center justify-center"
  >
    <span class="text-gray-600">No tasks yet</span>
    <button
      class="mt-1 text-sm text-orange-600 hover:underline"
      @click="openAddTaskForm(status.id)"
    >
      Add one
    </button>
  </div>
  <!-- ./No Tasks -->
</template>

<script>
import AddTaskForm from "./AddTaskForm"; // import the component

export default {
  components: { AddTaskForm }, // register component
  // ...
  data() {
    return {
      statuses: [],

      newTaskForStatus: 0 // track the ID of the status we want to add to
    };
  },
  // ...
  methods: {
    // set the statusId and trigger the form to show
    openAddTaskForm(statusId) {
      this.newTaskForStatus = statusId;
    },
    // reset the statusId and close form
    closeAddTaskForm() {
      this.newTaskForStatus = 0;
    },
    // add a task to the correct column in our list
    handleTaskAdded(newTask) {
      // Find the index of the status where we should add the task
      const statusIndex = this.statuses.findIndex(
        status => status.id === newTask.status_id
      );

      // Add newly created task to our column
      this.statuses[statusIndex].tasks.push(newTask);

      // Reset and close the AddTaskForm
      this.closeAddTaskForm();
    },
  }
};
</script>
将新任务存储到服务器上
回到我们的 Laravel 应用中,我们需要更新我们的代码TasksController来处理存储新任务。
// app/Http/Controllers/TaskController

public function store(Request $request)
{
    $this->validate($request, [
        'title' => ['required', 'string', 'max:56'],
        'description' => ['required', 'string'],
        'status_id' => ['required', 'exists:statuses,id']
    ]);

    return $request->user()
        ->tasks()
        ->create($request->only('title', 'description', 'status_id'));
}
首先,我们需要验证传入的请求,以确保我们获取的数据符合预期,否则将返回 422 响应以及验证错误(我们已经捕获并处理了这些错误 🙌)。
如果一切顺利,我们可以保存新任务并将其附加到已验证用户并返回该任务。
安全提示:
虽然任务会添加到已认证用户,但我们不会检查该用户是否拥有所附加的状态。我们将在后续章节中讨论授权和策略,请记住这一点。
拖拽和掉落
好了,我们现在有很多列,每列里都包含一些任务,我们还可以创建新任务。接下来,让我们进入有趣的部分:使用拖放功能将卡片从一列移动到另一列。
我们将使用SortableJS/Vue.Draggable来快速实现拖放功能。请使用 npm 安装它:
npm install vuedraggable

# once installed run watch again
npm run watch
将其添加到我们的看板组件中
安装完成后vuedraggable,让我们把它连接到我们的列上,开始传输任务。
// resources/js/components/KanbanBoard.vue

<template>
  // ...
  <div class="p-2 bg-blue-100"> // Update these classes because we're moving them to our transition-group
    <!-- AddTaskForm -->
    // ...
    <!-- ./AddTaskForm -->

    <!-- Tasks -->
    <draggable
      class="flex-1 overflow-hidden"
      v-model="status.tasks"
      v-bind="taskDragOptions"
      @end="handleTaskMoved"
    >
      <transition-group
        class="flex-1 flex flex-col h-full overflow-x-hidden overflow-y-auto rounded shadow-xs"
        tag="div"
      >
        <div
          v-for="task in status.tasks"
          :key="task.id"
          class="mb-3 p-3 h-24 flex flex-col bg-white rounded-md shadow transform hover:shadow-md cursor-pointer"
        >
          // ... nothing changed in here
        </div>
        <!-- ./Tasks -->
      </transition-group>
    </draggable>
  // ...
  </div>
<template>

<script>
import draggable from "vuedraggable"; // import the vuedraggable component
// ...

export default {
  components: { draggable, AddTaskForm }, // register
  // ...
  computed: {
    taskDragOptions() {
      return {
        animation: 200,
        group: "task-list",
        dragClass: "status-drag"
      };
    }
  },
  // ...
  methods: {
    // ...
    handleTaskMoved() {
      // Send the entire list of statuses to the server
      axios.put("/tasks/sync", {columns: this.statuses}).catch(err => {
        console.log(err.response);
      });
    }
  }
};
</script>

<style scoped>
.status-drag {
  transition: transform 0.5s;
  transition-property: all;
}
</style>
导入并注册draggable组件后,我们需要对其进行配置。
group我们的值告诉taskDragOptionssortable,即使我们的元素分布在不同的列中,它们也应该分组在一起。
上面的模板中,我们添加了 `<div>`<draggable>和 `<div>`组件,这样在拖动列表卡片时,卡片移动会更加流畅,从而带来更好的视觉反馈。请注意我们对 CSS 类所做的更新,这些组件会渲染它们自己的 DOM 元素,在使用flex布局排列子元素<transition-group>时,我们需要考虑到这一点。
这也是我们第一次在 Vue 组件中使用 section 属性style。我们只是给可拖动元素添加了一些过渡效果,但你也可以在拖动过程中更改卡片的样式。比如,添加一个更大的阴影?
现在我们可以在列内和列之间移动任务了!我们离目标很近了,最后一步是将订单保存到数据库。我们已经在组件中发出了请求,PUT所以/tasks/sync需要创建一个控制器方法来处理这个请求。
同步 TaskController 中的任务顺序
当我们把任务拖到新列中时,我们希望数据库中也能反映出这个变化。这部分代码会返回包含所有任务的列列表,然后由后端处理这些任务的更新方式。
首先,我们来添加新路线:
// routes/web.php

//..
Route::group(['middleware' => 'auth'], function () {
    Route::get('tasks', 'TaskController@index')->name('tasks.index');
    Route::post('tasks', 'TaskController@store')->name('tasks.store');
    // Important: this needs to be above the /tasks/{task} route
    Route::put('tasks/sync', 'TaskController@sync')->name('tasks.sync');
    Route::put('tasks/{task}', 'TaskController@update')->name('tasks.update');
});
请务必将此新路由添加到更新路由之上/tasks/{task}。这一点很重要,否则会触发该路由/tasks/sync而不是更新路由,导致我们的应用程序查找 ID 为“sync”的任务。
将新方法添加到我们的控制器中:
// app/Http/Controllers/TaskController.php

// ...
public function sync(Request $request)
    {
        $this->validate(request(), [
            'columns' => ['required', 'array']
        ]);

        foreach ($request->columns as $status) {
            foreach ($status['tasks'] as $i => $task) {
                $order = $i + 1;
                if ($task['status_id'] !== $status['id'] || $task['order'] !== $order) {
                    request()->user()->tasks()
                        ->find($task['id'])
                        ->update(['status_id' => $status['id'], 'order' => $order]);
                }
            }
        }

        return $request->user()->statuses()->with('tasks')->get();
    }
我们在这里所做的,是遍历所有列,检查任务的顺序或状态是否发生了变化。如果发生了变化,我们就更新该任务。
性能说明:
这不是处理同步更改的最有效方法,但稍后我们将深入研究并重构它,并构建一个更强大的 API。
现在轮到你了
目前我们可以创建新任务,并将其在列之间以及列表中上下移动,但无法更新或删除任务。请运用所学知识,尝试将此功能添加到我们的 Vue 组件中,并创建相应的控制器方法。
我们将在下一部分一起完成,并比较不同的方法!
总结
呼,这部分比我预想的要长得多。如果你读到这里,恭喜你!搭建和撰写这个模型的过程非常有趣。
如果您有任何疑问,或者想讨论不同的方法,请留言。
接下来会发生什么?
接下来我们将:
- 将Vuex实现为状态管理系统
- 自定义我们的专栏
- 更新和删除任务
- 重构我们的 API
- 在我们的 Vue 组件和后端之间构建一个存储库层。
如果大家感兴趣,我们将继续深入研究如何改进代码、重构代码以及增加测试覆盖率。
Github 仓库
本指南中的所有内容都已上传至 GitHub 👉 GitHub - messerli90/laravel-vue-kanban-tutorial
 messerli90 / laravel-vue-kanban-tutorial
使用 Laravel 和 Vue 构建看板(系列教程)
我会为本系列的每个部分创建一个分支。因此,如果您提交到主分支,它看起来可能与我们上面构建的内容完全不同。
插头
几个月前我发表了这篇博文:

从那时起,我决定围绕这个想法打造一款真正的产品。它使用与我们今天构建的类似的看板来跟踪求职申请的状态,并提供许多其他功能来帮助您管理求职过程。

您可以点击这里查看 👉 JobHuntBuddy.co
原版 JobHuntBuddy 将继续保持免费开源,您可以在这里找到它:
关注我的推特账号@michaelmesserli,即可与我互动,并查看我关于科技、旅行和游戏的随笔。
文章来源:https://dev.to/messerli90/build-your-own-kanban-board-with-laravel-vuejs-2i5l