Flutter Web 快速入门指南。
Flutter 和 Dart 概述:
- 在本指南中,我将向您展示我们将要构建的内容,只有这样您才能充分利用本教程。
- 点击链接https://bugudiramu.github.io/#/查看本文的输出结果。我会持续更新这个网站,但这个网站仍然需要很多改进。
- 本教程分为两部分。本文将介绍所有小部件和屏幕,下一篇文章将介绍网站的响应式设计,以及如何将其部署到 GitHub Pages 和其他一些托管服务中。
- Flutte Web 目前仍处于预览版阶段,因此您可能会遇到很多错误和问题,请记住这一点。
Flutter 和 Dart 概述:
- 你可能会觉得 Flutter Web 目前仍处于实验或技术预览阶段,但现在就值得尝试这项技术。如果你熟悉 Flutter,上手会很容易,但是等等?
Flutter是什么?
Flutter是谷歌的移动SDK,它可以帮助开发者使用同一套代码库,为移动设备、Web、桌面设备和智能手表创建令人惊艳的应用程序,并达到60帧/秒的流畅度。是不是很棒?
为什么我们选择 Dart 来编写 Flutter 应用程序?
Flutter 选择 Dart 作为编写适用于不同设备和操作系统的应用程序的编程语言,因为 Dart 是一种编译型语言。在 Android 和 iOS 系统中,Dart 代码会被直接编译成原生机器代码,从而显著提升性能。
警告:Flutter Web 应用程序的调试功能仅适用于 Chrome 浏览器。
- Flutter 1.9 更新带来了对 Flutter Web 的支持。如果您还没有升级 Flutter,请打开终端并输入以下命令。
flutter upgrade
然后将频道切换到主频道并启用网络支持。
 flutter channel master
 flutter upgrade
 flutter config --enable-web
 flutter create myportfolio
然后输入flutter devices
它会显示两个可用的设备,如下图所示 。然后你就可以开始了。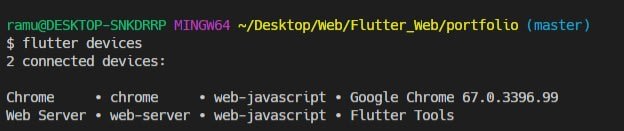
派对开始啦!!!!
在这篇文章中,我们将讨论如何在 flutter_web 中构建一个完整的作品集。
- 完整源代码(纯 Flutter 和 Dart 代码)可在此处获取:https://github.com/bugudiramu/Flutter_Web
- 完整源代码可在此处获取(已编译为 HTML、CSS 和 JavaScript):https://github.com/bugudiramu/bugudiramu.github.io
如果您在理解本文主题时遇到任何困难,请随时发表评论;如果您喜欢这篇文章,请点赞并收藏我的 GitHub 仓库https://github.com/bugudiramu/Flutter_Web。
- 首先,请在 pubspec.yaml 文件中添加所有必需的依赖项。
  responsive_builder: any
  universal_html: ^1.1.6
  universal_io: ^0.8.4
  url_launcher: ^5.2.7
- 在字体部分使用
  fonts:
    - family: Montserrat
      fonts:
        - asset: fonts/montserrat/Montserrat-Medium.ttf
- 在 main.dart 文件中,删除 flutter create 自带的样板代码,并粘贴以下代码。
import 'package:flutter/material.dart';
import 'package:portfolio/pages/homepage.dart';

void main() => runApp(MyApp());

class MyApp extends StatelessWidget {
  // This widget is the root of your application.
  @override
  Widget build(BuildContext context) {
    return MaterialApp(
      title: "My Portfolio",
      debugShowCheckedModeBanner: false,
      theme: ThemeData(
        primarySwatch: Colors.pink,
        fontFamily: "Montserrat",
      ),
      home: HomePage(),
    );
  }
}
-
在 lib 文件夹中创建 widgets、pages、constants 等文件夹,以便将所有 UI 代码分开,如下图所示。

-
我们将把项目分为5个部分。

- 应用栏(导航栏)
- 轮廓
- 项目
- 关于 &
- 联系页面
应用栏或导航栏

- 在 widgets 文件夹中创建一个名为 appbar_widget.dart 的文件,并将以下代码粘贴到该文件中。
- 不要被代码搞糊涂,因为我到处都用了函数,我不喜欢一遍又一遍地复制粘贴相同的代码。你试过之后也会觉得很容易。。
import 'package:flutter/material.dart';

class AppBarWidget extends StatefulWidget {
  @override
  _AppBarWidgetState createState() => _AppBarWidgetState();
}

class _AppBarWidgetState extends State<AppBarWidget> {
  Widget build(BuildContext context) {
    final width = MediaQuery.of(context).size.width;

    return Container(
      alignment: Alignment.center,
      height: 80.0,
      width: width,
      child: Row(
        mainAxisAlignment: MainAxisAlignment.spaceBetween,
        children: <Widget>[
          Container(
            child: Text(
              "Portfolio",
              style: TextStyle(
                  fontSize: 30.0,
                  fontWeight: FontWeight.normal,
                  color: Colors.black),
            ),
          ),
          Container(
            child: Row(
              mainAxisAlignment: MainAxisAlignment.end,
              children: <Widget>[
                SizedBox(width: 20.0),
                navbarItems("WORK"),
                SizedBox(width: 20.0),
                navbarItems("ABOUT"),
                SizedBox(width: 20.0),
                navbarItems("CONTACT"),
                SizedBox(height: 20.0),
              ],
            ),
          )
        ],
      ),
    );
  }

  navbarItems(String s) {
    return Container(
      child: Text(
        s,
        style: TextStyle(
          color: Colors.black,
        ),
      ),
    );
  }
}
- 这里我们返回一个高度为 80.0 的 Container() 元素,其子元素为 Row(),而 Row() 又包含两个子元素:Text() 和一个 Container()。Container() 元素内部又包含一个 Row() 元素,因为我们要将“作品”、“关于”和“联系我们”三个标签页放在右侧,所以我们可以为第二个 Row() 元素定义 mainAxisAlignment: MainAxisAlignment.end。所有标签页的样式都相同,只是名称不同,因此我们利用了
functions.navbarItems() 方法,它接受一个字符串名称作为参数,并根据需要多次调用 Row() 元素。
轮廓 :

- 在个人资料中,我们仅使用了如下所示的两个 Text() 小部件。
import 'package:flutter/material.dart';
import 'package:portfolio/widgets/custom_line_star_widget.dart';

class MyProfileWidget extends StatelessWidget {
  @override
  Widget build(BuildContext context) {
    final double height = MediaQuery.of(context).size.height;
    return Container(
      height: height,
      decoration: BoxDecoration(
        gradient: LinearGradient(
          begin: Alignment.topLeft,
          end: Alignment.bottomRight,
          colors: [
            Colors.pink.shade700,
            Colors.pink,
            Colors.pink.shade700,
          ],
        ),
      ),
      child: Column(
        mainAxisAlignment: MainAxisAlignment.center,
        children: <Widget>[
          Container(
            child: Text(
              "RAMU",
              style: nameStyle(),
            ),
          ),
          SizedBox(height: 10.0),
          CustomLineStarWidget(
            borderColor: Colors.white,
          ),
          SizedBox(height: 10.0),
          Container(
            margin: const EdgeInsets.all(8.0),
            padding: const EdgeInsets.all(8.0),
            child: Text(
              "Flutter - Android & Computer Enthusiast.",
              textAlign: TextAlign.center,
              style: skillStyle(),
            ),
          ),
        ],
      ),
    );
  }

  nameStyle() {
    return TextStyle(
      color: Colors.white,
      fontSize: 80.0,
      fontWeight: FontWeight.bold,
    );
  }

  skillStyle() {
    return TextStyle(
        color: Colors.white, fontSize: 22.0, fontWeight: FontWeight.bold);
  }
}
- 你可能会想,CustomLineStarWidget() 在哪里呢?

import 'package:flutter/material.dart';

class CustomLineStarWidget extends StatelessWidget {
  @override
  Widget build(BuildContext context) {
    return Row(
      mainAxisAlignment: MainAxisAlignment.center,
      children: <Widget>[
        Container(
          width: 100.0,
          color: Colors.black,
          height: 4.0,
        ),
        SizedBox(width: 10.0),
        Icon(
          Icons.star_half,
          color: Colors.black,
          size: 38.0,
        ),
        SizedBox(width: 10.0),
        Container(
          width: 100.0,
          color: Colors.black,
          height: 4.0,
        ),
      ],
    );
  }
}
项目:
- 项目页面看起来像下图所示

- 如果您在这里找到 Constants 类,那么所有属性都位于 constants.dart 文件中。
import 'package:flutter/material.dart';

class Constants {
  // * Images
  static String facebook = "images/facebook.png";
  static String twitter = "images/twitter.png";
  static String linkedin = "images/linkedin.png";
  static String github = "images/github.png";
  static String myimage = "images/myimage.jpg";
  static String bgimg = "images/bgimg.jpg";
  static String tasklist = "images/projectIcons/tasklist.png";
  static String ebazaar = "images/projectIcons/ebazaar.png";
  static String news = "images/projectIcons/news.png";
  static String calculator = "images/projectIcons/calculator.png";
  static String bmi = "images/projectIcons/bmi.png";
  static String weather = "images/projectIcons/weather.png";
  //* Fonts
  // static String montserratFont = "fonts/montserrat";

  // * TextStyles
  static TextStyle secondaryTitles = TextStyle(
    fontSize: 45.0,
    fontWeight: FontWeight.w700,
    color: Colors.brown.shade700,
  );

  static TextStyle nameStyle =
      TextStyle(color: Colors.red, fontSize: 86.0, fontWeight: FontWeight.w900);
  static TextStyle appBarStyle = TextStyle(backgroundColor: Colors.redAccent);
  static TextStyle customAppbarTitle = TextStyle(
      fontSize: 30.0, fontWeight: FontWeight.normal, color: Colors.black);
  static Color primaryColor = Colors.purple;
  static Alignment alignment = Alignment.center;

  // * Url's
  static const githubUrl = "https://github.com/bugudiramu";
  static const facebookUrl = "#";

  static const twitterUrl = "https://twitter.com/_iamramu";
  static const linkedinUrl =
      "https://www.linkedin.com/in/ramu-bugudi-2a5a5a161/";

  // * Colors
  static Color myPrimaryColor = Colors.blueGrey.shade900;
  static Color mySecondaryColor = Color(0xff95a5a6);
}
project_widget.dart
import 'package:flutter/material.dart';
import 'package:portfolio/constants/constants.dart';

class ProjectsWidget extends StatelessWidget {
  @override
  Widget build(BuildContext context) {
    final double width = MediaQuery.of(context).size.width;
    return Container(
      width: width,
      alignment: Alignment.center,
      child: Column(
        children: <Widget>[
          Row(
            mainAxisAlignment: MainAxisAlignment.center,
            children: <Widget>[
              projectContainer(Constants.bmi, context),
              projectContainer(Constants.news, context),
              projectContainer(Constants.ebazaar, context),
            ],
          ),
          Row(
            mainAxisAlignment: MainAxisAlignment.center,
            children: <Widget>[
              projectContainer(Constants.calculator, context),
              projectContainer(Constants.weather, context),
              projectContainer(Constants.tasklist, context),
            ],
          ),
        ],
      ),
    );
  }

  Widget projectContainer(String img, context) {
    return MaterialButton(
      splashColor: Colors.transparent,
      hoverElevation: 10.0,
      onPressed: () => _showDialogAboutProject(context),
      child: Container(
        decoration: BoxDecoration(
          backgroundBlendMode: BlendMode.colorBurn,
          // color: myColors[random.nextInt(6)],
          color: Colors.black,
          borderRadius: BorderRadius.circular(10.0),
        ),
        margin: const EdgeInsets.all(20.0),
        alignment: Alignment.center,
        height: 200.0,
        width: 300.0,
        child: Image.asset(
          img,
          height: 150.0,
          width: 150.0,
        ),
      ),
    );
  }

  _showDialogAboutProject(context) {
    return showDialog(
      context: context,
      child: AlertDialog(
        title: Text("Project Title"),
        content: ListTile(
          title: Text("Description of the Project"),
          subtitle: Text(
              "If you want to see the the project details head over to my GitHub profile (click the github icon below the contact section)"),
        ),
        actions: <Widget>[
          MaterialButton(
            onPressed: () => Navigator.of(context).pop(),
            child: Text("Close"),
          ),
        ],
      ),
    );
  }
}
- 这里我们返回一个包含 Row() 子组件的 Column() 组件。Row() 组件返回一个 projectContainer() 组件,它充当一个按钮,点击后会弹出一个关于项目的 AlertDialog() 对话框。
关于页面
- 关于页面图片

- 在“关于我们”页面,我们只会展示关于我们自己的文字信息。这里我使用了 SelectableText() 组件,因为它支持复制、粘贴和全选等功能。
import 'package:flutter/material.dart';
import 'package:portfolio/widgets/custom_line_star_widget.dart';

class AboutPage extends StatelessWidget {
  @override
  Widget build(BuildContext context) {
    return Container(
      decoration: BoxDecoration(
        gradient: LinearGradient(
          begin: Alignment.topLeft,
          end: Alignment.bottomRight,
          colors: [
            Colors.pink.shade700,
            Colors.pink,
            Colors.pink.shade700,
          ],
        ),
      ),
      padding: const EdgeInsets.all(20.0),
      alignment: Alignment.center,
      child: Column(
        children: <Widget>[
          SizedBox(height: 60.0),
          Container(
            child: Text(
              "ABOUT",
              style: TextStyle(
                fontSize: 45.0,
                fontWeight: FontWeight.w700,
                color: Colors.white,
              ),
            ),
          ),
          SizedBox(height: 10.0),
          CustomLineStarWidget(
            borderColor: Colors.white,
          ),
          SizedBox(height: 60.0),
          _dymmyText(),
          SizedBox(height: 60.0),
        ],
      ),
    );
  }

  _dymmyText() {
    return Container(
      alignment: Alignment.center,
      padding: const EdgeInsets.symmetric(horizontal: 10.0, vertical: 5.0),
      child: SelectableText(
        "“My Name Is Bugudi Ramu And I Am A Mobile,Web Developer And Programmer Aswell.I Am From India. I Will Get My Graduation In 2020 With A Bachelor’s Degree In Electronic And Communication Engineering From Bharath Institute Of Higher Education And Research(BIHER) In Chennai(Tamilnadu). I Served My Most Of The Time In Practicing,Exploring New Ways For Solving Problems And Doing Projects.As I Am Self-Taught I'm Looking For Right Platform To Explore My Knowledge And Improve Skills.”",
        style:
            TextStyle(color: Colors.white, fontSize: 16.0, letterSpacing: 1.0),
      ),
    );
  }
}
联系页面

- 在“联系我们”页面,我使用了三个文本框,分别是姓名、邮箱和留言。我创建了一个按钮,用于引导用户查看欢迎信息(也可以选择不显示)。此外,我还添加了验证功能。
import 'package:flutter/material.dart';
import 'package:portfolio/constants/constants.dart';
import 'package:portfolio/pages/welcome_message_page.dart';
import 'package:portfolio/widgets/custom_line_star_widget.dart';
import 'package:responsive_builder/responsive_builder.dart';

class ContactPage extends StatefulWidget {
  @override
  _ContactPageState createState() => _ContactPageState();
}

class _ContactPageState extends State<ContactPage> {
  var _formKey = GlobalKey<FormState>();
  var nameController = TextEditingController();
  var emailController = TextEditingController();
  var msgController = TextEditingController();

  @override
  Widget build(BuildContext context) {
    final double width = MediaQuery.of(context).size.width;
    return Container(
      color: Colors.transparent,
      child: Column(
        children: <Widget>[
          SizedBox(height: 60.0),
          Container(
            child: Text(
              "CONTACT ME",
              style: Constants.secondaryTitles,
            ),
          ),
          SizedBox(height: 20.0),
          CustomLineStarWidget(borderColor: Colors.brown.shade900),
          SizedBox(height: 60.0),
          customForm(width),
          SizedBox(height: 60.0),
        ],
      ),
    );
  }

  Widget customForm(width) {
    return Container(
      padding: const EdgeInsets.all(20.0),
      margin: const EdgeInsets.all(20.0),
      width: width,
      alignment: Alignment.center,
      child: Form(
        key: _formKey,
        child: Column(
          children: <Widget>[
            _textFormField(nameController, "Name"),
            _textFormField(emailController, "Email"),
            _textFormField(msgController, "Message"),
            SizedBox(height: 10.0),
            Container(
              alignment: Alignment.topLeft,
              child: MaterialButton(
                onPressed: () {},
                hoverColor: Colors.pink,
                color: Constants.myPrimaryColor,
                child: Text("Send",
                    style: TextStyle(
                        color: Colors.white, fontWeight: FontWeight.bold)),
              ),
            ),
          ],
        ),
      ),
    );
  }

  _textFormField(controller, hintText) {
    return TextFormField(
      // autovalidate: true,
      enableInteractiveSelection: true,
      toolbarOptions:
          ToolbarOptions(copy: true, cut: true, paste: true, selectAll: true),
      onSaved: (val) {
        setState(() {
          controller.text = val;
        });
      },
      validator: (val) {
        if (val.isEmpty || val.length < 0) {
          print(val);
          return "Please provide atleast you'r name";
        }
        return "";
      },
      controller: controller,
      decoration: InputDecoration(hintText: hintText),
      onChanged: (text) {
        print(text);
      },
    );
  }
}
- 在网页的最后,我们希望展示我们的社交媒体账号,以便向观众展示我们自己。
import 'package:portfolio/constants/constants.dart';
import 'package:universal_html/prefer_universal/html.dart' as html;
import 'package:universal_io/io.dart';
import 'package:url_launcher/url_launcher.dart';
import 'package:flutter/foundation.dart';
import 'package:flutter/material.dart';

class CopyrightWidget extends StatelessWidget {
  @override
  Widget build(BuildContext context) {
    return Container(
        alignment: Alignment.center,
        color: Constants.myPrimaryColor,
        height: 170.0,
        child: Column(
          children: <Widget>[
            SizedBox(height: 30.0),
            Row(
              mainAxisAlignment: MainAxisAlignment.center,
              children: <Widget>[
                socialMediaLinks(Constants.facebook, Constants.facebookUrl),
                socialMediaLinks(Constants.twitter, Constants.twitterUrl),
                socialMediaLinks(Constants.github, Constants.githubUrl),
                socialMediaLinks(Constants.linkedin, Constants.linkedinUrl),
              ],
            ),
            SizedBox(height: 10.0),
            Container(
              child: Text(
                "Designed & Coded by ramu",
                style: TextStyle(color: Colors.white),
              ),
            ),
            SizedBox(height: 30.0),
          ],
        ));
  }

  Widget socialMediaLinks(String image, String url) {
    return InkWell(
      onTap: () => launchUrl(url),
      child: Container(
        padding: const EdgeInsets.all(12.0),
        margin: const EdgeInsets.all(8.0),
        decoration: BoxDecoration(
          shape: BoxShape.circle,
          color: Colors.white,
          border: Border.all(
            color: Colors.white60,
            width: 3.0,
          ),
        ),
        child: Image.asset(
          image,
          height: 30.0,
          width: 30.0,
          color: Colors.white,
          colorBlendMode: BlendMode.darken,
        ),
      ),
    );
  }

  launchUrl(String url) async {
    if (kIsWeb) {
      html.window.location.href = url;
      // html.window.location.assign(url);
    } else if (Platform.isAndroid || Platform.isIOS) {
      if (await canLaunch(url)) {
        await launch(url);
      } else {
        throw 'Could not launch $url';
      }
    } else {
      throw Exception("Unknown Platform");
    }
  }
}
- 这里我们使用 universal_io 和 universal_html 作为 html 包,以便在任何平台上启动 URL。
- 首先,我们要检查KIsWeb如果应用程序已编译为在 Web 上运行,则该常量为真,然后我们将通过以下方式访问窗口对象:
html.window.location.href = url
或者
-
如果是在 Android 或 iOS 上编译的,我们可以使用 url_launcher 插件来启动 URL。
-
好了,各位。我知道这篇文章有点长,但我只是想帮你们复习一下 Flutter 的基础知识。下一篇文章我们将讨论网站的响应式设计,并添加一些炫酷的动画效果。
下一篇见!